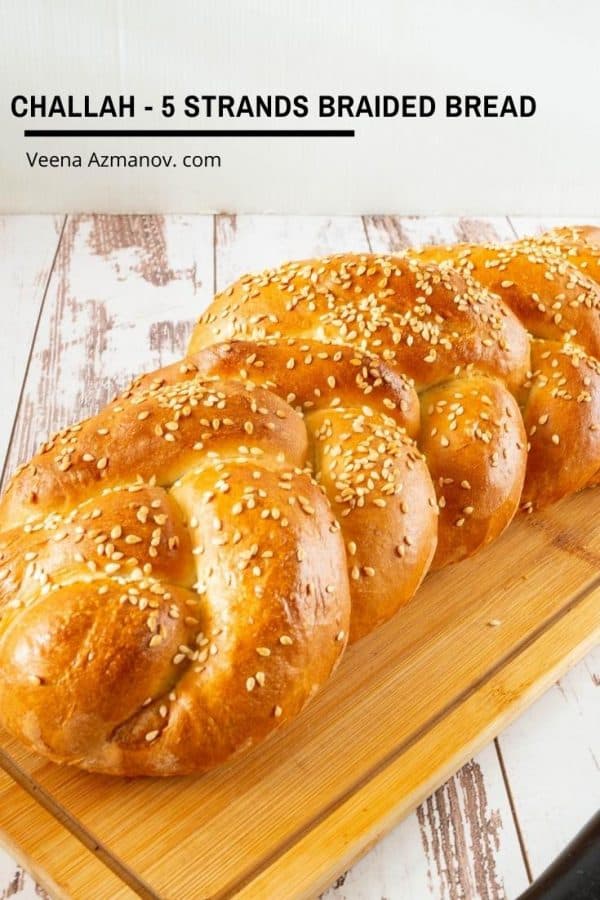
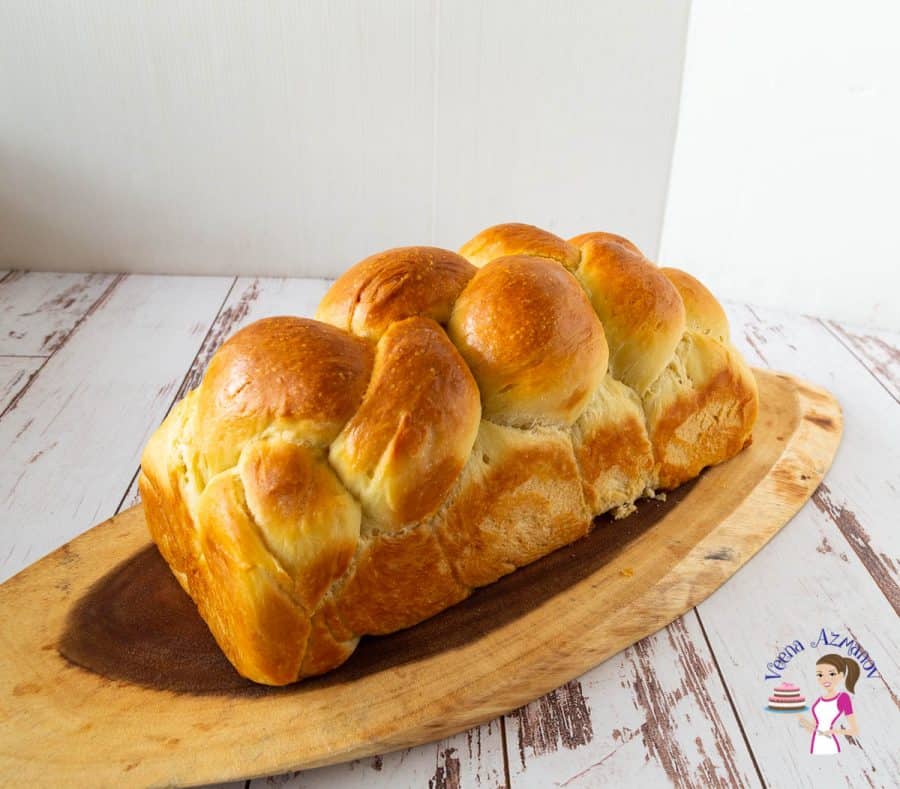
Challah is a Jewish bread made every week on Friday to celebrate Shabbat, the Jewish weekend. It is also eaten on Jewish holidays, except Passover. It’s an enriched dough made with flour, oil, and eggs and gets a slight yellow color from the eggs. Traditional challah is made with water because Jews do not eat dairy and meat together. But if you’re not keeping kosher, try milk to make this bread, it is quite delicious. I will share my recipe with you next week.
Step-by-step: Challah – 5 Braid Bread
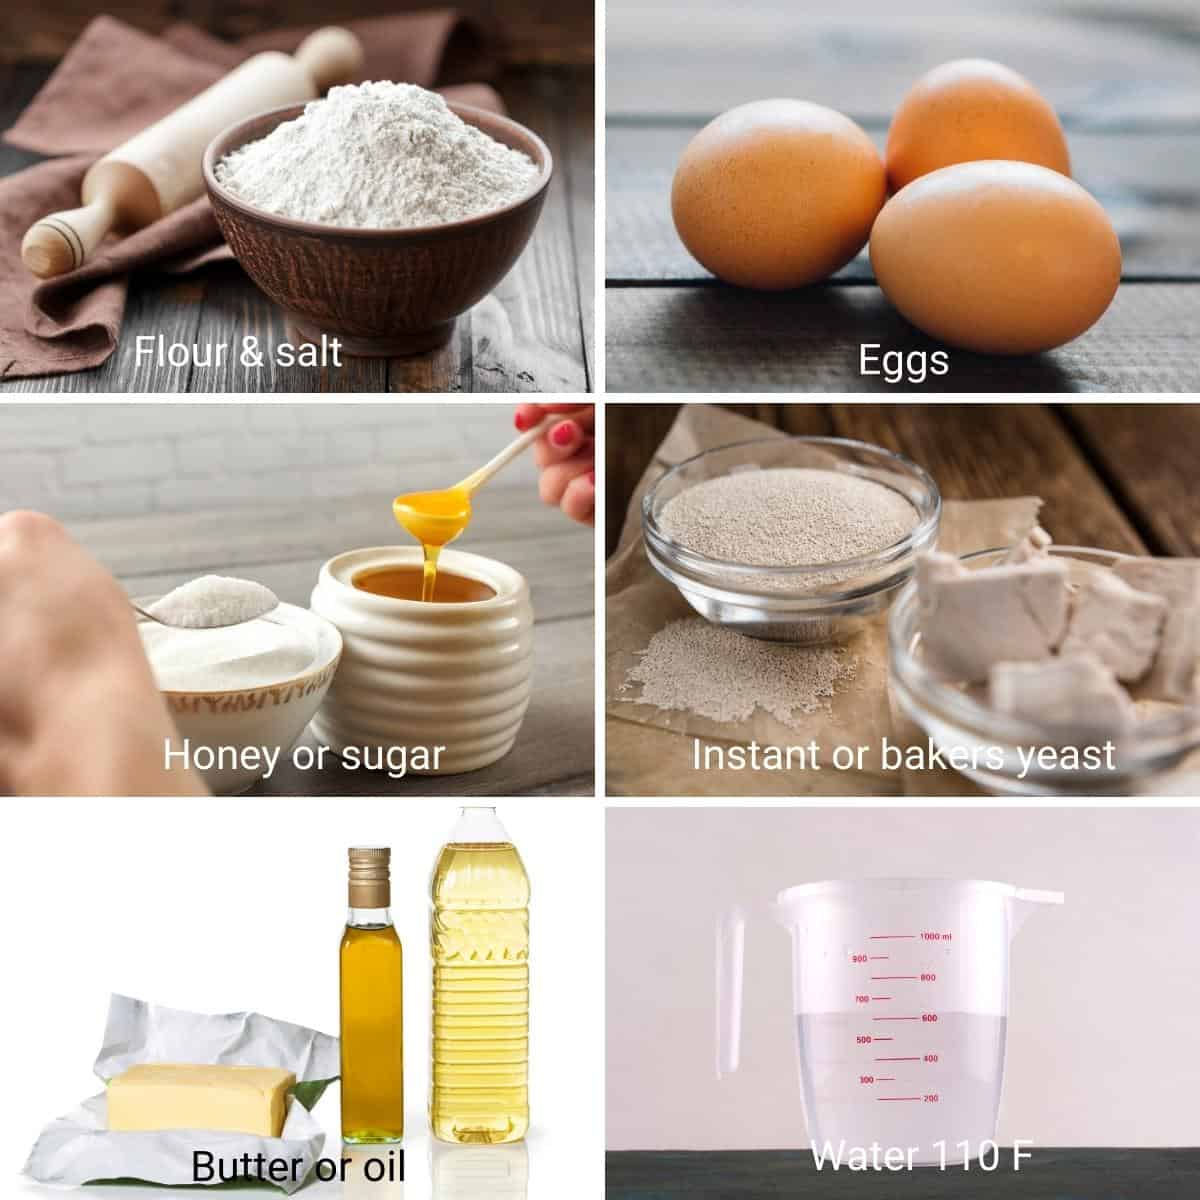
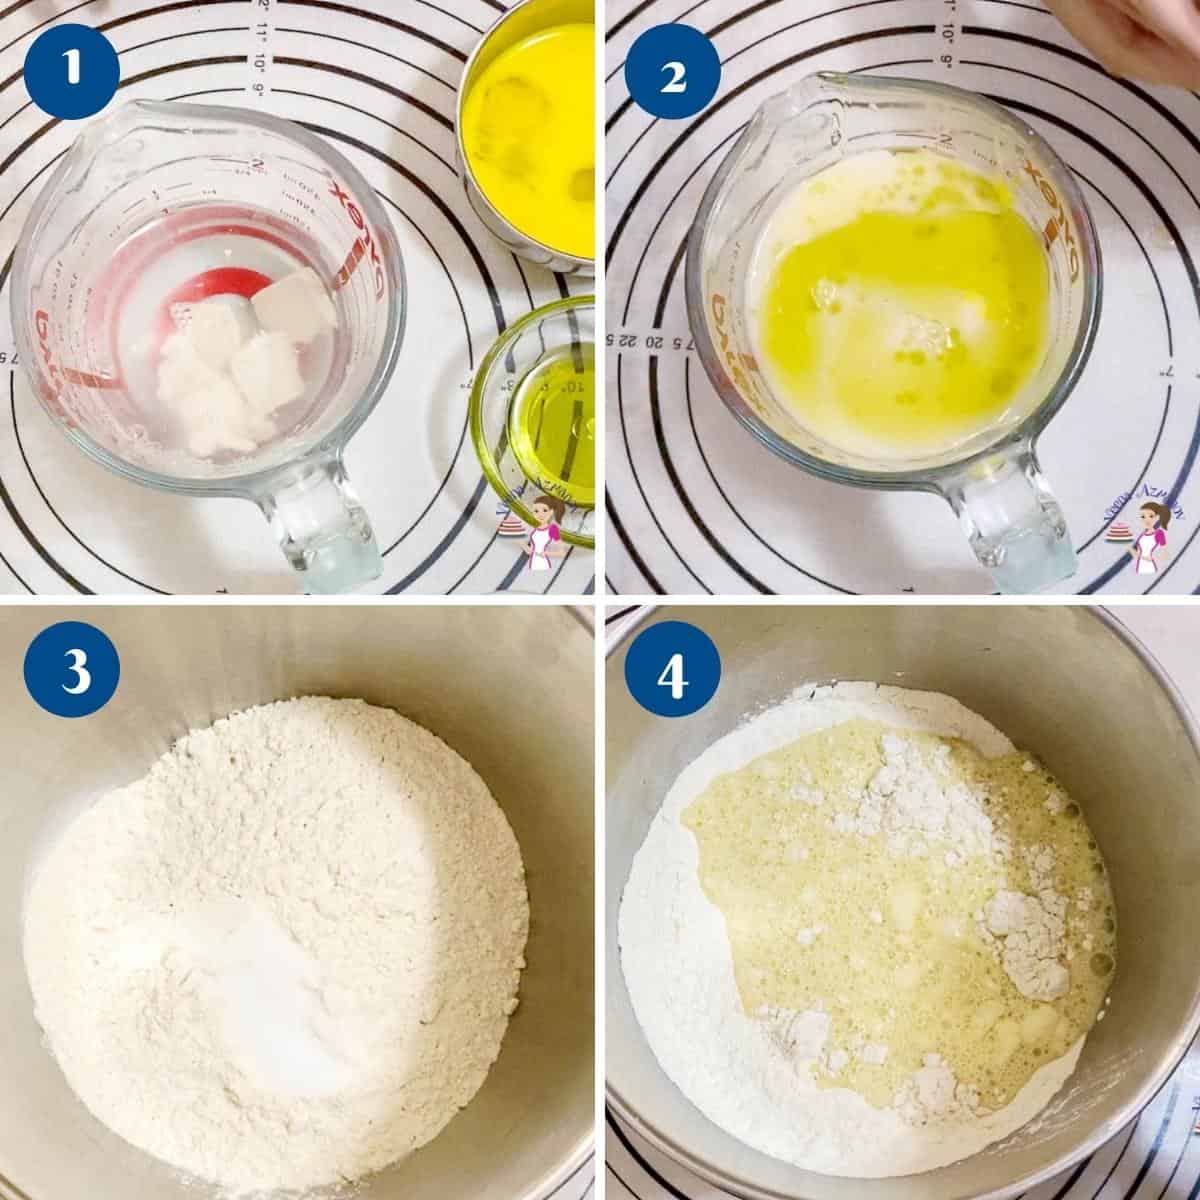
Yeast mixture – In a mixing bowl or measuring cup combine warm water (110 F), yeast, honey, oil, and eggs. Stir and set aside to foam for 3 mins. Dry mixture – Measure the flour and salt in a mixing bowl or stand mixer with the dough hook.
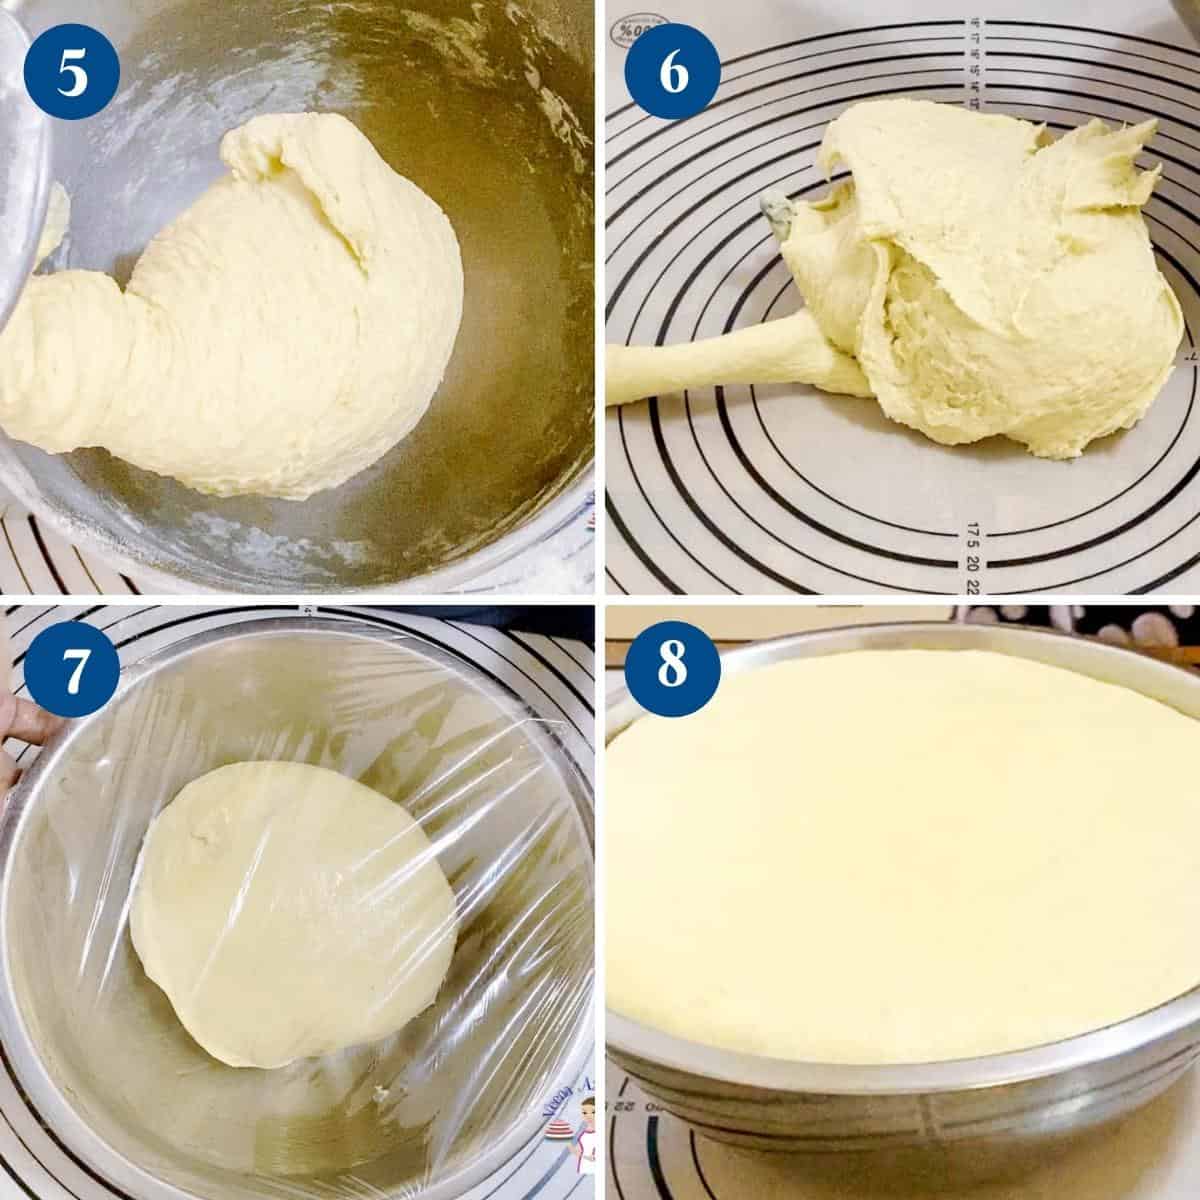
Knead – Add the yeast mixture to the flour mixture and combine well on medium-low speed. Knead until smooth and elastic. This should take about 6 to 8 minutes on medium-low in the stand mixer or about 10 to 15 minutes by hand on a lightly dusted work surface. Bowl – When the dough is smooth, soft, and elastic. Shape it into a ball. Place the dough in an oiled bowl seam side down. Coat the surface with oil to prevent drying. Cover with a clean kitchen cloth or plastic wrap. Rise – Leave in a warm place. Let rise for 60 to 90 minutes until doubles in volume.
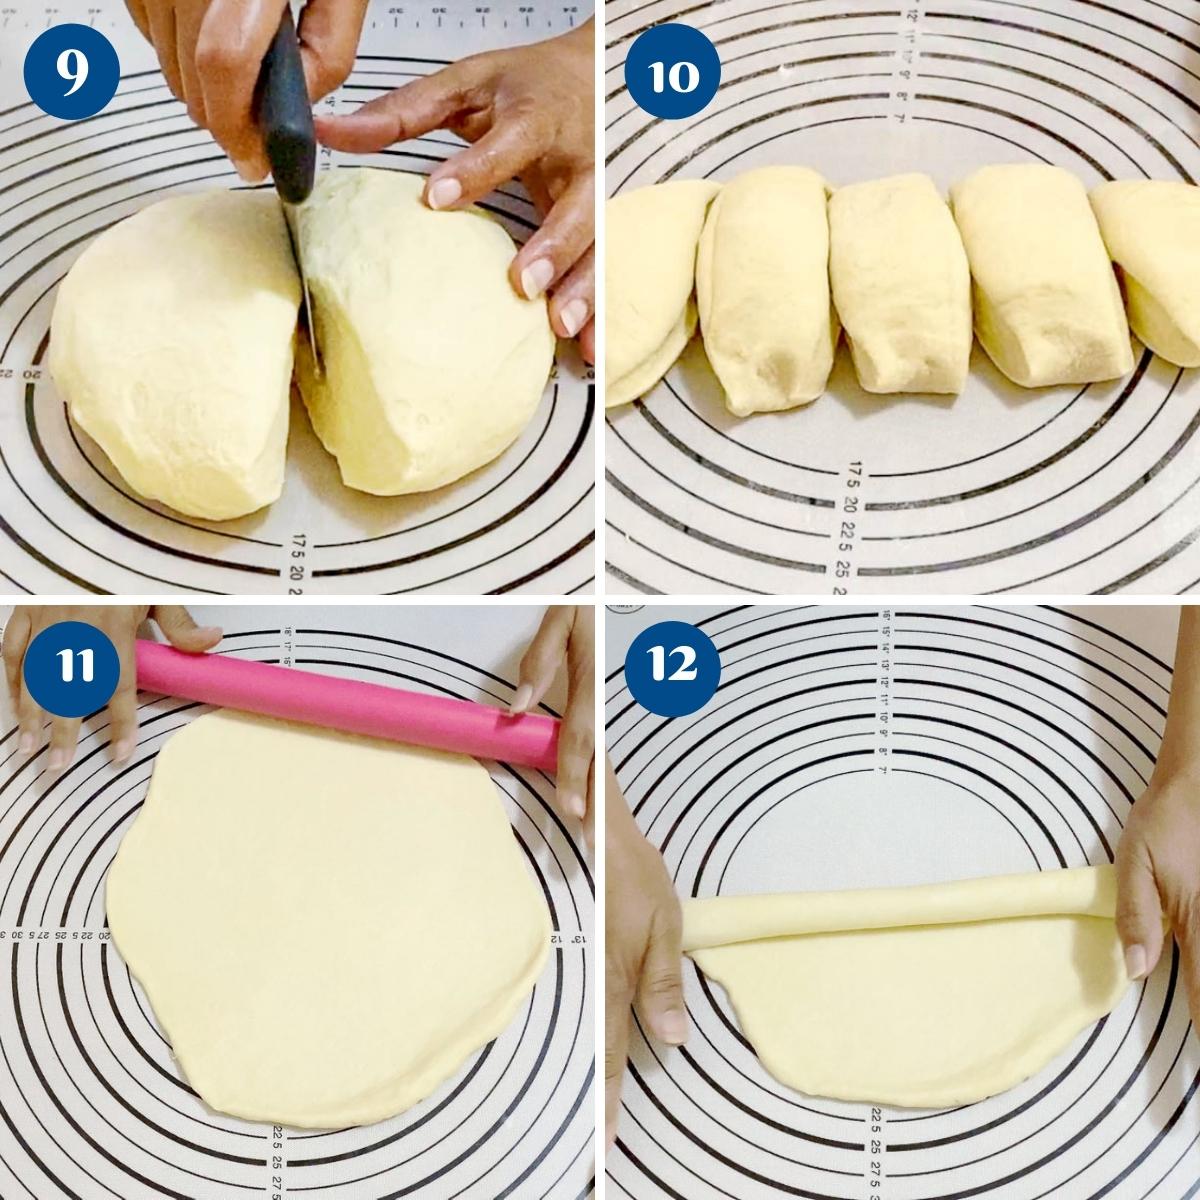
Divide – Transfer to a well-dusted work surface. Press down and shape it into a log. You can divide the dough into two small loaves. Then, divide the dough into 5 equal pieces. Ropes – Shape each into a ball. If necessary, let rest for 5 to 10 minutes. Roll each ball with a rolling pin on an un-floured work surface. Then, roll like a jelly roll into a rope about 18 inches long (see video)
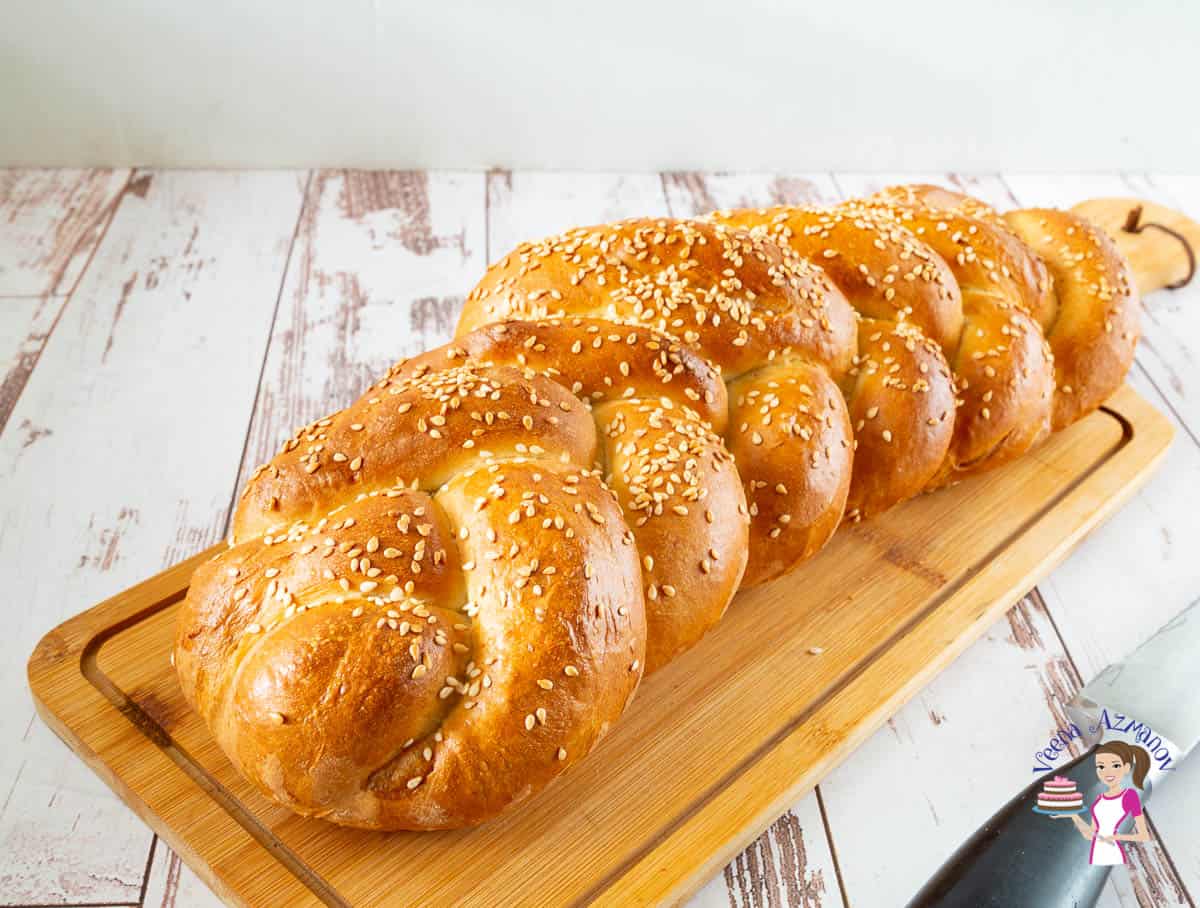
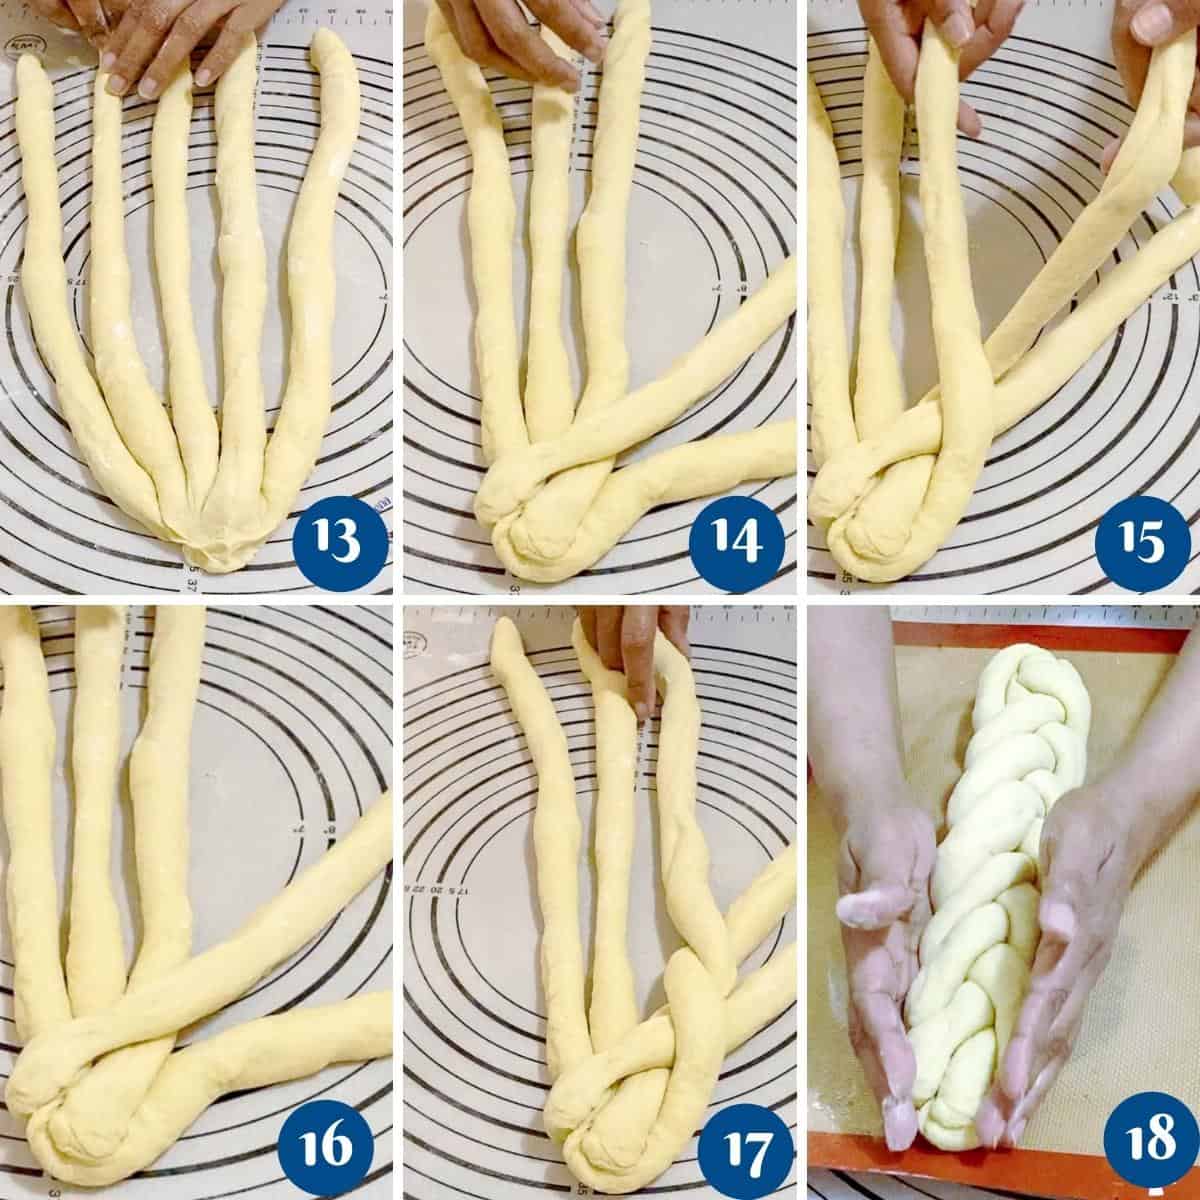
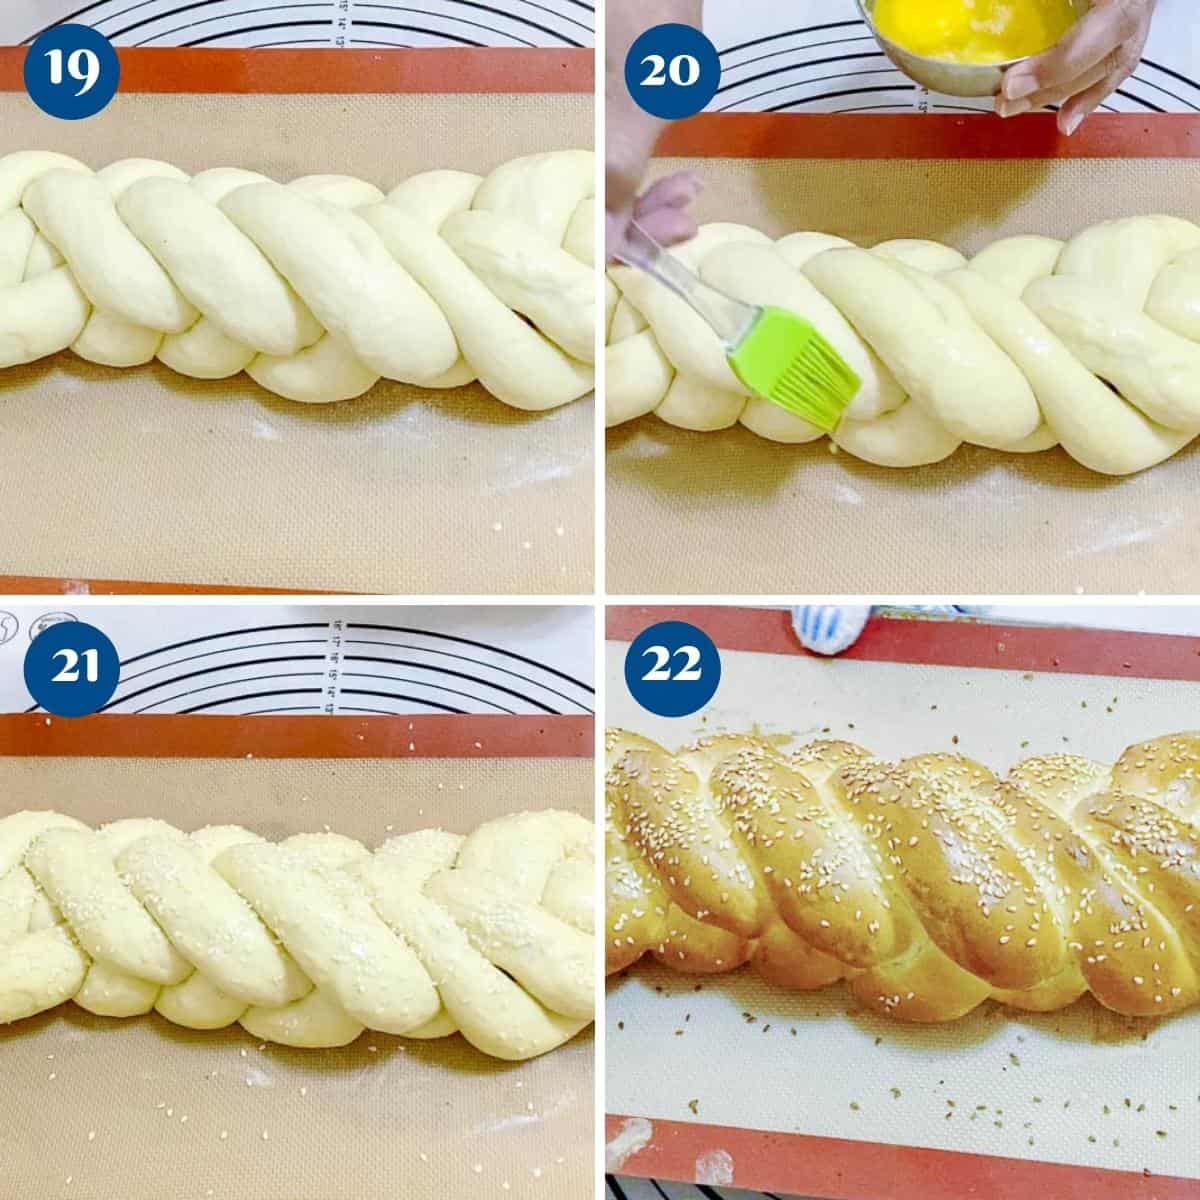
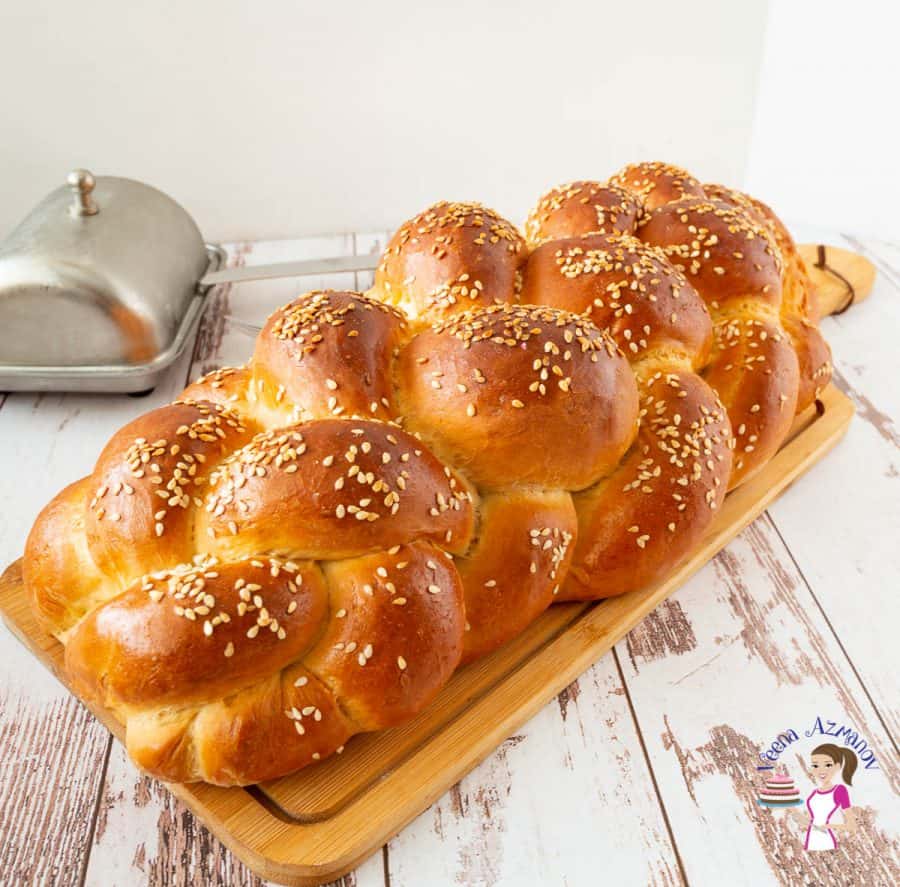
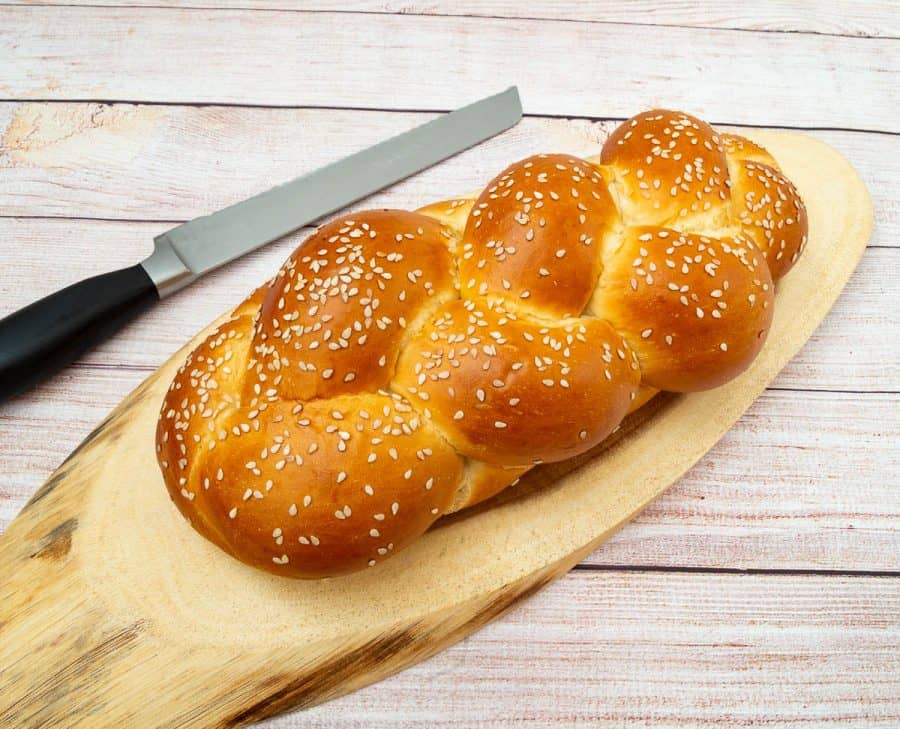
Five-Braid challah – Place all five ropes so they intersect at the top. Ensure the six strands are secured at the top. From left to right you now have 1, 2, 3, 4, and 5, strands in front of you. Strand 1 over 3, 2 over 3, and 5 over 2. Then starting from 1 continue with the process until you have reached the bottom. Tuck the seams at the top and bottom under.Pro tip – It’s easier to watch the video first than try to understand my instructions. ? ?
Proof – Place the loaves on a baking sheet lined with parchment paper. Cover with a plastic wrap or clean kitchen cloth and let proof for 45 to 60 minutes. Alternatively, you can also place the dough in an 8-inch round baking pan.Pro tip – Spray the plastic wrap with oil to prevent it from sticking to the rolls. Oven – About 20 minutes before baking preheat the oven at 350°F /177°C / Gas Mark 4
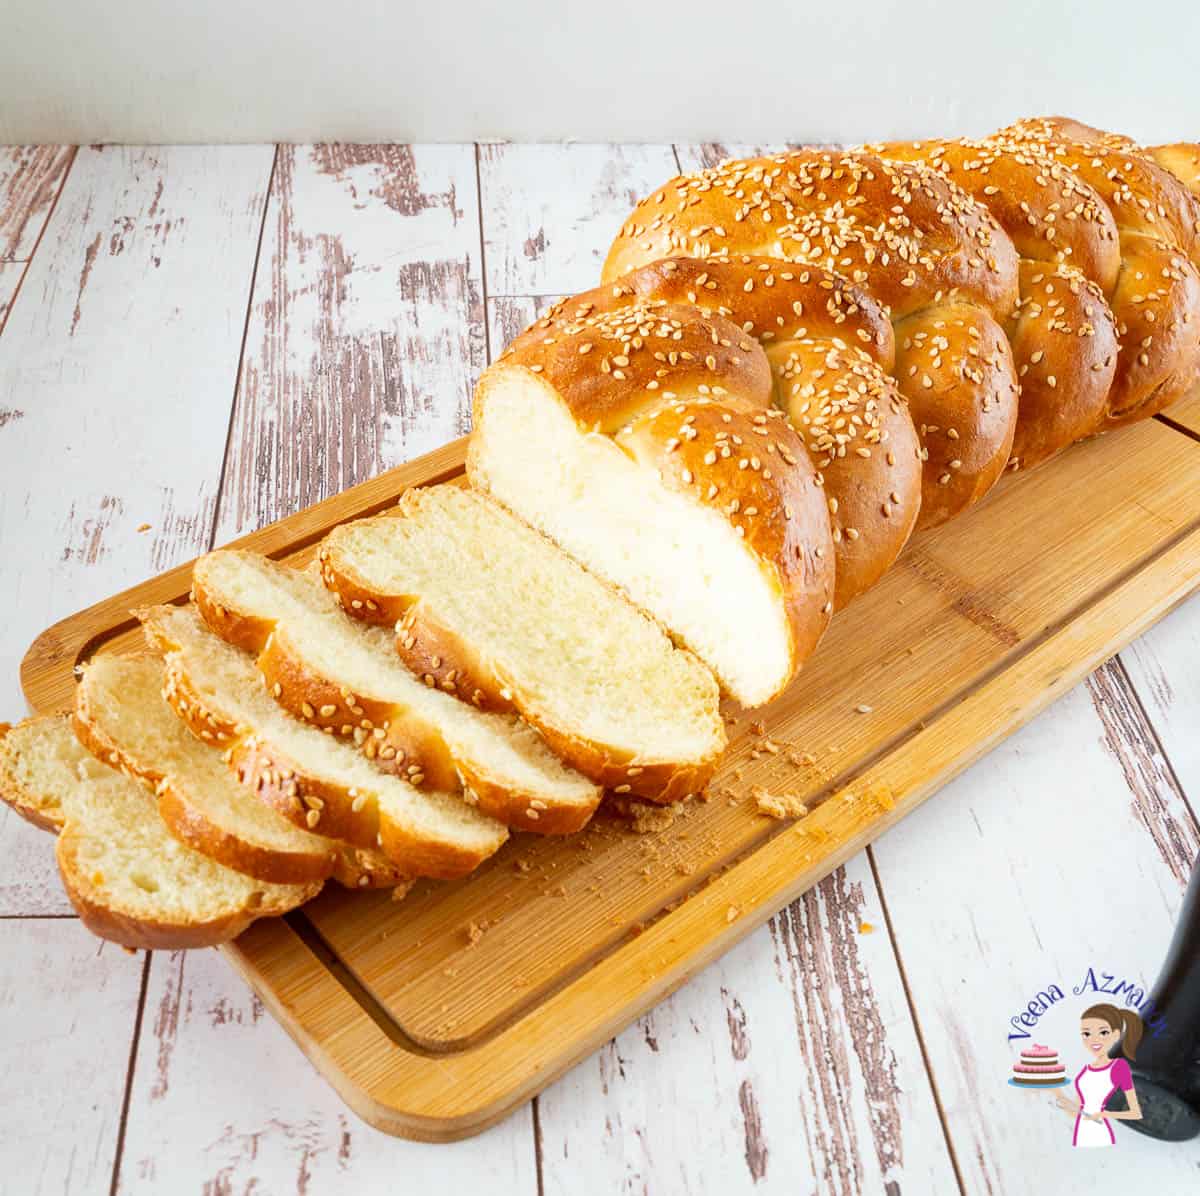
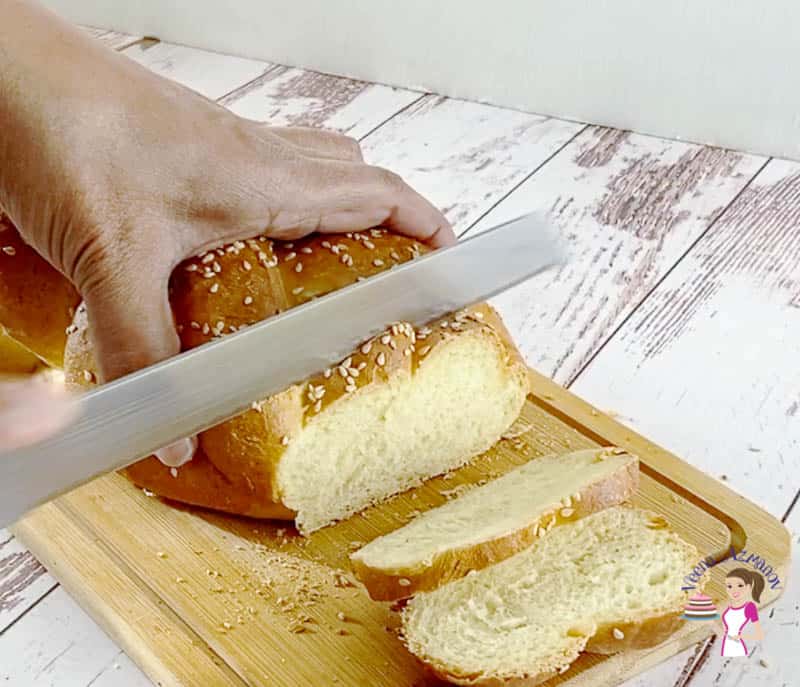
Bake – Brush the bread with a beaten egg. Then bake each loaf on the center rack of the oven for 35 to 40 minutes. Cool – Remove from the oven and let cool on a wire rack for 5 minutes. Then, cover with a clean kitchen cloth to keep it soft.
Tips for success
Use Fresh Ingredients: Make sure your yeast is fresh and active. Check the expiration date and proof the yeast before using it to ensure it’s working. Use good quality all-purpose flour for consistent results. Measure Accurately: Use a kitchen scale to measure your ingredients, especially the flour, for accuracy. Too much or too little flour can affect the dough’s consistency. Activate Yeast Properly: Dissolve the yeast in warm water (about 110°F/45°C) with a bit of sugar to activate it. Let it sit for 5-10 minutes until it becomes frothy. Knead Thoroughly: Knead the dough until it is smooth, elastic, and slightly tacky but not sticky. This usually takes about 10 minutes by hand or 5-7 minutes with a stand mixer. Allow Proper Rising Time: Let the dough rise in a warm, draft-free area until it has doubled in size. This can take 1 to 1.5 hours for the first rise. The second rise, after shaping, should be about 30-45 minutes until puffy. Maintain Consistent Braiding: Divide the dough into equal pieces and roll them into uniform ropes. Follow a consistent braiding pattern, starting with the outermost ropes and bringing them to the center alternately. Monitor Oven Temperature: Preheat your oven to 350°F (175°C) and use an oven thermometer to ensure the temperature is accurate. Bake in the center of the oven for even heat distribution. Egg Wash for a Glossy Finish: Apply an egg wash made from a beaten egg yolk mixed with a tablespoon of water. This will give the challah a beautiful, glossy finish. If desired, sprinkle sesame or poppy seeds on top for added texture and flavor. Check for Doneness: The challah is done when it is golden brown and sounds hollow when tapped on the bottom. If the top browns too quickly, tent it with aluminum foil during the last 10-15 minutes of baking. Cool Properly: Allow the challah to cool on a wire rack to prevent the bottom from becoming soggy. Let it cool completely before slicing to maintain its structure. Practice and Patience: Braiding takes practice. Don’t be discouraged if your first few attempts aren’t perfect. The more you practice, the better your braids will become. Experiment with Flavors: Once comfortable with the basic recipe, experiment by adding flavors like cinnamon, raisins, or other dried fruits to the dough for variety.
Easiest 3 Braid Challah Bread Recipe 4 Braid Challah Bread Recipe 6 Braid Challah Recipe Milk and Honey Challah Challah Sandwich Bread See all challah bread recipes or see all bread recipes
Frequently asked questions
Creative ways to use challah bread
French toast casserole – Cut the challah into thick slices, soak them in a mixture of eggs, milk, cinnamon, and vanilla, and then bake them in a casserole dish. Serve these challah French toast with maple syrup and fresh fruits for a delightful breakfast or brunch dish. Challah bread pudding – Transform leftover or slightly stale challah into a rich and decadent bread pudding. Combine cubed challah with a custard mixture of eggs, milk, sugar, and favorite flavors like chocolate, caramel, or berries. Bake until golden and set for a delightful dessert. Savory bread stuffing – Use challah bread instead of traditional white bread in your Thanksgiving or holiday stuffing. The slight sweetness of the challah adds a unique twist to the savory dish. Grilled cheese sandwiches – Elevate your grilled cheese game by using challah bread slices instead of regular sandwich bread. The thickness and texture of challah make for a delicious and indulgent sandwich experience. Challah bread croutons – Cube challah bread and toss them with olive oil, salt, pepper, and your favorite herbs. Bake until crispy to create delicious homemade croutons for salads or soups. Bread bruschetta – Cut challah into thin slices, toast them, and top with fresh tomato, basil, garlic, and balsamic glaze for a unique twist on classic bruschetta. Challah bread panzanella – Make a delightful panzanella salad using cubed and toasted challah bread, fresh tomatoes, cucumber, red onion, basil, and a tangy vinaigrette dressing. Challah bread fondue – Cube and toast challah bread piece and serve it as one of the dippers for a tasty cheese fondue. The combination of sweet challah with savory melted cheese is a delightful contrast. Sweet bread pudding parfait – Layer chunks of challah bread pudding with whipped cream, fresh fruits, and nuts to create a delightful dessert parfait. Bread strata – Create a savory breakfast strata using challah bread layered with eggs, cheese, vegetables, and meats. Let it sit overnight, then bake it for a delicious and satisfying breakfast casserole.
Did you LIKE this recipe? Save it for later. You can find my recipes on Pinterest. Follow me on Facebook, Twitter, and Instagram.Subscribe, and I’ll send you new recipes right to your inbox. Thank you for sharing - Save for later