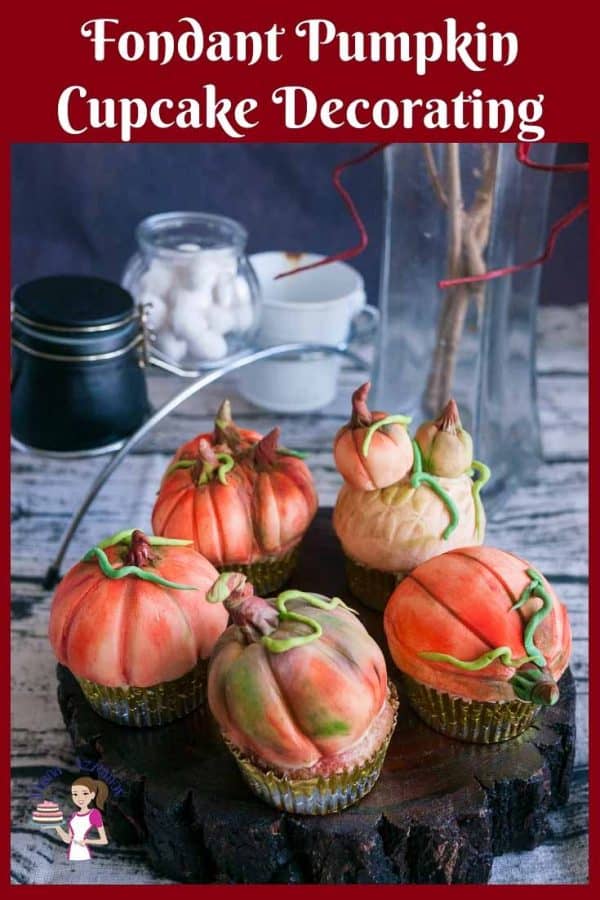
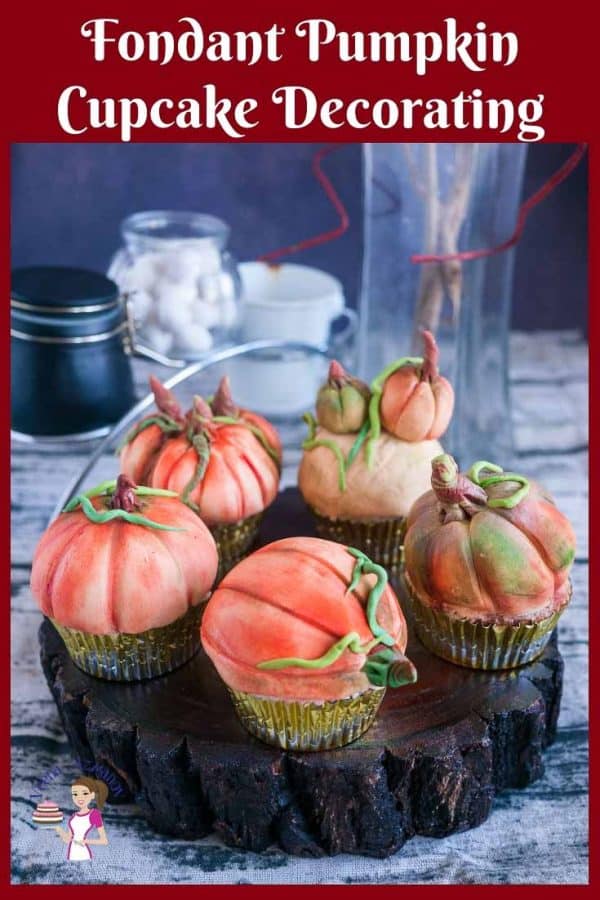
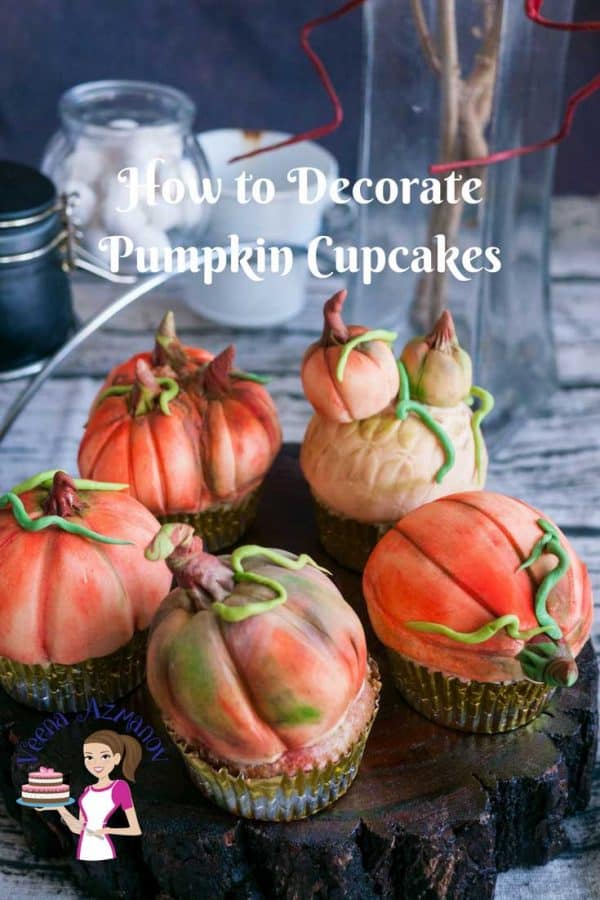
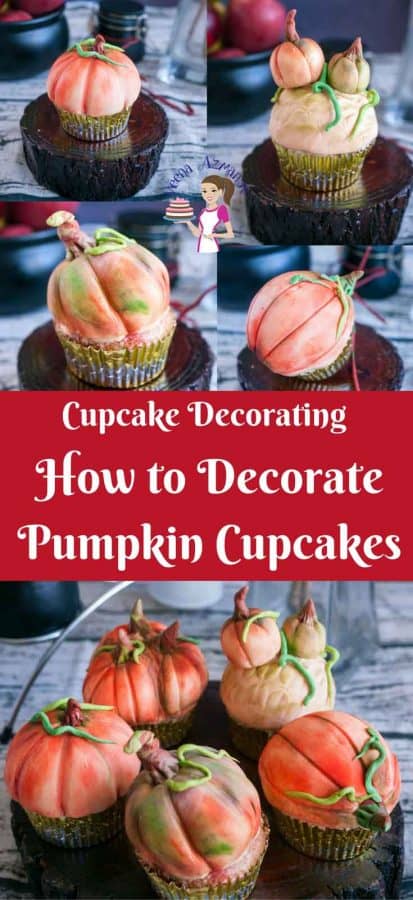
As the leaves turn golden and the air becomes crisp, there’s no better way to celebrate fall than by incorporating the season’s star ingredient—pumpkin—into your baking. Pumpkins are synonymous with autumn, bringing warmth and comfort to our favorite recipes. By adding pumpkin puree and a dash of pumpkin spice to your cupcakes, you introduce a rich, earthy sweetness and a medley of cozy spices that elevate the classic cupcake to a whole new level. The result is a moist, flavorful treat that perfectly captures the essence of fall. But why stop at delicious flavor when you can also wow your family and friends with stunning presentation? Take your cake decorating skills to the next level by shaping the top of your cupcake frosting into adorable pumpkins. After frosting your cupcakes with a generous dollop of cream cheese frosting, mold the frosting into a round, pumpkin-like shape. Chill the cupcakes, cover them with fondant, and add finishing touches like realistic ridges and a green fondant stem. This creative twist not only makes your cupcakes taste amazing but also turns them into a festive centerpiece that’s sure to impress at any fall gathering!
Why is this the best recipe and tutorial?
Perfect Flavor Combination: The combination of pumpkin, cinnamon, ginger, cloves, and nutmeg creates a deliciously spiced cupcake that captures the essence of fall. The cream cheese frosting adds a rich, tangy contrast that complements the sweetness of the pumpkin cupcake perfectly. Easy-to-Follow Instructions: This tutorial provides clear, step-by-step instructions that make it easy for bakers of all levels to follow along. From baking the cupcakes to decorating them with fondant, each step is detailed to ensure success. Beautiful and Festive Presentation: The detailed instructions for decorating the cupcakes to look like pumpkins ensure that the final product is not only delicious but also visually stunning. The use of fondant and edible petal dust gives the cupcakes a professional and realistic finish that will impress guests. Versatile and Fun: This recipe is versatile enough to be used for various fall occasions, from Halloween parties to Thanksgiving dinners. The fun and creative decorating process makes it an enjoyable activity to do with family or friends, especially during the festive season.
Ingredients and Substitutes
All-Purpose Flour: Provides structure to the cupcakes. You can use a gluten-free all-purpose flour blend to make the cupcakes gluten-free. Baking Powder & Baking Soda: Both leavening agents help the cupcakes rise and become fluffy. No direct substitutes. Ensure they are fresh for the best results. Ground Spices (Cinnamon, Ginger, Cloves, Nutmeg): Provide the warm, autumnal spice profile. Pumpkin pie spice can be used as a blend, or adjust the quantities of each spice to your preference. Granulated Sugar: Sweetens the cupcakes. Brown sugar for a deeper molasses flavor, or coconut sugar for a less refined option. Vegetable Oil: Keeps the cupcakes moist. Melted butter, coconut oil, or applesauce for a healthier option. Eggs: Bind the ingredients and provide moisture. Flax eggs (1 tablespoon ground flaxseed mixed with 3 tablespoons water per egg) or applesauce (1/4 cup per egg). Pumpkin Puree: Adds moisture, flavor, and a tender texture. Sweet potato puree or butternut squash puree. Vanilla Extract: Adds depth of flavor. Almond extract (use half the amount) or maple syrup. Cream Cheese: Provides a tangy, creamy base for the frosting. Mascarpone cheese or vegan cream cheese for a dairy-free option. Unsalted Butter: Adds richness and helps with the frosting’s structure. Margarine or vegan butter for a dairy-free option. Powdered Sugar: Sweetens and thickens the frosting. Coconut powdered sugar or a blend of granulated sugar and cornstarch processed until fine. Vanilla Extract: Enhances the flavor of the frosting. Almond extract (use half the amount) or any other flavored extract of choice. Orange Fondant: Used to create the pumpkin shape. Homemade fondant, or marzipan colored with food coloring. Green Fondant: Used for leaves and vines. Same as above, or you can use colored marzipan or modeling chocolate. Edible Petal Dust: Adds realistic shading and highlights. Edible glitter or gel food coloring diluted with a bit of vodka or lemon extract.
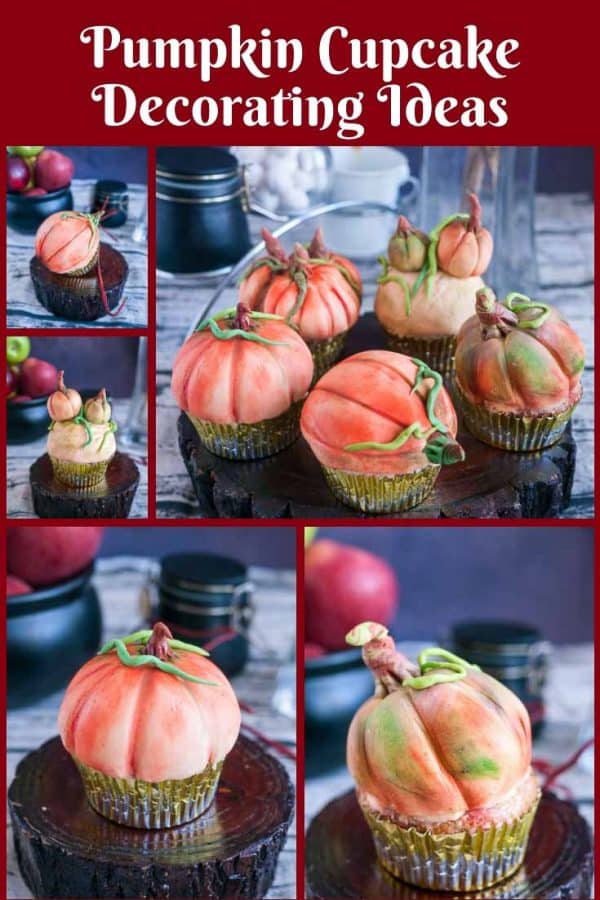
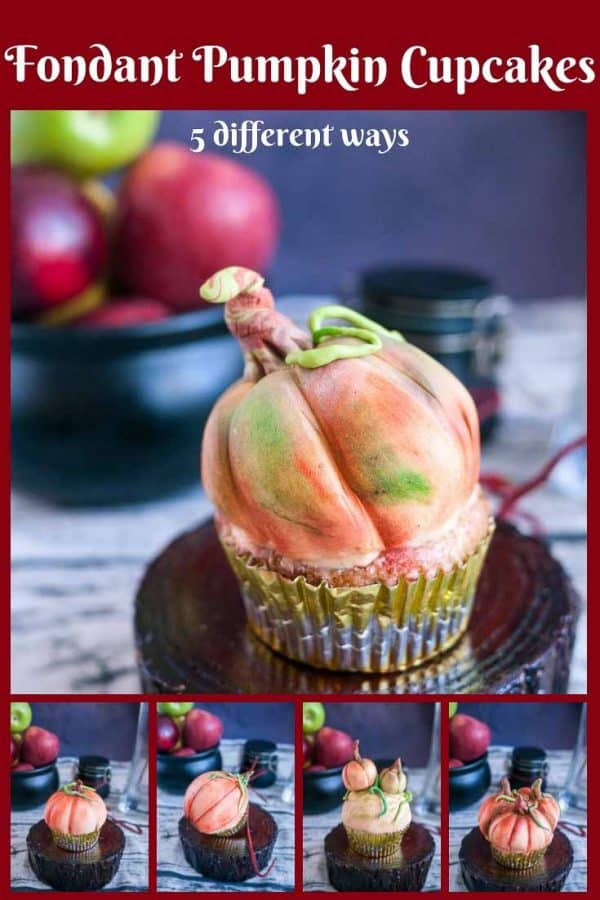
Step-by-step: Fondant pumpkin cupcakes
For the cupcakes
Preheat the oven to 350°F (175°C) and line a muffin tin with cupcake liners. Dry ingredients: In a medium bowl, whisk together the flour, baking powder, baking soda, salt, cinnamon, ginger, cloves, and nutmeg. Wet ingredients: In a large bowl, whisk together the sugar, oil, eggs, pumpkin puree, sour cream, and vanilla extract until well combined. Dry to wet: Gradually add the dry ingredients to the wet ingredients, mixing until just combined. Bake: Divide the batter evenly among the cupcake liners, filling each about two-thirds full. Bake for 18-20 minutes, or until a toothpick inserted into the center comes out clean. Cool the cupcakes in the pan for 5 minutes, then transfer to a wire rack to cool completely.
For Cream cheese frosting
In a large bowl, beat the cream cheese and butter together until smooth and creamy. Gradually add the powdered sugar, one cup at a time, mixing well after each addition. Add the vanilla extract and a few drops of orange food coloring, mixing until the frosting is smooth and evenly colored. Chill the frosting in the refrigerator for about 15 minutes to firm up slightly.
Decorating cupcakes
Pipe or dollop a generous amount of frosting onto each cooled cupcake, shaping it into a round dome. Chill the frosted cupcakes in the refrigerator for 30 minutes to firm up the frosting. Roll out the orange fondant on a cornstarch-dusted surface to about 1/8-inch thickness. Cut out circles of fondant large enough to cover the frosting domes on the cupcakes. Carefully drape the fondant circles over the chilled frosting domes, smoothing it down and shaping it to resemble a pumpkin. Use a small knife or fondant tool to create vertical lines around the sides of the fondant-covered frosting to mimic pumpkin ridges. Roll small pieces of green fondant into vines and leaves, and attach them to the top of each pumpkin using a small amount of water or edible glue. Use edible petal dust and a small paintbrush to add realistic shading and highlights to the pumpkins, focusing on the ridges and top areas.
Tips for Success – Fondant Pumpkin Cupcakes
Chill the Frosting Domes: Why: Chilling the frosting domes ensures they are firm enough to hold the shape and support the fondant without collapsing. Tip: After shaping the frosting into domes, refrigerate them for at least 30 minutes to an hour before covering with fondant. Roll Fondant Evenly: Why: Rolling the fondant to an even thickness (about 1/8 inch) ensures a smooth, professional finish. Tip: Use a rolling pin with thickness guides or measure the thickness with a ruler to keep it consistent. Avoid Sticky Fondant: Why: Fondant can become sticky when exposed to moisture or warmth, making it difficult to work with. Tip: Dust your work surface and rolling pin with cornstarch or powdered sugar to prevent sticking. Work in a cool, dry environment. Smooth Fondant Gently: Why: Smoothing the fondant too aggressively can tear it or create unwanted marks. Tip: Use your hands or a fondant smoother to gently smooth the fondant over the frosting dome, working from the top down. If air bubbles form, gently press them out or use a clean pin to release the air. Create Realistic Pumpkin Ridges: Why: Proper ridges give the cupcakes a realistic pumpkin look. Tip: Use a fondant tool or the back of a butter knife to gently press vertical lines around the sides of the fondant-covered frosting, creating the pumpkin’s characteristic ridges. Use Edible Petal Dust for Realism: Why: Petal dust adds depth, making the pumpkins look more lifelike. Tip: Apply petal dust sparingly using a small, soft brush. Focus on the creases and ridges, blending outward for a natural gradient. Work with Fondant Quickly: Why: Fondant dries out when exposed to air, making it difficult to shape and smooth. Tip: Keep unused fondant wrapped in plastic wrap or stored in an airtight container. Only roll out and shape the amount you need immediately. Shape the Pumpkin Stem and Leaves with Care: Why: Small details like the stem and leaves enhance the overall appearance. Tip: Roll green fondant into small, thin vines and shape them into curls. For the leaves, use a leaf cutter or mold to create detailed shapes. Attach them carefully to the top of the pumpkin with a dab of water or edible glue. Practice Patience: Why: Creating detailed fondant decorations can be time-consuming and requires attention to detail. Tip: Take your time with each step, especially when shaping and decorating the pumpkins. Don’t rush the process; the results will be worth the effort. Store Properly: Why: Fondant can absorb moisture from the air, leading to a sticky or droopy finish. Tip: Store finished cupcakes in a cool, dry place. If you need to refrigerate them, keep them in an airtight container to prevent moisture from softening the fondant.
Easy Pumpkin Cupcakes with Cream Cheese Frosting Moist Pumpkin Cream Cake Recipe Ultimate Pumpkin Spice Cake: Fall Celebrations The Surprising Secret Ingredient for Irresistible Rose Shortbread Cookies Homemade Pumpkin Puree
Frequently asked questions
Did you LIKE this recipe? Save it for later. You can find my recipes on Pinterest. Follow me on Facebook, Twitter, and Instagram.Subscribe, and I’ll send you new recipes right to your inbox. Thank you for sharing - Save for later