Brace yourself because this ultimate guide will take you on a spine-tingling journey through the shadowy realm of Halloween culinary delights. Prepare to be amazed as we unveil the secrets behind these wickedly delectable creations, igniting your imagination and leaving you craving more. So gather your courage, steel your nerves, and let’s dive headfirst into the abyss of Halloween Wormy Dirt Cupcakes.
Why are these the best for Halloween?
Why are these dirt cupcakes the best for Halloween? Well, these spooktacular treats are perfect for a variety of Halloween-themed events and celebrations. Whether you’re hosting a haunted house party, participating in a bake sale, or simply looking to add a touch of frightful fun to your family gathering. These Halloween Wormy Dirt Cupcakes are guaranteed to be a hit.
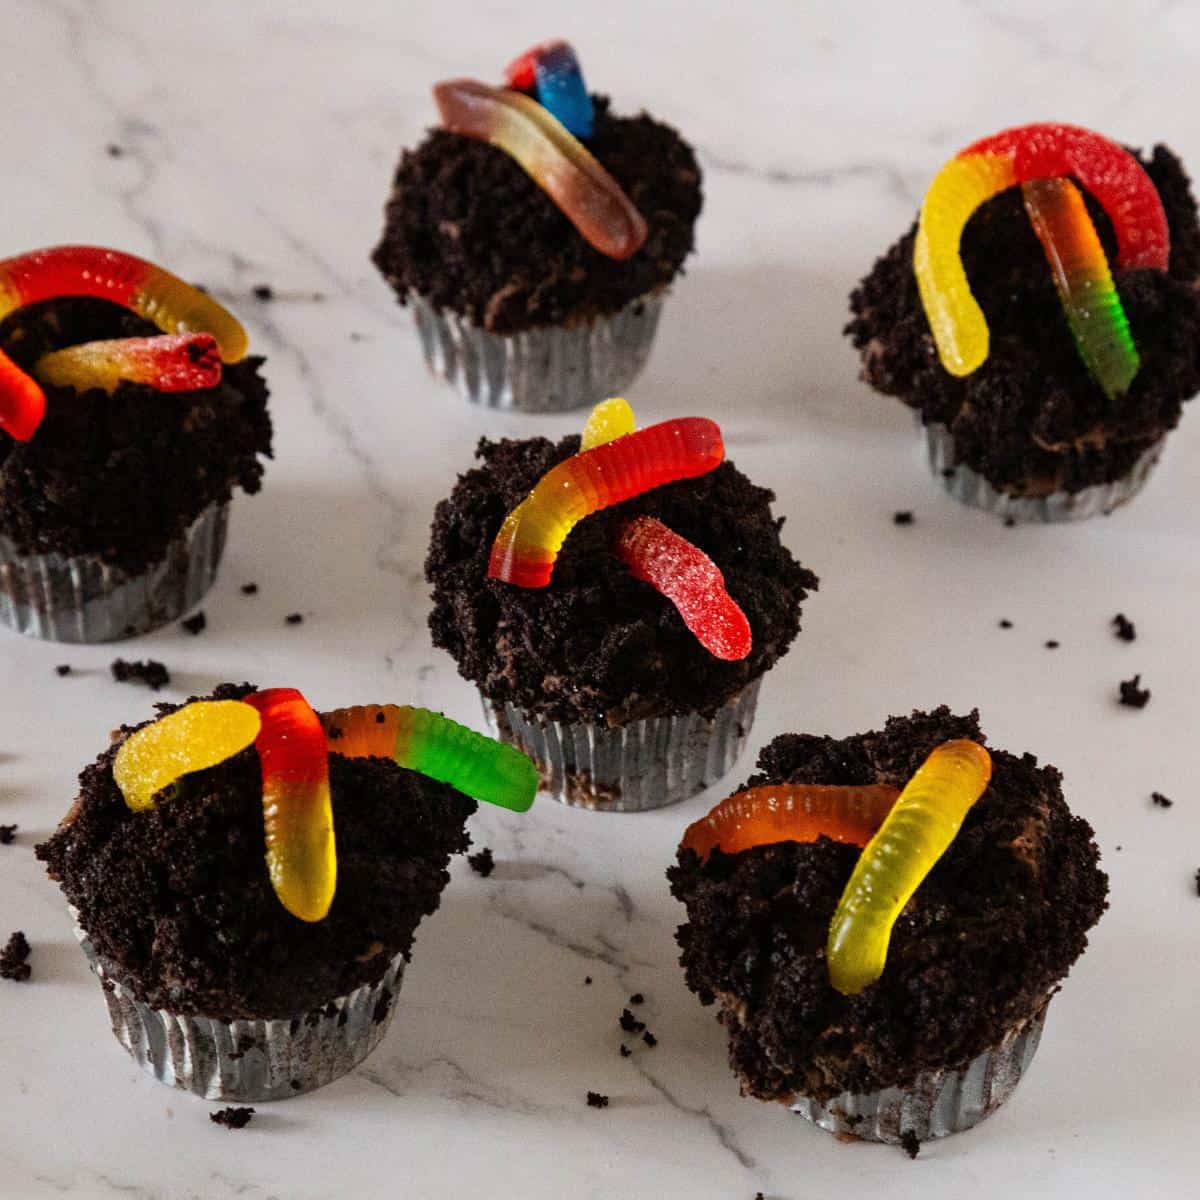
Their eerie appearance and gory decorations make them an ideal centerpiece for any Halloween dessert table. Imagine a platter filled with cupcakes that resemble freshly dug graves, complete with creepy crawling worms and tombstone-shaped cookies. These cupcakes will send shivers down your guests’ spines and set the perfect ambiance for a spooky event. In addition to their visual appeal, these cupcakes also offer a delightful combination of flavors that will satisfy both kids and adults alike. The moist chocolate cake base, topped with a rich chocolate ganache and crunchy cookie crumbs, creates a delectable contrast of textures. And let’s not forget about the gummy worms hidden within the dirt-like topping, adding a playful surprise with each bite. Furthermore, Halloween Wormy Dirt Cupcakes are a fantastic opportunity to unleash your creativity. You can easily customize the decorations and toppings, allowing you to cater to different themes or preferences. From tombstones and skeletons to spiders and bats, the possibilities are endless. So why not embrace your inner artist and let your imagination run wild as you turn these cupcakes into edible works of art? Whether you’re a seasoned baker or a novice in the kitchen, Halloween Wormy Dirt Cupcakes are a delightful project that anyone can tackle. With patience and the right ingredients, you can create a memorable Halloween treat with everyone scrambling for seconds. So get ready to dive into these eerie confections’ dark and delicious world, and let your Halloween spirit soar.
Ingredients and substitutes
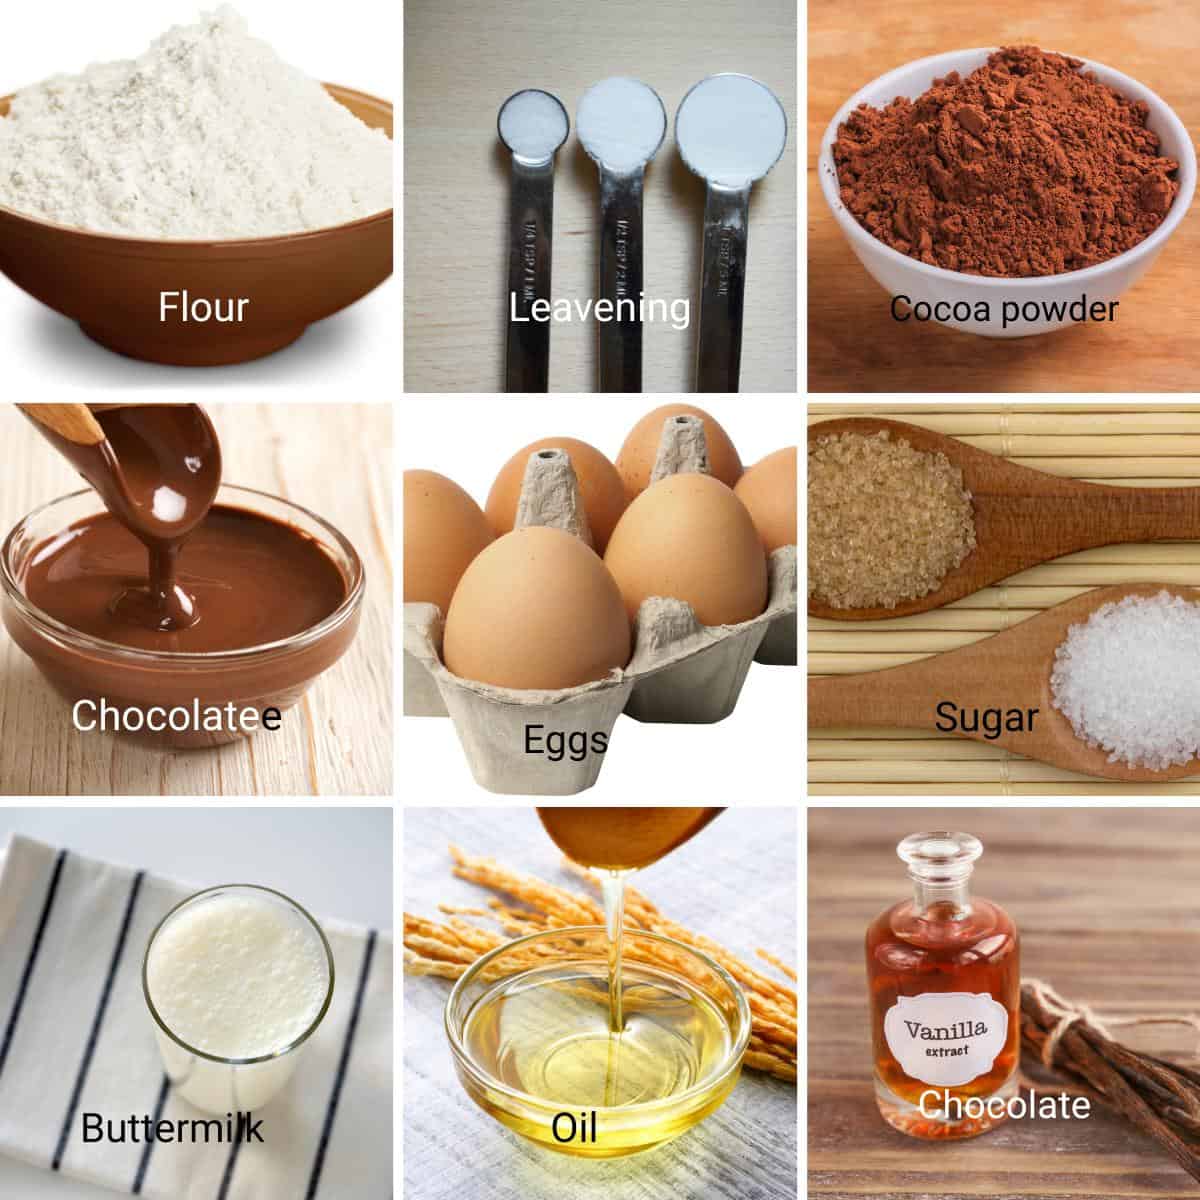
When it comes to creating the perfect Halloween Wormy Dirt Cupcakes, having the right ingredients is essential. The combination of flavors and textures is what makes these treats truly special. Here’s a quick rundown of the key components:
Chocolate Cupcakes: The foundation of your dirt cupcakes should be rich and moist. You can use your favorite chocolate cake recipe if you prefer a homemade touch. Today, I am using my death by chocolate cake batter. And for a shortcut, a boxed cake mix will work perfectly fine. Dirt – You can use crumbled cakes or crunchy Oreo cookies as the “dirt” in your cupcakes. Simply crush them up into crumbs to create the illusory effect of soil. Gummy Worms: The centerpiece of your dirt cupcakes, gummy worms add a playful and creepy touch. These little critters can be found at most candy stores or supermarkets. And if you prefer a different creature crawling through your dirt, feel free to substitute the gummy worms with other gummy creatures like snakes or bugs. Frosting – To add the finishing touch to your dirt cupcakes, you’ll need a smooth and creamy frosting. Chocolate or vanilla buttercream are classic choices, but you can also get creative here. Consider using cream cheese frosting for a tangy twist. Or experiment with different food coloring to match your Halloween theme. As for toppings, crushed cookies, Halloween-themed sprinkles, or edible glitter can add an extra element of fun.
Dirt cupcakes with gummy worms
Cupcakes
Prep – Preheat the oven to 325°F/ 165°C/ Gas Mark 3. Line a muffin pan with cupcake liners. Chocolate – Chop the chocolate into small pieces and place in a microwave-safe bowl. Melt for a minute or more until smooth. Set aside to cool.Pro tip – You can also melt chocolate in a double boiler or a bowl over a pot of simmering water.
Dry ingredients – In a mixing bowl, combine the flour, baking powder, baking soda, and salt – and set aside. Cocoa paste – Combine the cocoa powder, coffee, and hot water in a medium bowl. Set aside. Wet ingredients – In the bowl of a stand mixer with the whisk attachment, whip the egg with white and brown sugars until light and fluffy. Next, add the vanilla extract, cocoa paste, and melted cooled chocolate. Combine well, then add the buttermilk and oil. Wet to dry – Add the flour mixture to the egg mixture. Combine well until you have a smooth batter.Pro tip – You will need a whisk or whisk attachment to ensure no lumps in the batter. Bake – Divide the batter equally between the prepared muffin pans. Bake for 20 to 25 minutes or until a skewer inserted in the center comes clean. Cool – When baked, cool in the baking pans for 5 minutes. Then, cool on a wire rack completely before you decorate.Pro tip – The cupcakes must be completely cooled before frosting. Otherwise, the frosting will melt on the warm cakes.
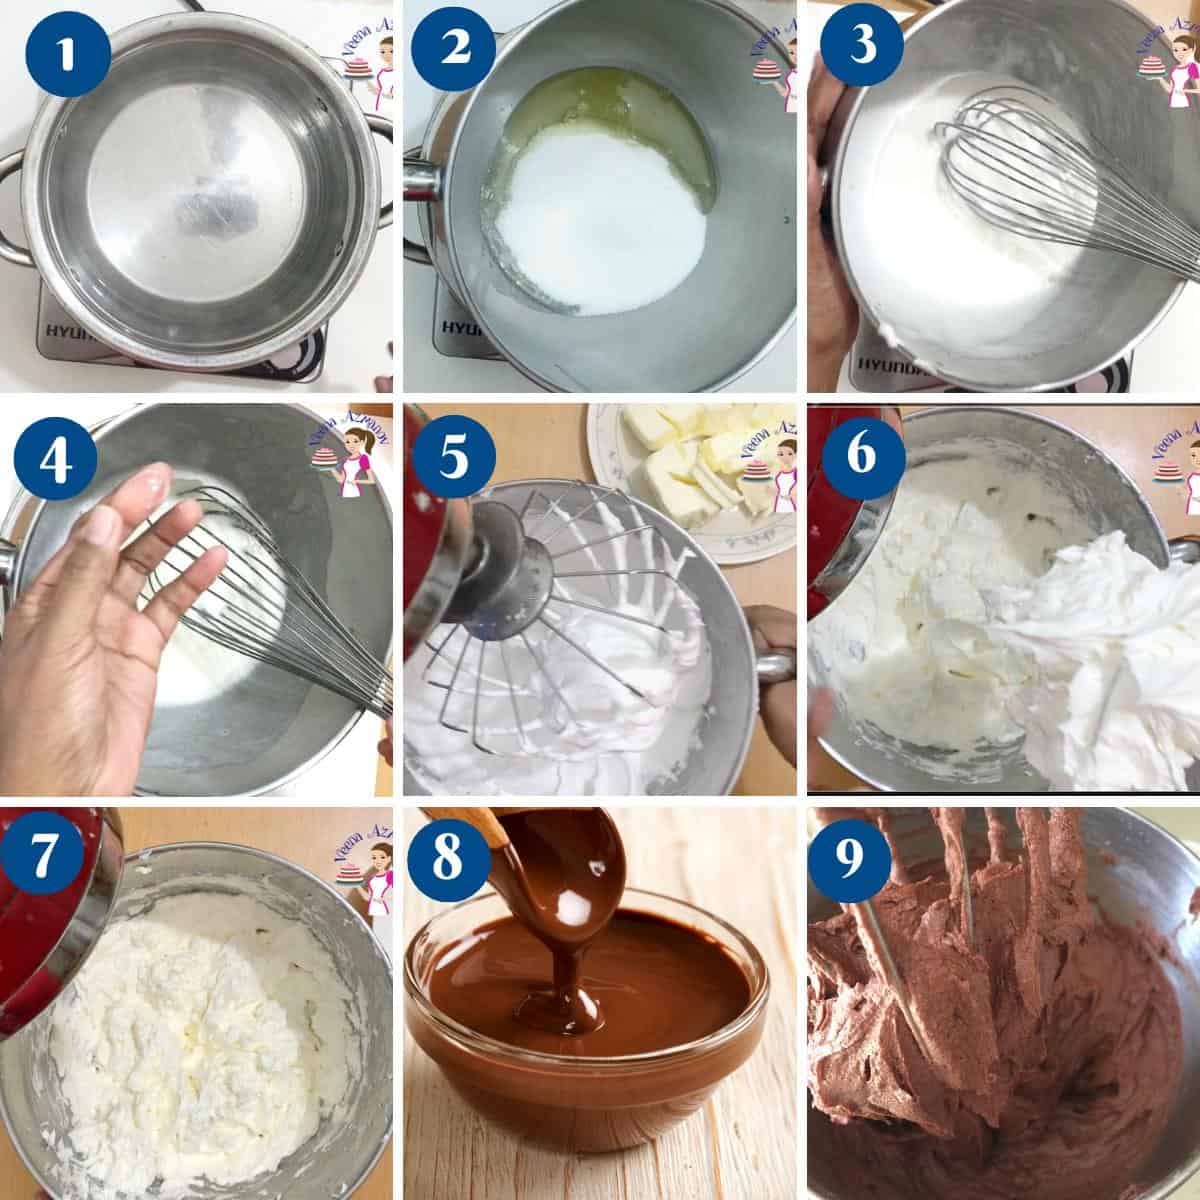
Chocolate Swiss meringue buttercream
Temper – Place egg whites and sugar in the bowl of the stand mixer. Using a whisk, place the bowl over a pot of simmering water (double boiler). Whip until all the sugar has dissolved and the egg whites are fairly warm (about 160 F).Pro tip – Make sure the bowl is grease-free. Otherwise, the egg whites will not whip Whip – Take the bowl off the heat and whip the egg whites with cream of tartar and salt on medium to high speed until you have a thick meringue with stiff peaks. Let the mixer continue to whip on medium-low until the mixer bowl feels cool to the touch.Pro tip – It is best to start whipping eggs at medium speed then increase speed as you go for the best meringue. Butter – Gradually add butter, one cube at a time, with the mixer at medium speed. Once all the butter is added, whip on medium-high for 2 minutes. Lastly, add the vanilla. Combine well until everything is well combined. Then, add the vanilla extract. This is your classic Swiss meringue buttercreamPro tip – It is VERY important that the meringue is completely cooled before adding the butter. Otherwise, you will have a soupy mess. Chocolate – Now, fold in the melted, cooled chocolate. Combine until you have a smooth frosting.Pro tip – The chocolate mustn’t be warm. Otherwise, it will seize when added to the chilled frosting.
Assemble
Frost – Using a spatula, frost each cupcake with a generous amount of frosting. Dirt – You can crumble a few cupcakes to use as dirt, or you can crush a few chocolate Oreo cookies. Top each cupcake with a generous amount of crumbs.Pro tip – You can use as little or as many crumbs as you like for this part. Decorate – Top each cupcake with gummy worms. Be creative and arrange them so they look like they are digging out of the dirt.
Adding your spooky decorations
Remember, the key to making fun dirt cupcakes is to embrace the messiness and imperfections. The rough texture, combined with the spooky decorations, will add to the overall charm of these ghoulish treats. So don’t worry about making them look too polished – the messier the better!
One classic decoration that never fails to impress is the gummy worm. These squiggly creatures can be buried within the dirt-like frosting, wriggling their way out to create an eerie effect. And if you want to take it up a notch, try placing the worms strategically so they appear to be crawling out of the cupcake or coiling around the tombstones. The sight of these wriggling worms will surely send shivers down your guests’ spines! And if worms aren’t your thing, there are plenty of other options to explore. How about using Oreo cookies to create tombstones? Write spooky messages on the cookies using black icing and stick them upright into the frosting. It will give your cupcakes a graveyard-like atmosphere, adding a touch of eeriness to the overall presentation. For a more whimsical twist, consider incorporating Halloween-themed candy into your decorations. Think candy eyeballs, vampire fangs, or even miniature pumpkins made of marzipan. These colorful additions will make your cupcakes visually appealing and provide a delightful surprise when your guests take a bite.
Creative twists and presentation
By experimenting with different decorations and arrangements, you can transform these gory treats into glorious works of art that will impress everyone at your party.
One idea is to create a spooky graveyard scene on top of your cupcakes. Use crushed chocolate cookies or chocolate sprinkles to resemble dirt, and then add tombstone-shaped cookies or candy to create a mini graveyard. You can even use gummy worms to make it look like they’re crawling out of the “dirt.” This eerie and haunting design will surely grab everyone’s attention. And if you want to add a touch of elegance to your Halloween cupcakes, try crafting a spiderweb design with black licorice. Simply cut the licorice into thin, long pieces and arrange them in a crisscross pattern on top of the cupcakes. You can then place a small plastic spider in the center of the web for an extra creepy effect. This sophisticated twist will bring a sense of mystery and glamour to your Halloween desserts. Another option is to use edible glitter or colored sugar to give your cupcakes a touch of sparkle. Sprinkle a bit on top of the frosting or pudding mixture to add a bit of magic and intrigue. The glitter or sugar will catch the light and make your cupcakes stand out, creating a mesmerizing effect that will impress your guests. Another fun twist is incorporating colorful candies or edible eyeballs into your cupcakes. After filling the cupcakes with the “worms” and pudding mixture, place a few brightly colored candies or eyeballs on top. This will give your cupcakes a playful and whimsical look, perfect for a children’s Halloween party or for those who prefer a less scary take on the holiday.
Peach Mini CakesHalloween Sugar CookiesHalloween BrowniesHalloween Shortbread CookiesHalloween Stenciled Cookies
Frequently asked questions
Did you LIKE this recipe? Save it for later. You can find my recipes on Pinterest. Follow me on Facebook, Twitter, and Instagram.Subscribe, and I’ll send you new recipes right to your inbox. Thank you for sharing - Save for later