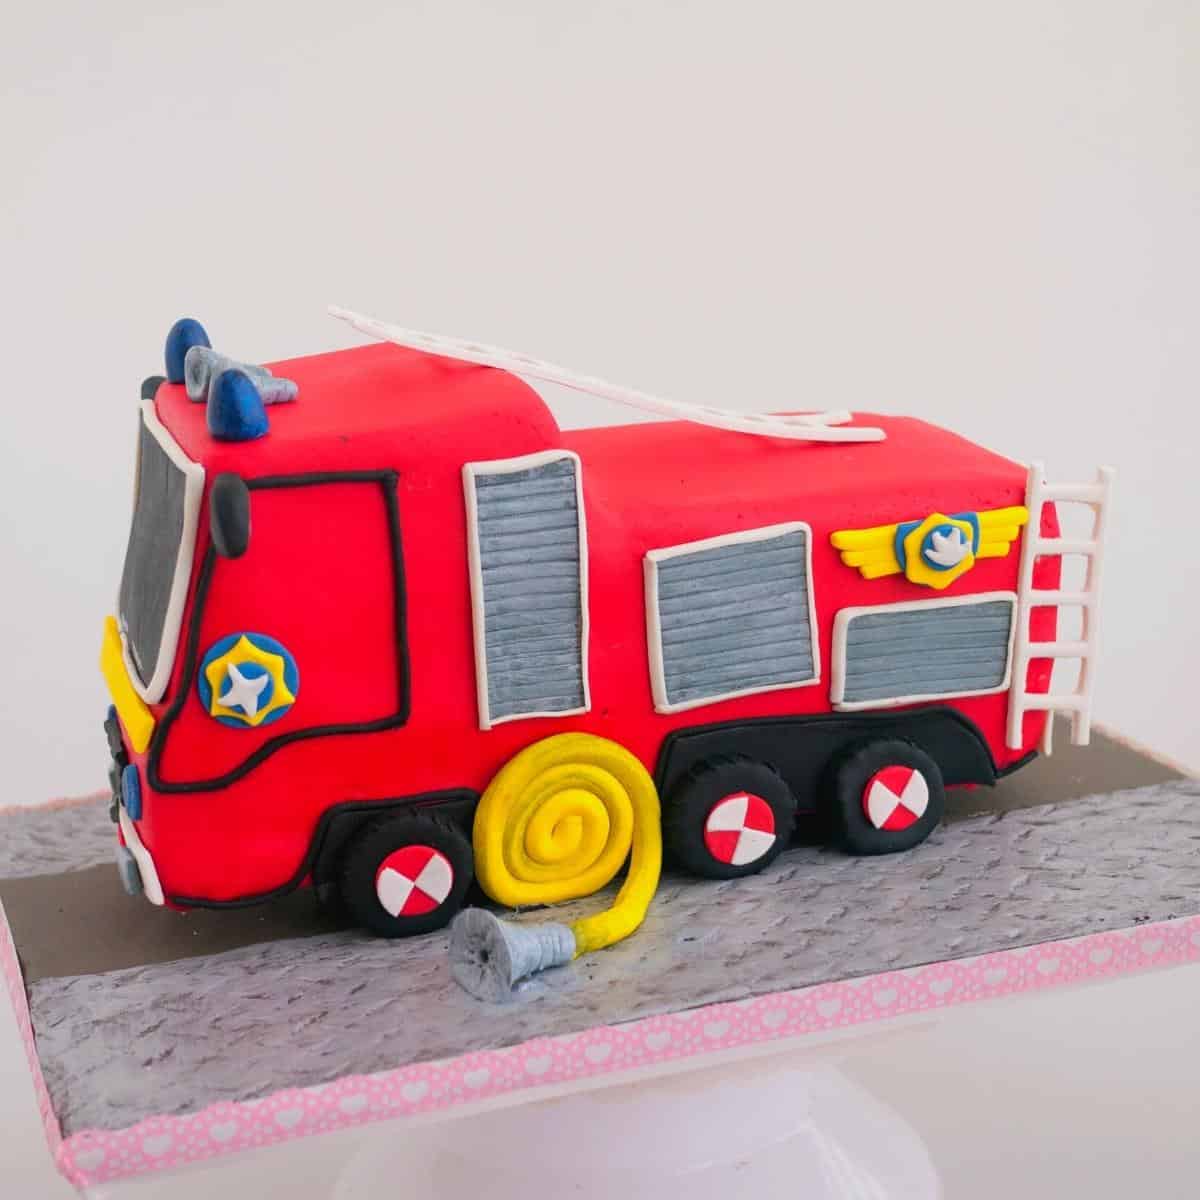
It was Rhea’s birthday recently and she asked for a fire truck cake. She loves the TV series Fireman Sammy with the fire engine. Also, not long ago she had the opportunity to visit a fire station and got to visit the fire engine with the firemen. It was a wonderful experience she speaks very fondly about. So it just made perfect sense that she want to have a fire engine cake. It was also an opportunity for me to share with you how I made this cake. So, I of course kept the camera on and hope that you can see how simple and easy it is to make this cake.
Recipes
Cake Recipe – The cake recipe below is my moist vanilla Pound cake recipe but baked in a sheet pan. I colored the batter into a few different colors for a tie-dye effect. You can find more cake recipes here – 30 plus layer cake recipesFrosting – White Chocolate Ganache – I’ve used Ganache today because it’s hot and humid (40 C here in summer) but any other buttercream or frosting will work. You can find a huge selection of my frosting recipes here – 30 plus buttercream frosting recipesFondant – This is marshmallow fondant using magic colors extra red. You can find all my fondant recipes here.
Long video (short below)
How to make a Fire Truck Birthday Cake
Rainbow vanilla cake
Prepare – Preheat the oven 350°F/ 177°C/ Gas mark. Prepare a 15 x 17 sheet cake pan for baking – grease, and line with parchment paper. If you don’t have a sheet pan you can also use 2 x 8-inch square tins.Dry ingredients – In a bowl combine flour, baking powder, baking soda, and salt – set aside.Wet ingredients – In the bowl of a stand mixer cream butter and sugar until light and fluffy. Add eggs one at a time until well combined. Use a spatula and scrape the sides of the bowl when necessary. Next, add the flour and milk mixture in three batches. Then, add the vanilla extract.Rainbow batter – divide the batter into 5 or 6 bowls and add a few drops of gel food colors in each. Combine well until you have the desired colorBake – Pour the batter into the prepared sheet pan and bake on the middle rack for 50 to 55 minutes or until a skewer inserted inside the cake comes out clean.
Frosting – White chocolate ganache
In a large bowl (microwave-safe) combine the white chocolate and heavy cream. Heat for a minute or more until all the chocolate is melted and smooth. Add the vanilla extract and combine well. Cover and leave to set in the refrigerator for a few hours overnight.
Prepare
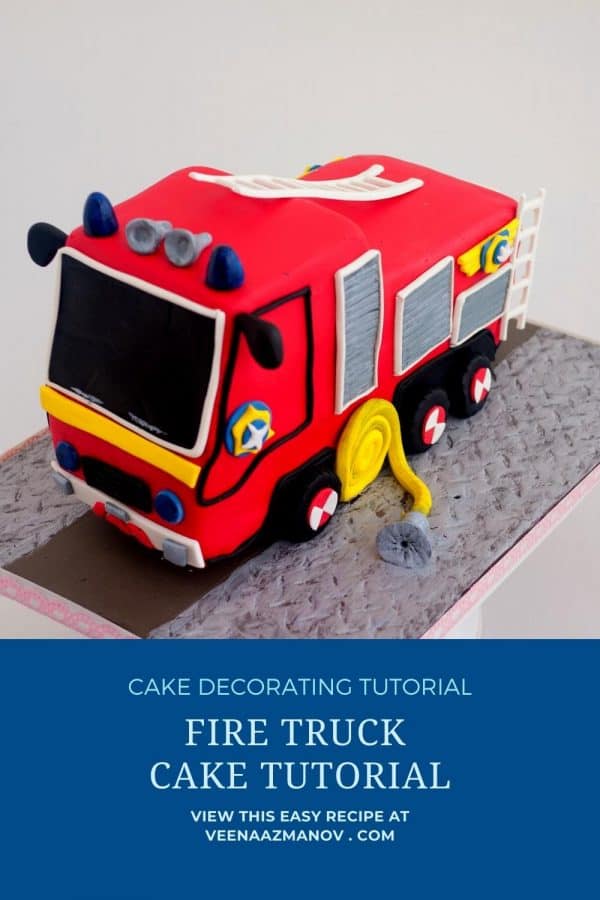
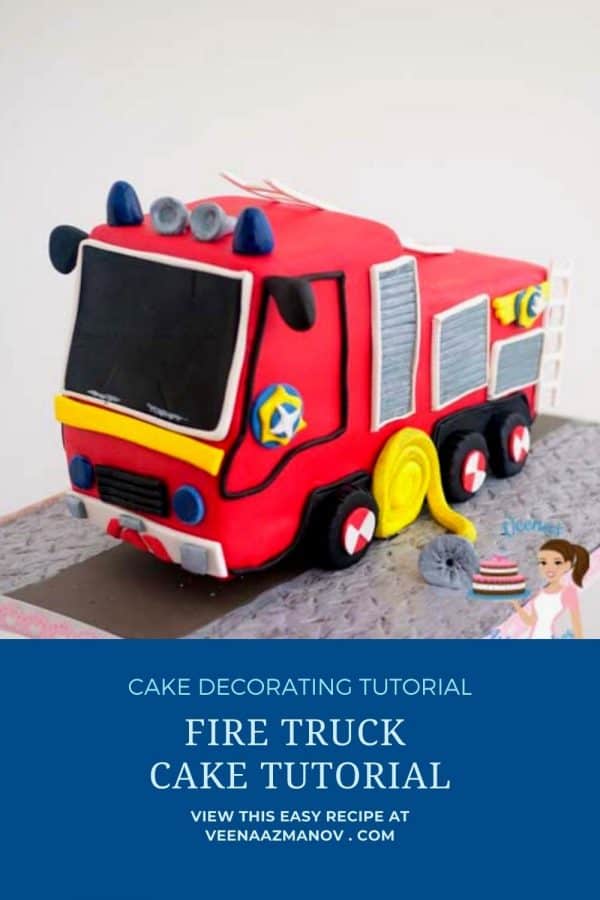
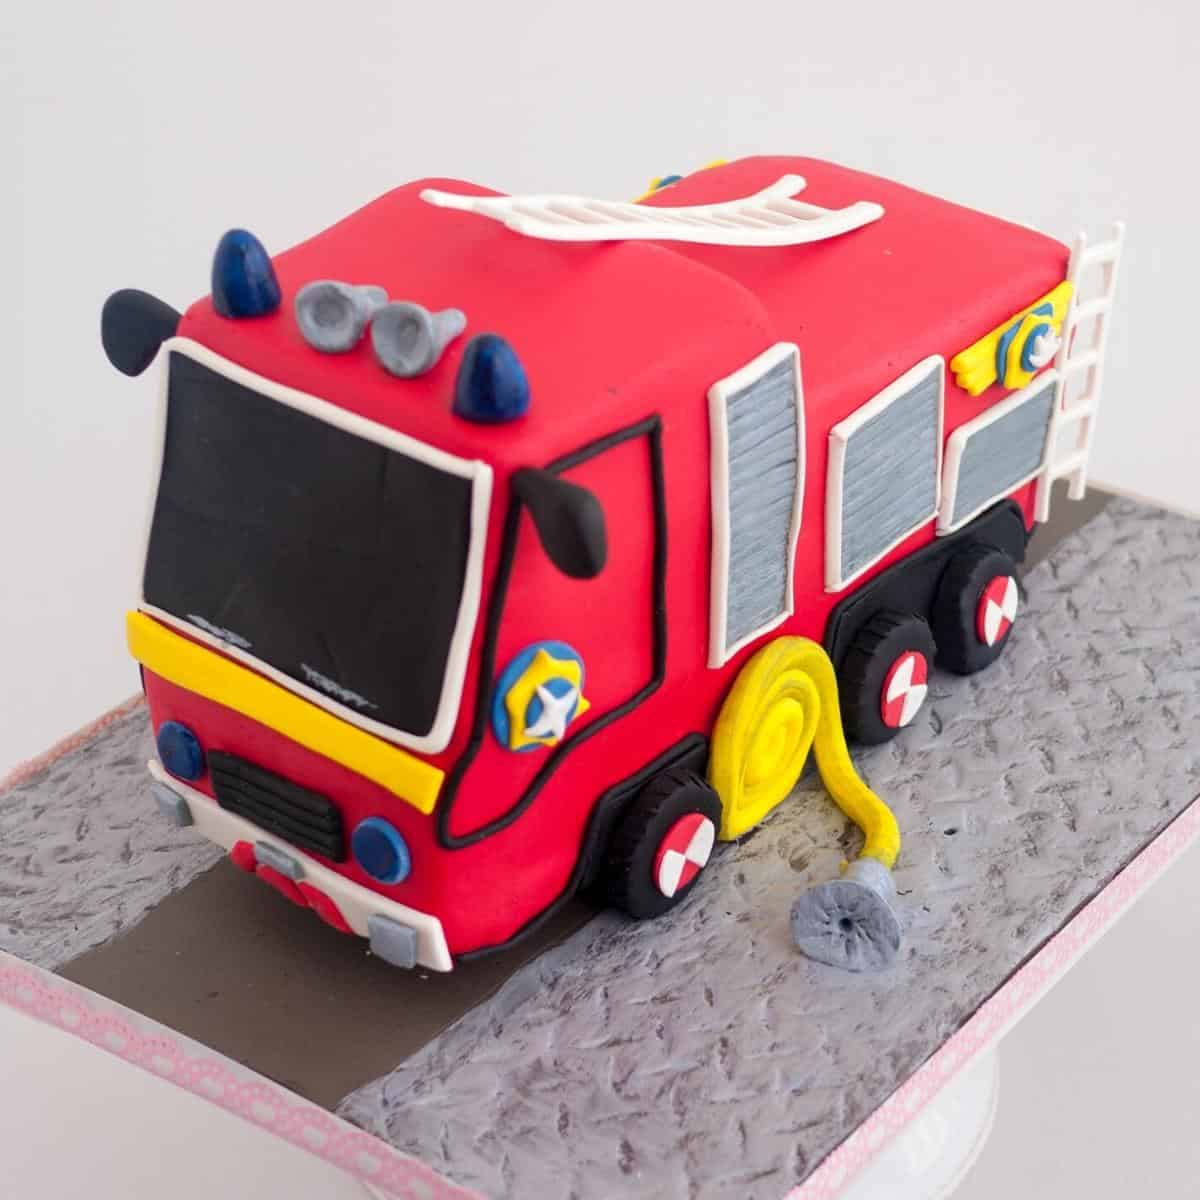
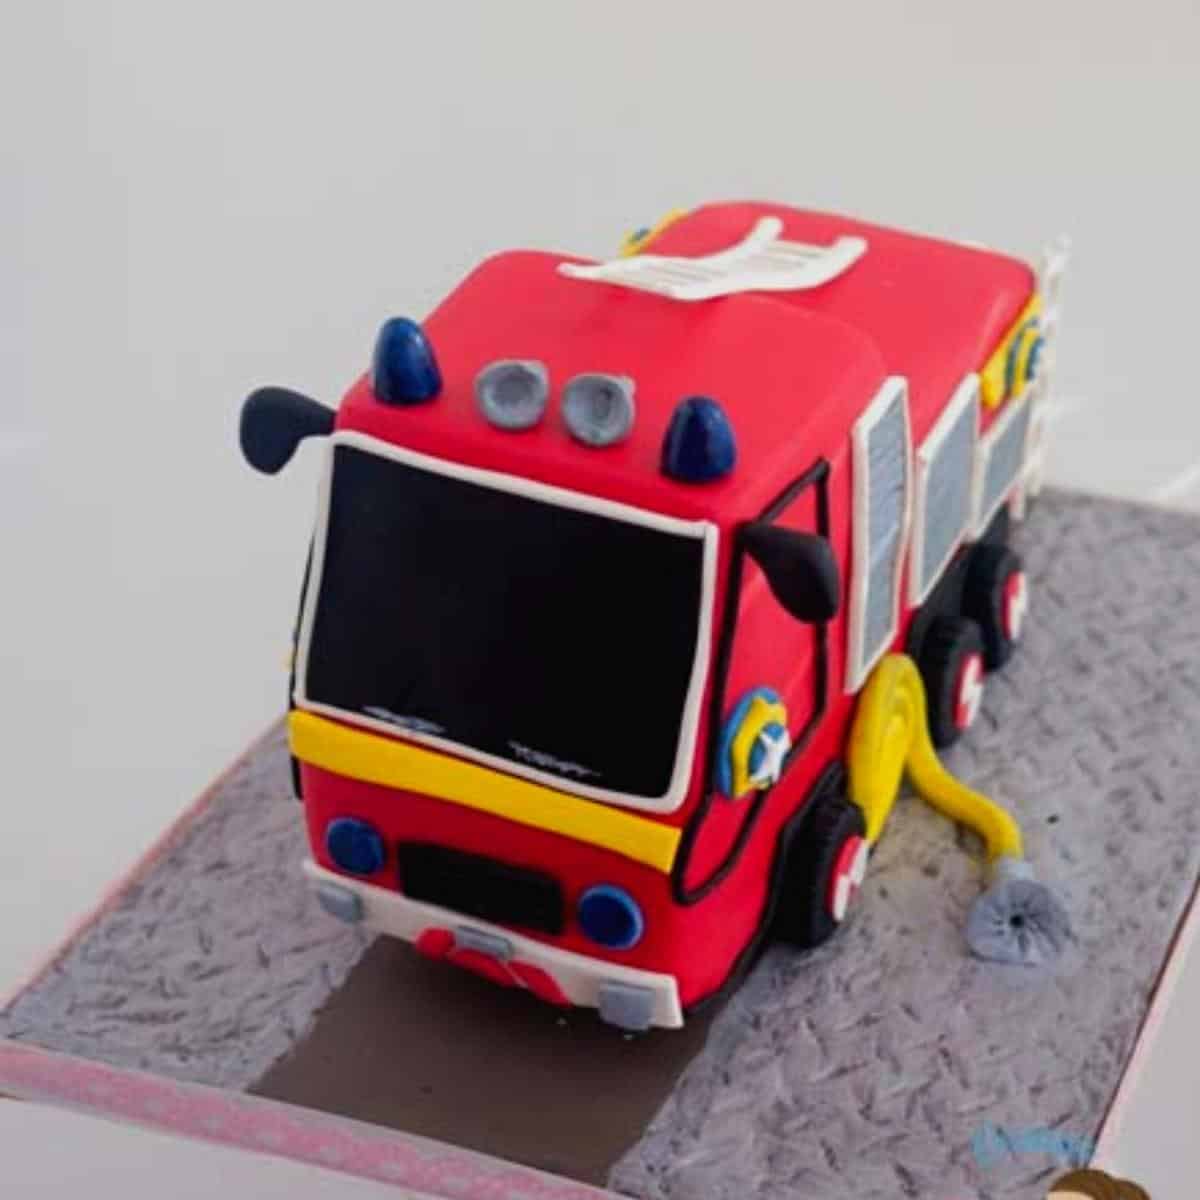
Template – Print the picture of a fire truck – the size you want. I used A4 paper size. You just need one image on paper to use as a guide. I printed a few copies from different angles so I can use them as inspiration. But, you can even use pictures on your phone.Cake board – Cut a rectangular piece of foam core board or piece of cardboard the size of your truck as per the paper. Mine was about 15 x 5 inches. Using strips of foam core make feet for your cake board under the cake. This will keep the cake elevated so you can add the wheels later.Pro tip – the edges of the cake should be in line with the edge of the cake board.
Carving the cake
Carve the cake as shown in the video. Cut cakes, arrange the pieces stacking them according to the template. Cut the sheet cake in three lengthways. The back has two layers of stacked cakes and the front has three layers of stacked cakes cut at an angle.Stack two pieces and check the height with your template. Use the third piece to create the front of the cake. Shape the front as shown in the video.
Frosting the cake
Ganache – Once you have carved the shape. Frost the cake with frosting between layers and crumb coat the cake with a thin layer of frosting. Chill the cake for 15 minutes. Then, add more frosting and frost the truck making sure you have nice square corners. Smooth the cake with a flexible smoother and let chill until the frosting is firm.Pro tip – Don’t forget to brush the layers with simple syrup before frosting.Fondant – Roll red fondant and cover the whole cake as shown in the video. Cut excess fondant from around the cake. Use a cake smoother to smooth and create square corners around the cake.
Fondant cake board
For the board use grey fondant. Roll and cover the entire board. Use a texture mat as shown in the video. Use the cake as a guide and remove some fondant from the center so you can secure the cake. (See video) Use hot glue and secure the cake in place.Pro tip – the hot glue is only to secure the board to board, make sure it does not touch the cake.
Complete Firetruck design
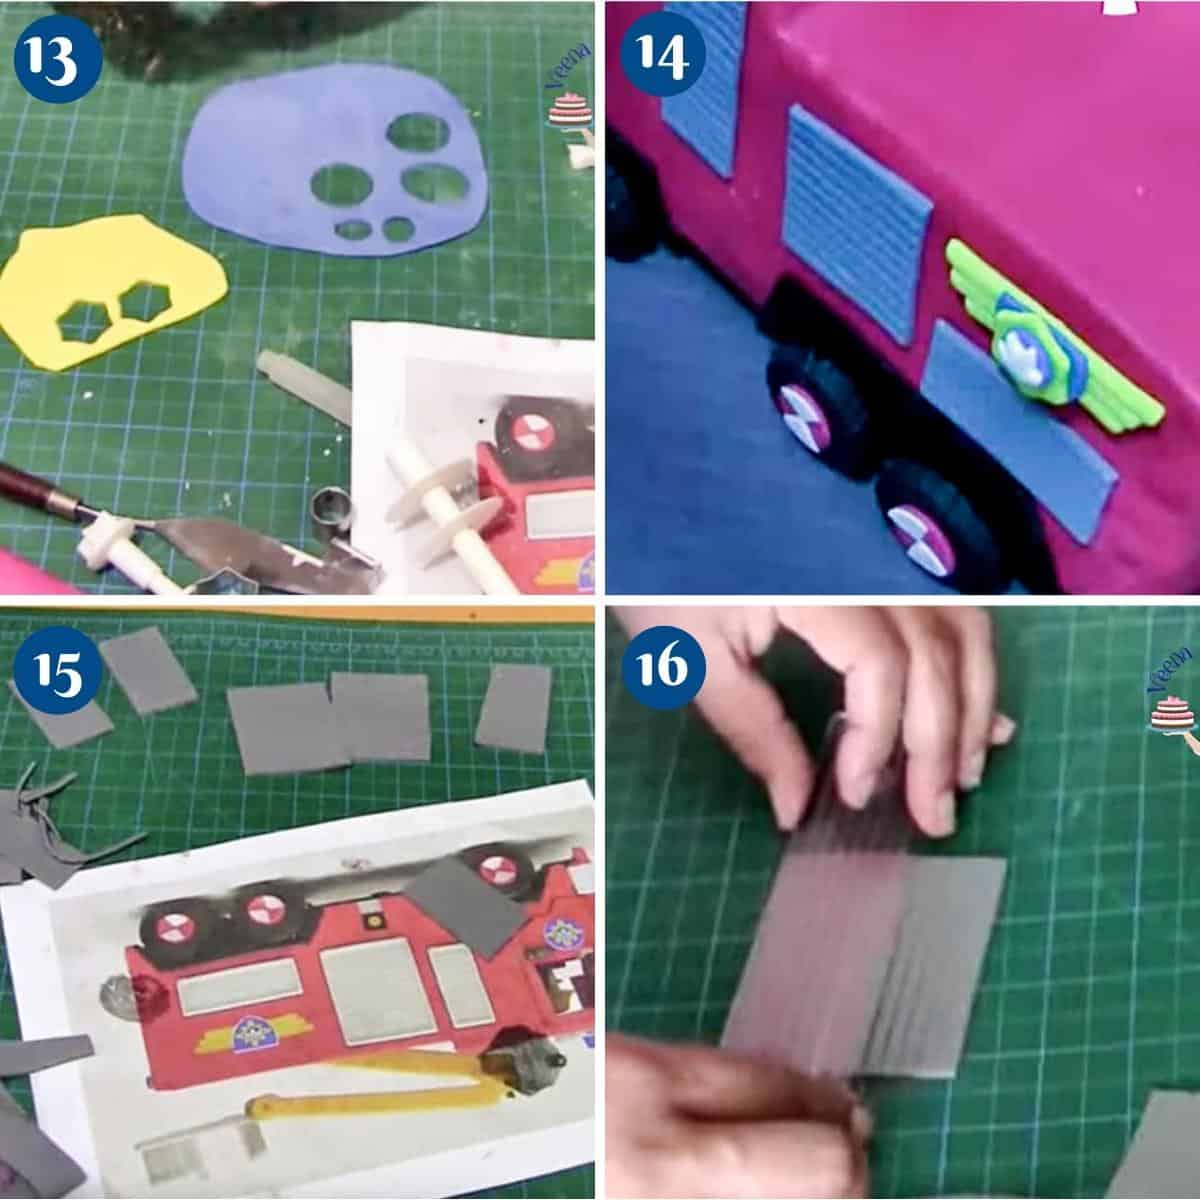
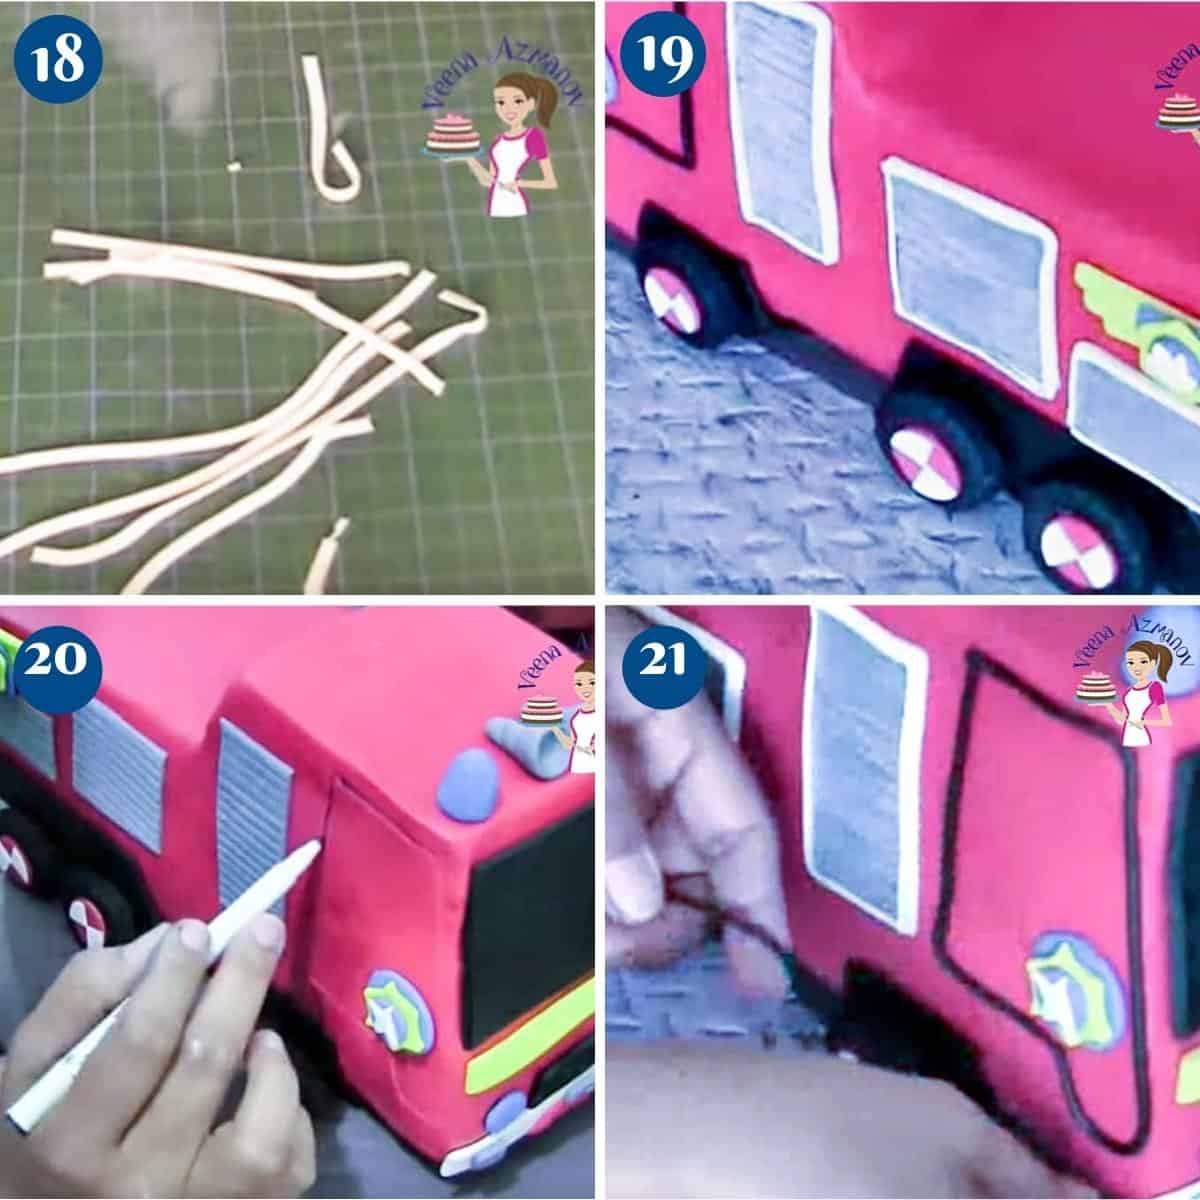
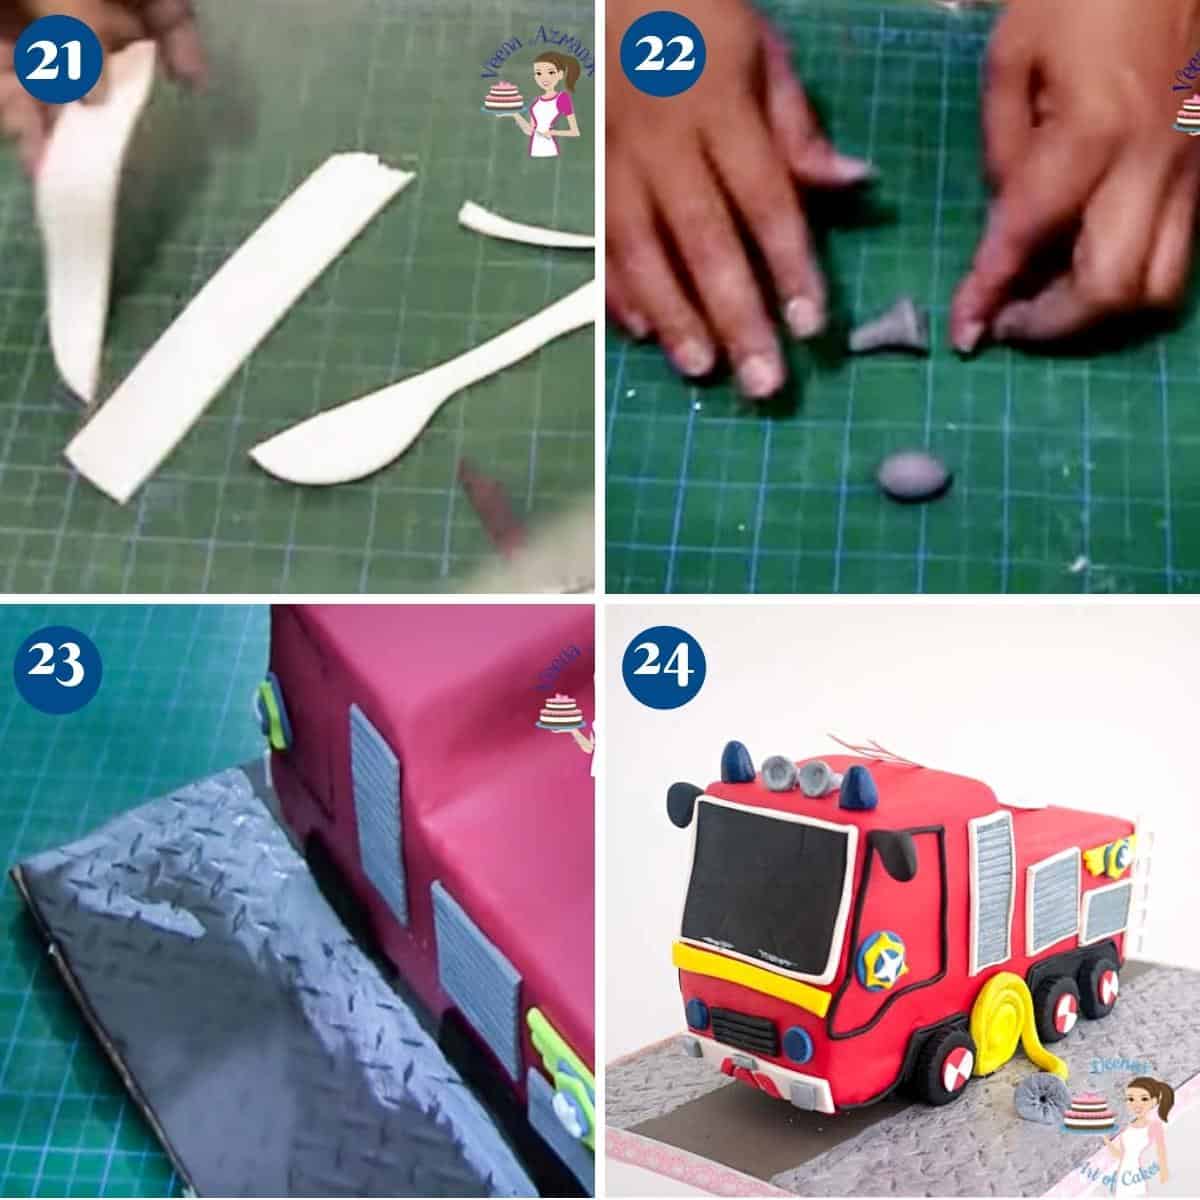
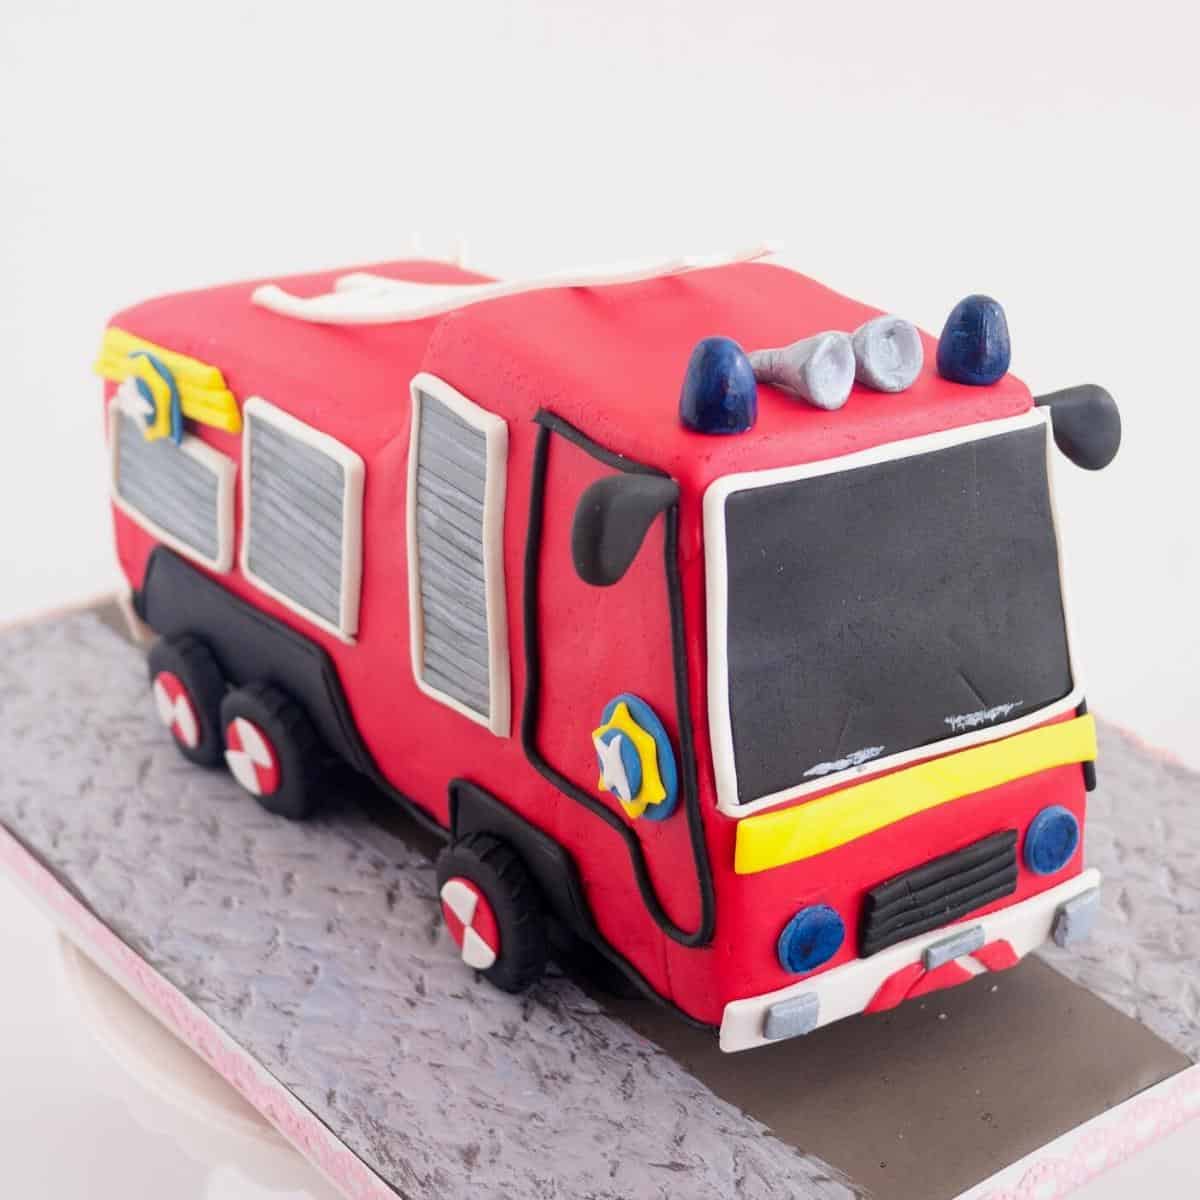
Wheels – Use small cookie cutters for the wheels as shown in the video. Cut a large black fondant disc and a thinner red fondant disc. Use white for the center design. And use a tweezer for the tire marksPanels – Use black fondant for the truck bottom panels.Sutters – And use grey fondant with CMC for the shutters. Alternatively, you can also use grey buttercream frosting but it can become quite smudgy if not done correctly.Ladder – White fondant with CMC for the ladderFire hydrant & Hose – Grey and yellow fondant for the hose.Borders – White and black fondant for the borders. I used a strip cutter to make the white borders for the shutters. Use a fondant extruder for the black spaghetti for the doors and mirrors. But you can also pipe the borders with black royal icing and a number 3 piping tip.Windows – Make the front and back windows.Silver metallic for the road on the board as well as the shutters and the hose and the headlights.
Variations
Buttercream – you can use buttercream instead of fondant to frost the cake. But, you will need to dye the buttercream to deep red gel food colors. Alternatively, you can also use buttercream for just a few parts of the cake such as gray buttercream frosting such as the rectangle shutters. Yellow frosting for the hose.
Tips for success
Use a butter-based cake recipe as it adds more stability for novelty / sculpted cakes. Always keep the cake well wrapped in plastic to prevent it from drying out. Chill the cake well or freezer the cake for an hour before carving. This helps to create fewer crumbs. Use firm sturdy pieces of cardboard or foam core for the cake base. Brush the cake with simple syrup after carving and before frosting. When frosting a novelty cake use a light crumb coat. This helps to hold the crumbs in place.Chill the cake between crumb coat and frosting. Use a bench scraper to get sharp corners. Use a thicker fondant so it creates nice sharp corners using a smoother. Let the fondant dry for a while before you start attaching other details. It becomes easier to stick fondant when it is less tacky.
More cake tutorials
Pancake Cake TutorialIce Cream Sundae Cake TutorialVintage Birdcage Cake TutorialBurger Cake TutorialMinion Cake TutorialLetter Cakes Recipe TutorialSee all cake decorating tutorials
Did you enjoy this article/tutorial? Please ⭐️⭐️⭐️⭐️⭐️ itDon’t forget to Save it for latter. You can also find a collection of my tutorials and recipes on Pinterest. Follow me on Facebook, Twitter, and Instagram for more. Of course, make sure to Subscribe to my blog to receive my tutorials, and recipes by email. Thank you for sharing - Save for later