Croissants hated me for a long time before I finally felt I could make them confidently. They would either turn out too dark, or I’d have a pool of butter on my baking tray. And, if they had a good color on the outside they’d still be underdone inside. Has any of this happened to you? Well, then you’ve come to the right place. Today, I am going to teach you how to make perfect homemade croissants every single time. With my step-by-step progress pictures as well as a video tutorial you will master them in your very first attempt.
Easy Homemade Croissants Recipe
Croissant Dough
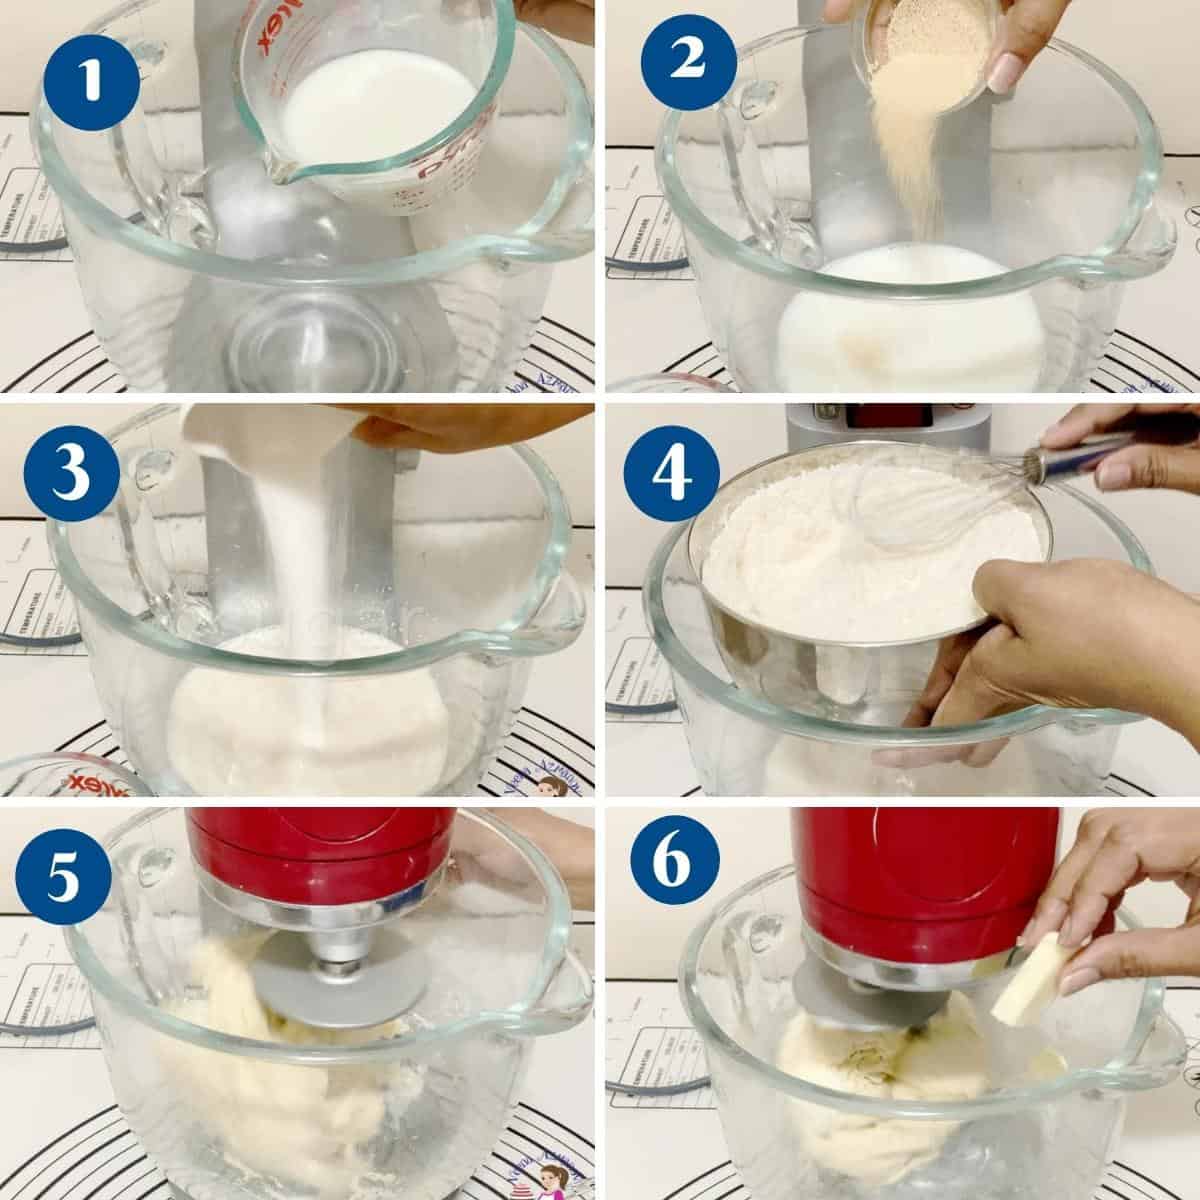
In the bowl of a stand mixer with the dough hook attachment, combine water, milk, and yeast. Add the sugar – combine well.Pro tip – You can let the yeast mixture sit for 3 to 5 minutes to foam up. But, not all varieties of yeast need to be activated.Add salt to the flour, then add the flour to the mixer bowl (see video).Pro tip – It is best to add salt directly to the yeast mixture as it slows the process of fermentation so we add it to the flour.Combine on medium-high speed until all flour is incorporated. You may or may not knead the extra flour for kneading.Pro tip – A good indication that you have enough flour is that the dough leaves the sides of the bowl. Avoid adding too much four as it will make the dough stiff resulting in dense croissantsKnead on medium speed for 2 minutes, until you have a fairly smooth elastic dough.
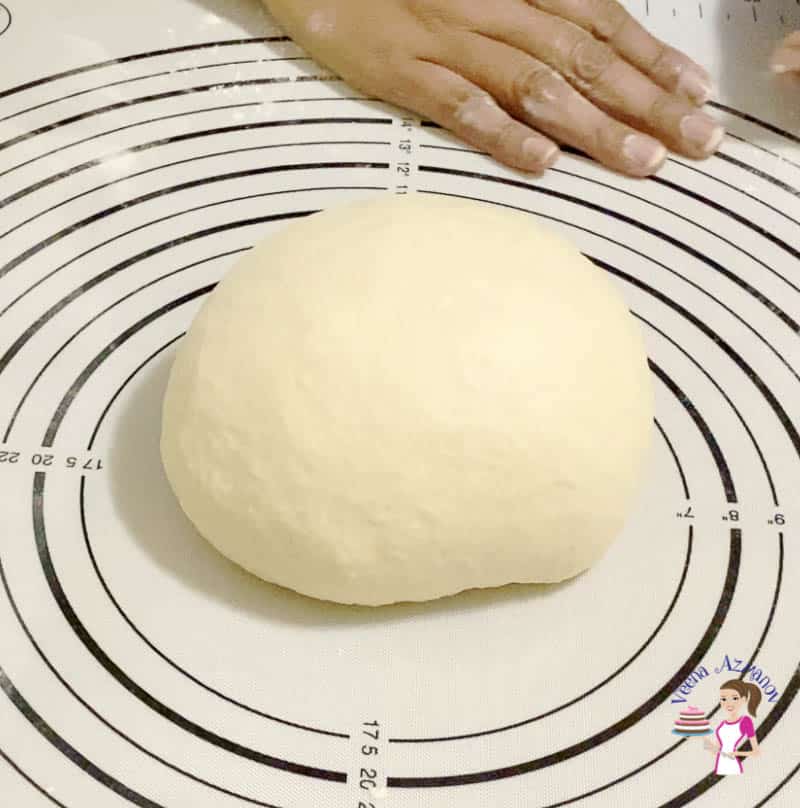
Next, add the room temperature butter, one cube at a time. Once all the butter is in knead for two minutes more.Pro tip – The dough should be soft, smooth, and elastic. Don’t over knead as we will still be laminating and rolling the dough a few more times.Remove the dough from the stand mixer and shape it into a ball. Place in a lightly oiled bowl. Cover and chill in the fridge for 30 minutes.Pro tip – Chilling will help to relax the gluten. The butter in the dough will chill making it easier to work.
Butter block
In the same stand mixer with the paddle attachment (no need to clean the mixer), add the butter.Cream for 30 seconds then, add the flour and cream 30 seconds morePro tip – Cream the butter to ensure there are no lumps. But, don’t over mix as we do not want to whip air into the butter.Butter template – Use an 8-inch square baking pan or a ruler to measure the piece of parchment paper. Fold it so you have an 8-inch square guide (see video).Pro tip – You can also line the 8-inch square baking pan with plastic wrap and create an 8-inch square block of butter.Transfer the butter onto the parchment paper. Use an off-set spatula to spread the butter to an 8-inch square using the guide you created.Fold the paper over the butter – into an 8-inch square. Then, use the rolling pin to spread the butter into the corners (see video).Pro tip – If the butter block is not a proper square you will have gaps in your lamination.Place in the fridge for 20 to 30 minutes.Pro tip – The butter must be chilled but still flexible so that when we roll it spreads rather than cracks into the dough.
Laminate the dough
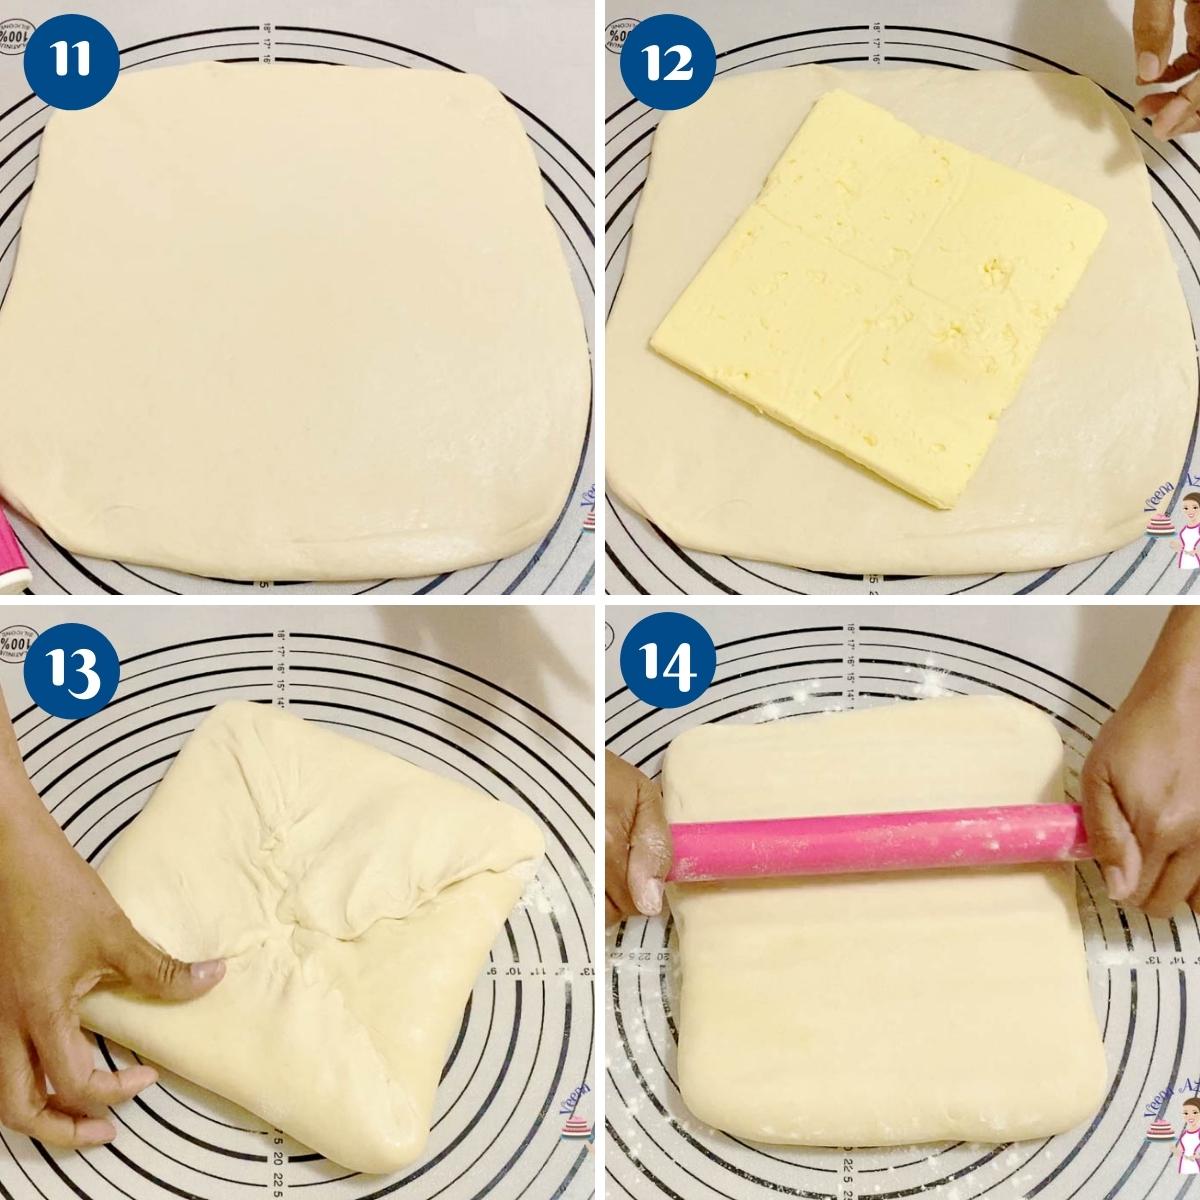
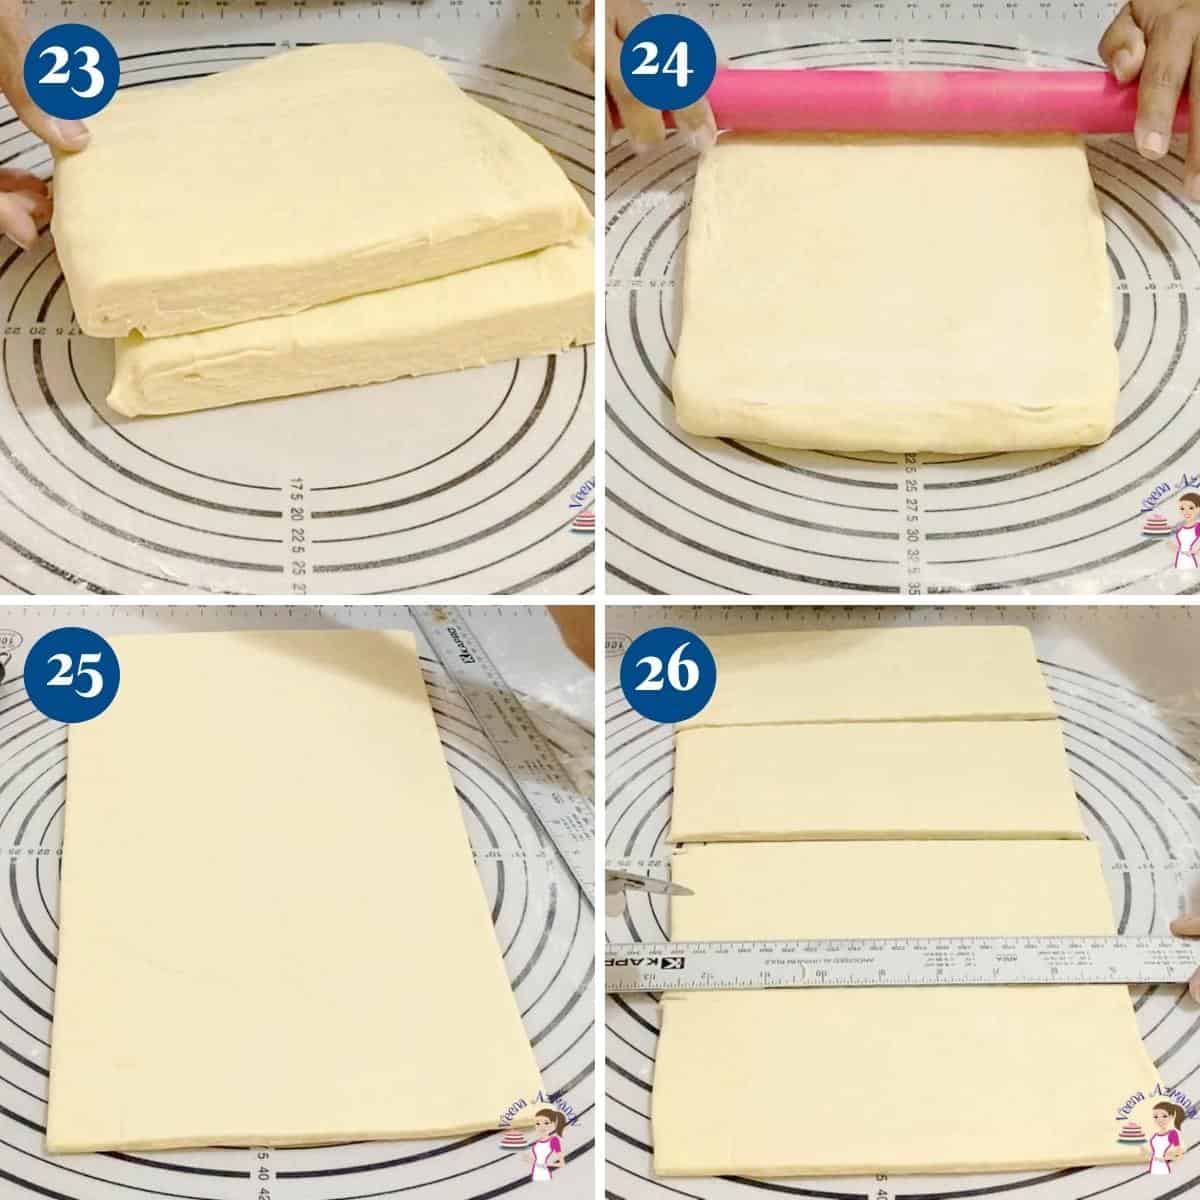
Remove the dough from the fridge onto a lightly floured surface. Roll to a 12 x 12-inch square.Place the chilled butter block diagonally on the square. Then, fold the dough over – seal the edges well (see video).Pro tip – Try to seal the butter in the dough as much as possible so that it does not come out when rolling.
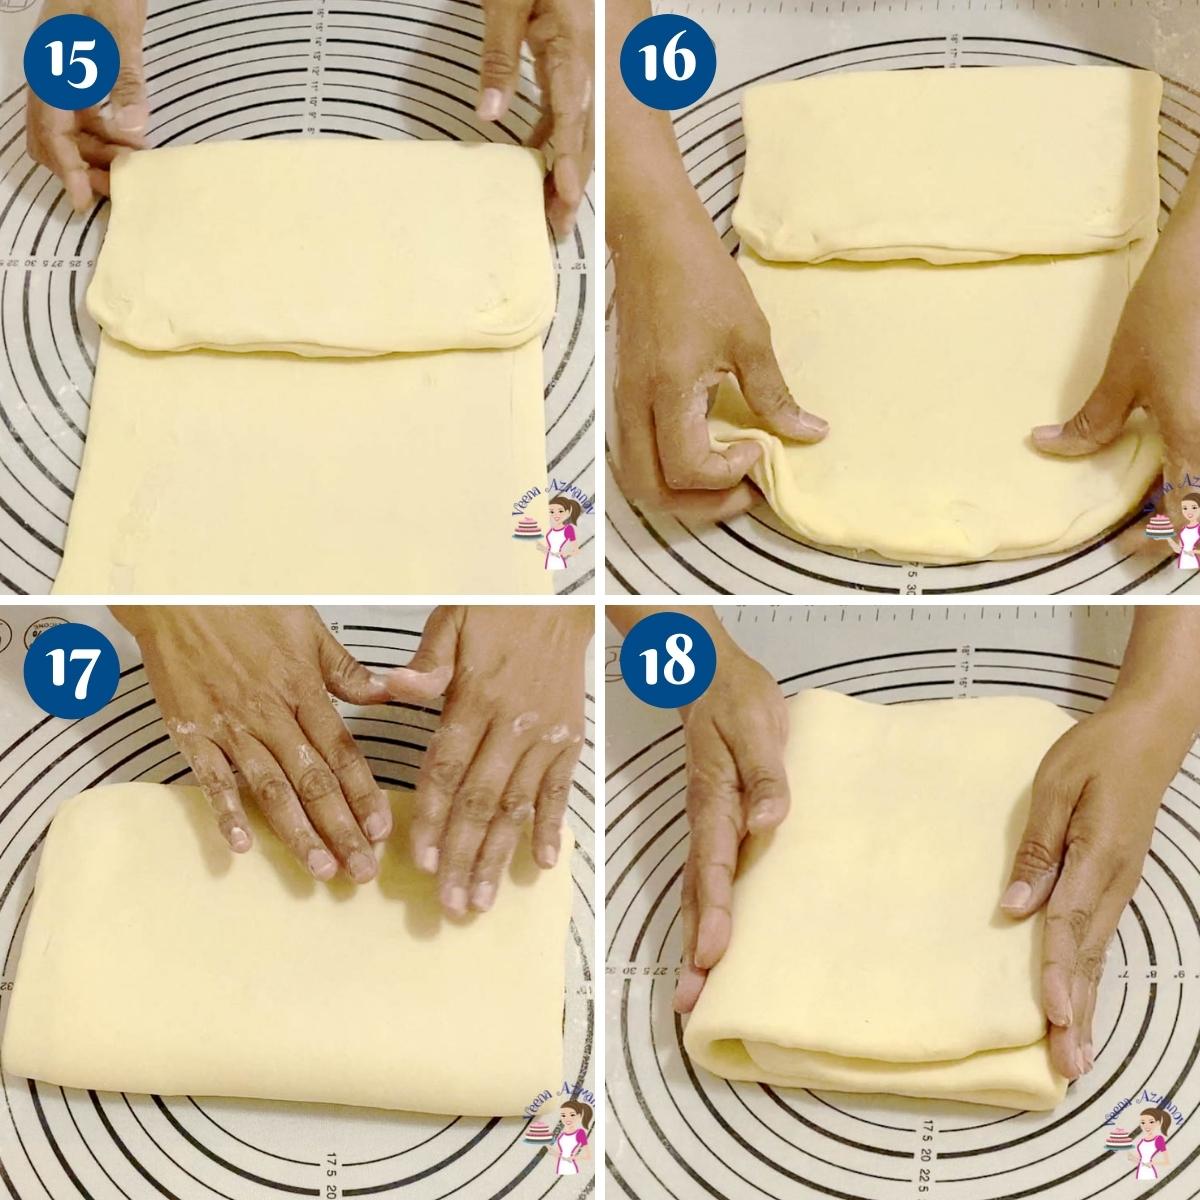
Now, roll in one direction so you have a long 10 x 20-inch rectangle. Dust off excess flour as you go.First fold – Fold the dough lengthways into thirds like a business letter (see video). Wrap and place into the fridge to chill for 30 minutes.Pro tip – Always turn the dough and roll lengthways. This will easier to roll and prevent the folds from opening when rolling.
Second fold – Roll the dough lengthways again with the short side facing you – (see video) to about 10 x 20-inch long again. Fold the dough into thirds again like a business letter (see video). Place in the fridge for 30 minutes if necessary.Pro tip – It is very important that the dough be well chilled before using. Otherwise, the layers will blend ruining all your effort.Third fold – roll the dough again lengthways with the short side facing you to about 10 x 20-inches long. Fold the dough one last time into thirds again like a business letter (see video).Chill in the fridge for an hour or until well chilled. This can be chilled for up to 24 hours.
Measure the dough
Roll the dough onto a lightly floured work surface to 6 x 12-inches. Divide into 2. Place one in the fridge while you work on the second one.Pro tip – Do not use too much flour when rolling and keep a dry brush to dust off excess flour.
Roll the dough into a long rectangle about 10 x 19-inches (we actually need 9 x 18-inches the extra is to cut edges).Pro tip – I always roll a bit extra so I can trim off the edges. This will open the edges and the layers will open during baking.Use a sharp knife to cut the edges on all sides, making sure that you have a 9 x 18-inch rectangle (see video).Pro tip – If you find that the dough is shrinking it means the gluten needs to relax. Let it rest on the counter for 10 minutes or in the fridge.Mark at every 4-inch so you have 4 x 9-inch rectangles. (see video)Pro tip – A standard croissant is 4 x 9-inch but can make smaller or larger ones too.Then, take each rectangle and cut it diagonally, which will give you two triangles (see video). Each triangle makes a croissant (total – 8 croissants).
Shape the croissants
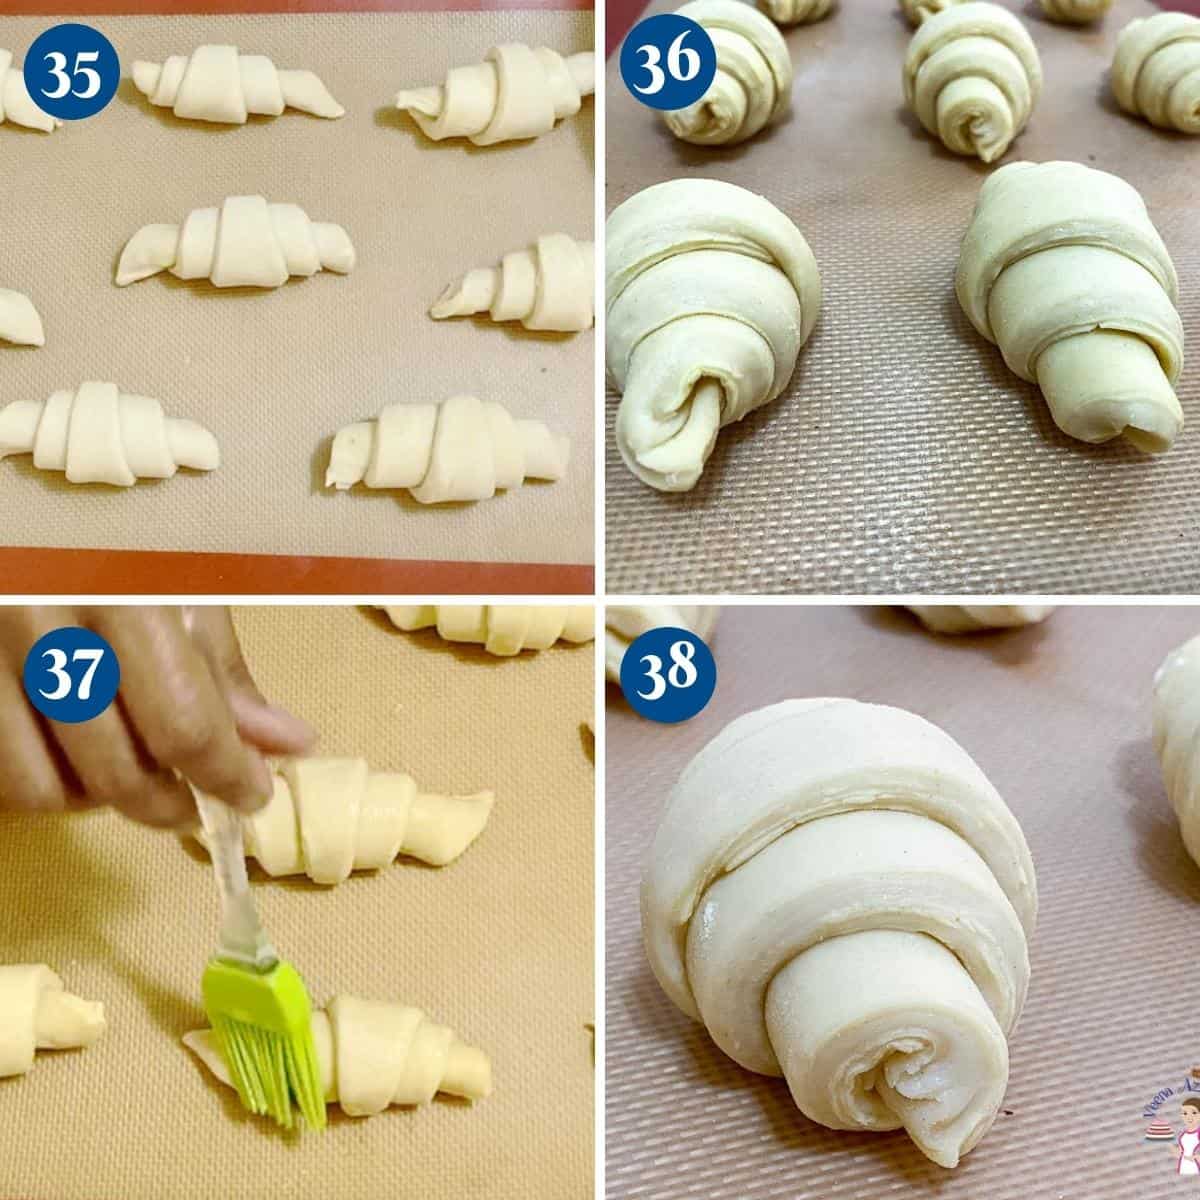
Take each triangle. Stretch it lengthways slightly, cut a slit or notch at the wide end.Pro tip – Do not stretch the dough too hard or you will break/lose those layers. Be gentle.Then, hold the two sides of that slit and roll onto itself until you reach the tip (similar to a jelly roll). (see video)You can bend the two ends towards you to make a curved crescent shape.Alternatively, you can roll without making a slit or notch and keep the two ends straight. (see video)
Proof and bake
Place the croissant on a baking sheet making sure the tips are on the bottom.Pro tip – If the tips are on top they will open, so make sure to tuck them under. If you press slightly they will sit well.Cover and let proof at room temperature for an hour or until almost doubled in size. Then, place it into the fridge for 30 minutes.Pro tip – I find letting the last 30 minutes chill in the fridge works better for homemade baking. You can also cover and let the croissants prove in the fridge overnight for up to 12 hours.
Preheat the oven at 400 F/ 200 C / Gas mark 6. Brush the croissants with egg wash.Pro tip – It is very important that the oven be preheated well for at least 10 minutes. Otherwise, the butter will melt baking a soggy pastry.Bake for 10 minutes, then reduce the temperature to 190 C / 375 F / Gas Mark 5 for 15 minutes more until golden brown.Pro tip – The initial high heat will help the layers open as the butter melts and creates steam. Then, the lower heat will ensure the pastry is baked through before browning too quickly.Remove from the oven – cool on the tray for at least 10 minutes then transfer to wire racks to cool completely.Enjoy!
Tips for success
Ensure the dough is soft – this makes it easier to roll. A stiff dough means you have to work hard to roll it later with the butter. Chill the butter block for only 20 minutes – this means when laminated it will spread between the layers and not break into pieces. Chill the dough between folds, but don’t over-chill. It takes longer to thaw the butter between the layers. After the third fold, I let the dough rest overnight. This is not just because I want to give myself a break, but it also lets the dough rest well. This is the time you can over-chill and it will still be ok.When rolling the dough for croissants, do not roll too thin. Croissants are all about those layers. Commercially made croissants are proofed at room temperature then baked. I like to chill for 30 minutes while my oven is preheating. This helps keep those layers intact. Ensure your oven is preheated for at least 20 minutes before you put the croissants in. Otherwise, the butter will melt and your croissants will be swimming in a pool of butter. Commercially made croissants are brushed with an egg wash made of egg yolks and milk. I find that for my home oven a beaten whole egg works best and prevents overbrowing. This may be different for different ovens.
Frequently asked questions
Troubleshooting
My homemade croissants melted, all the butter has melted – If the butter has melted and the pan has lots of melted butter, it means the oven temperature was too low or the oven was not properly preheated. Ensure your oven is preheated for at least 20 minutes before you put the croissants in.My croissants are too big – If you follow the above measurements you should get a standard croissant that 4-inches wind 6-inches long. You can also make mini croissants by cutting smaller rectangles/ as well. For example 4 x 4-inch squares.My croissants are hard – it is important roll the dough chilled and make sure to not roll it too thin. This is one of the reasons we have measurements. Rolling the dough too thin will fused the layers together so when baked you will have a dense not flaky pastry. My croissants are not flaky? Too many turns will not make more layers but rather destroy the layer. So three folds is good number to fold, followed by cut, shape, proof, and bake.
Thank you for sharing - Save for later