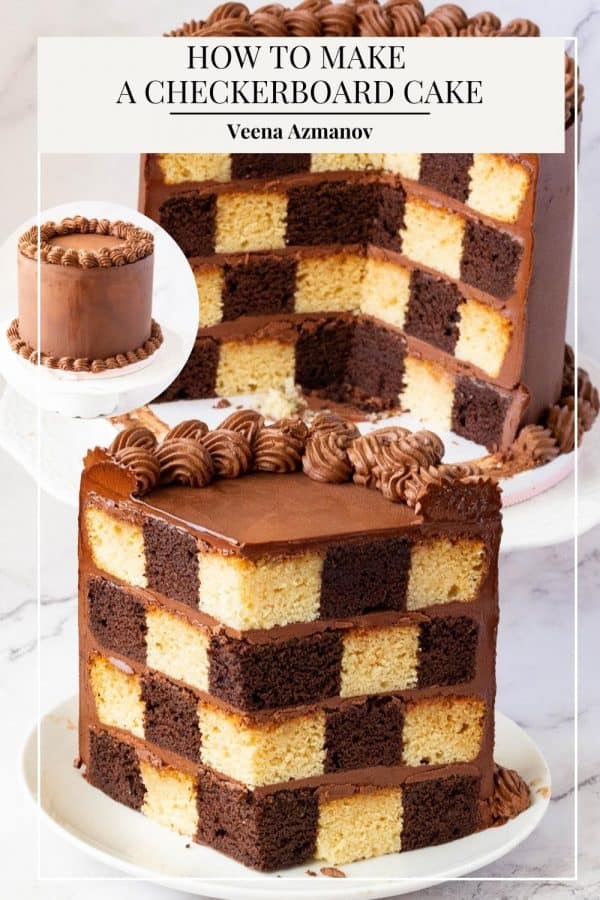
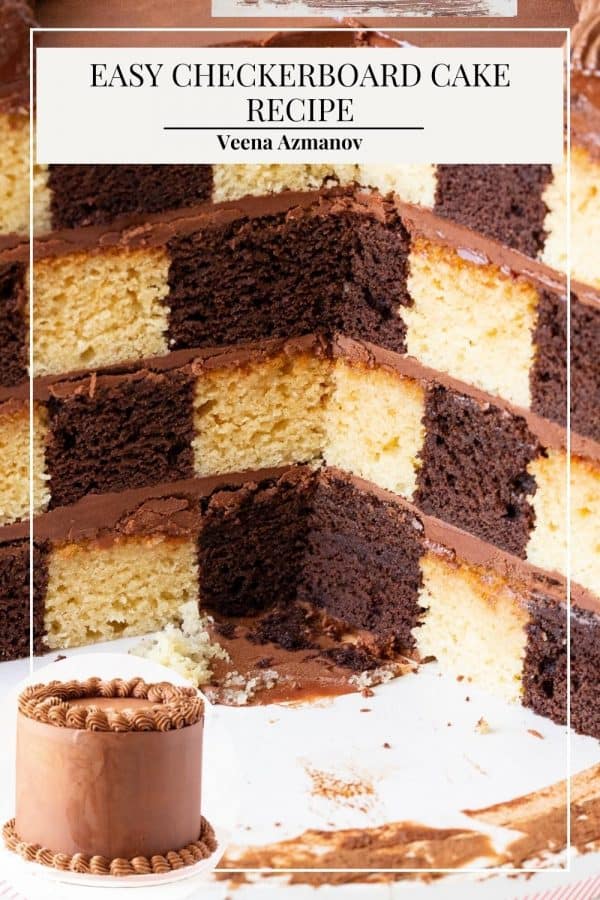
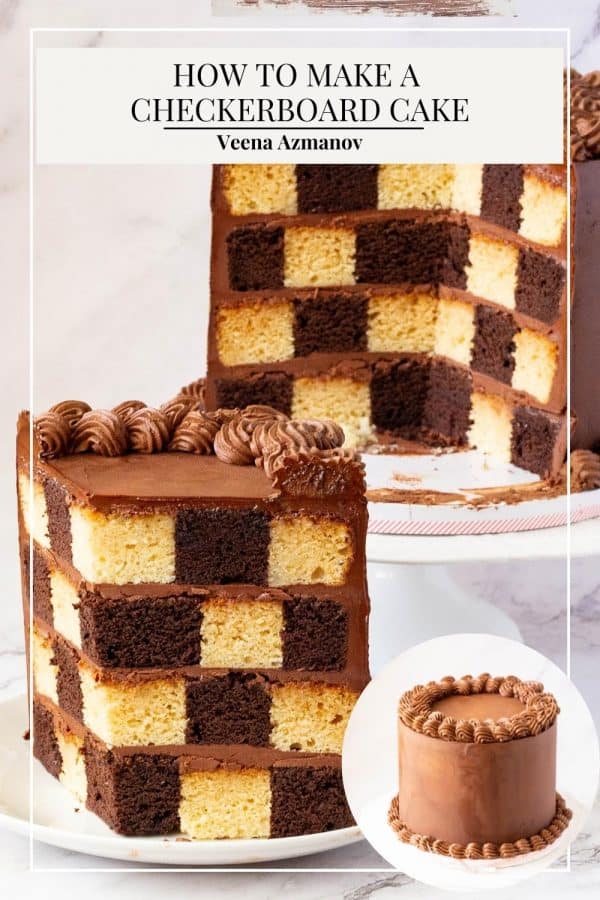
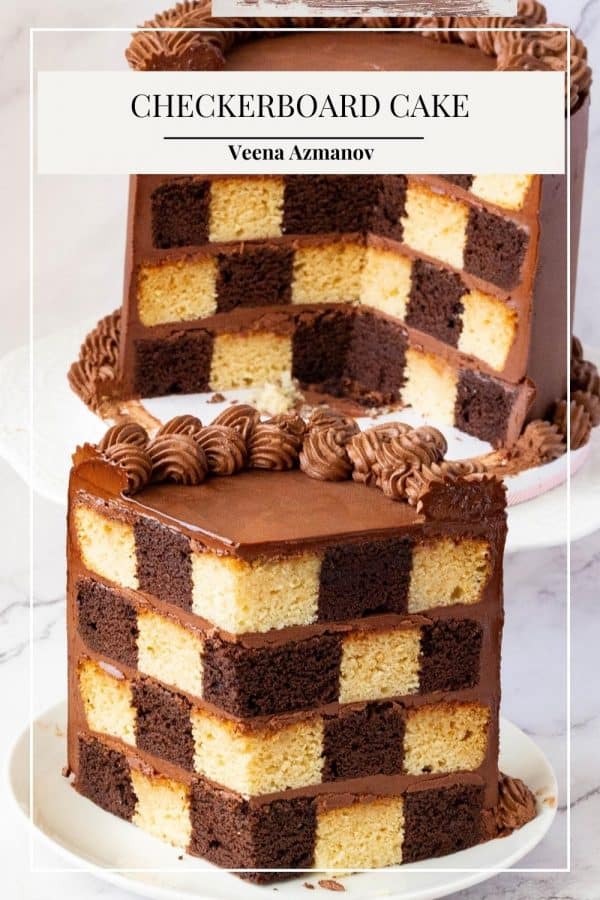
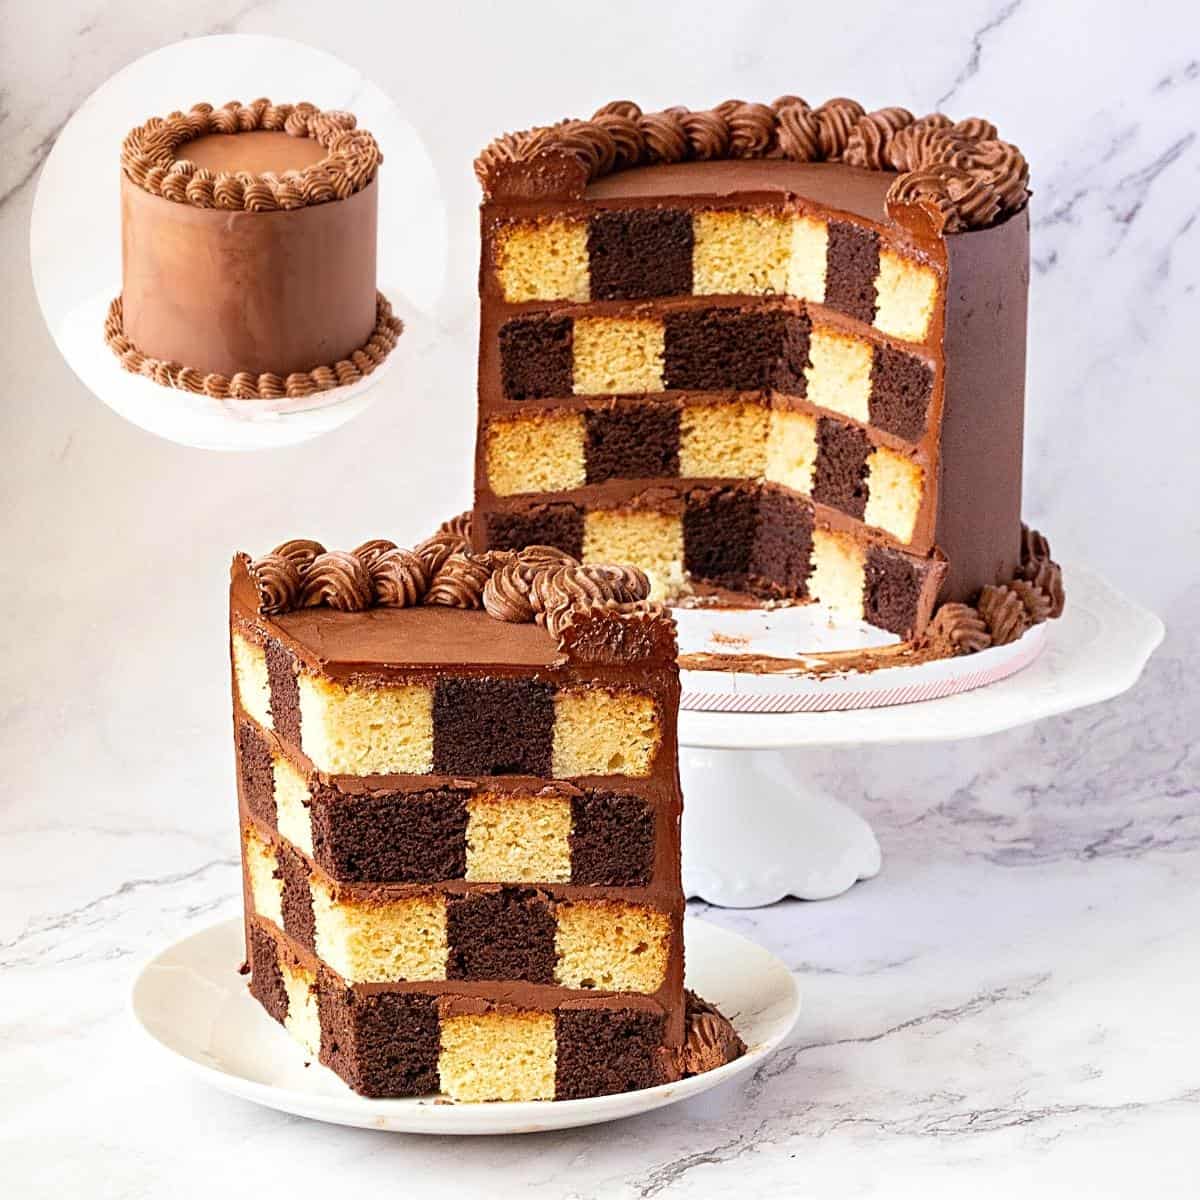
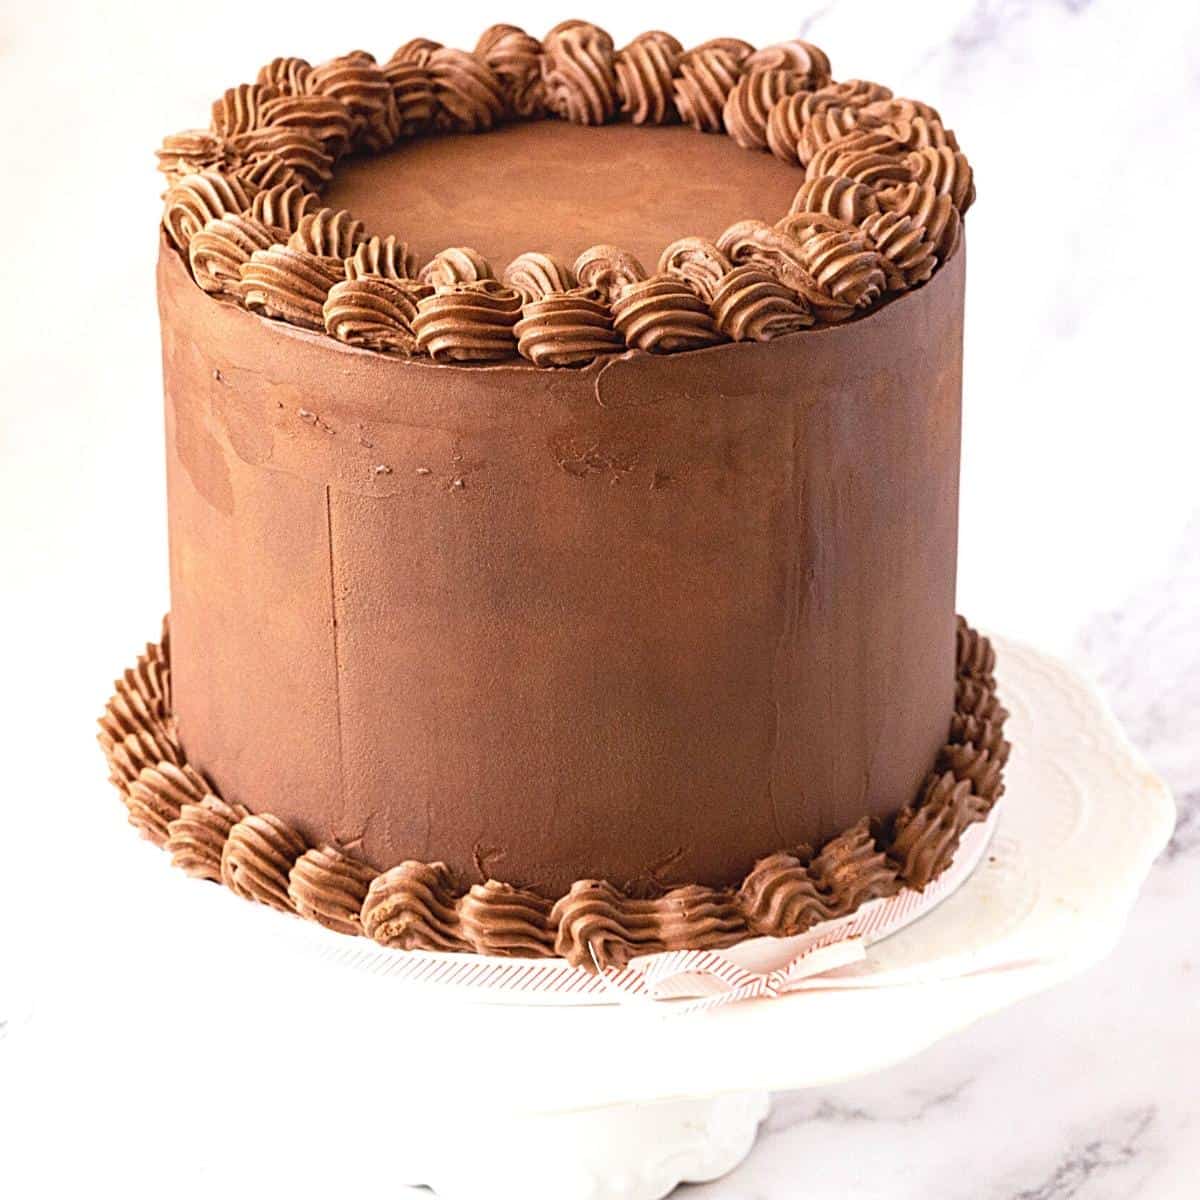
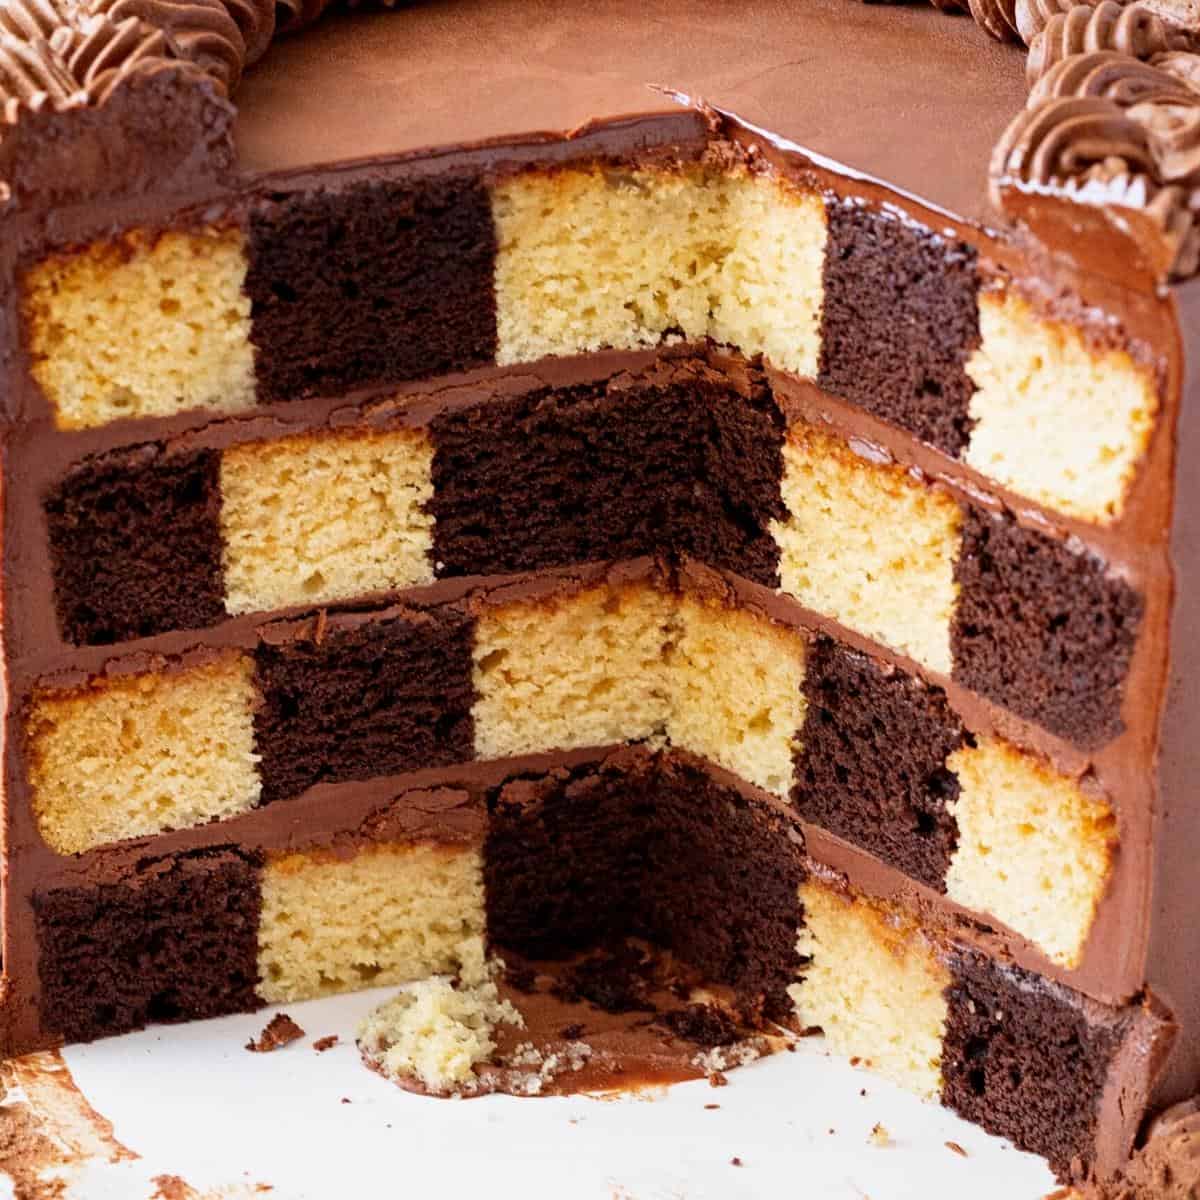
Checkerboard cake is a visually striking dessert that features alternating layers of vanilla and chocolate cake arranged in a checkerboard pattern. This unique cake is created by cutting and interchanging different colored cake layers to create a stunning visual effect when sliced. The popularity of checkerboard cake lies in its playful appearance and versatility. It’s a fun and creative way to showcase different cake flavors, making it a hit at parties and celebrations. Additionally, the checkerboard pattern adds an element of surprise and excitement when the cake is sliced, making it a memorable and impressive dessert. Whether you’re a beginner or experienced baker, checkerboard cake is a delightful treat that never fails to impress!
Why is this the best cake recipe?
Visual Appeal: The checkerboard pattern creates a stunning visual effect that is sure to impress. Flavor Variety: The combination of vanilla and chocolate layers provides a delicious contrast in flavors. Moist and Tender Crumb: The use of sour cream in the batter helps to keep the cake moist and tender. Versatility: This recipe can be easily adapted to different flavors and decorations to suit various occasions. Fun to Make: Creating the checkerboard pattern is a fun and creative baking project that can be enjoyed by both novice and experienced bakers. Great for Celebrations: The unique look of the cake makes it perfect for special occasions and celebrations.
Step-by-step: How to make a checkerboard cake
Cake batter
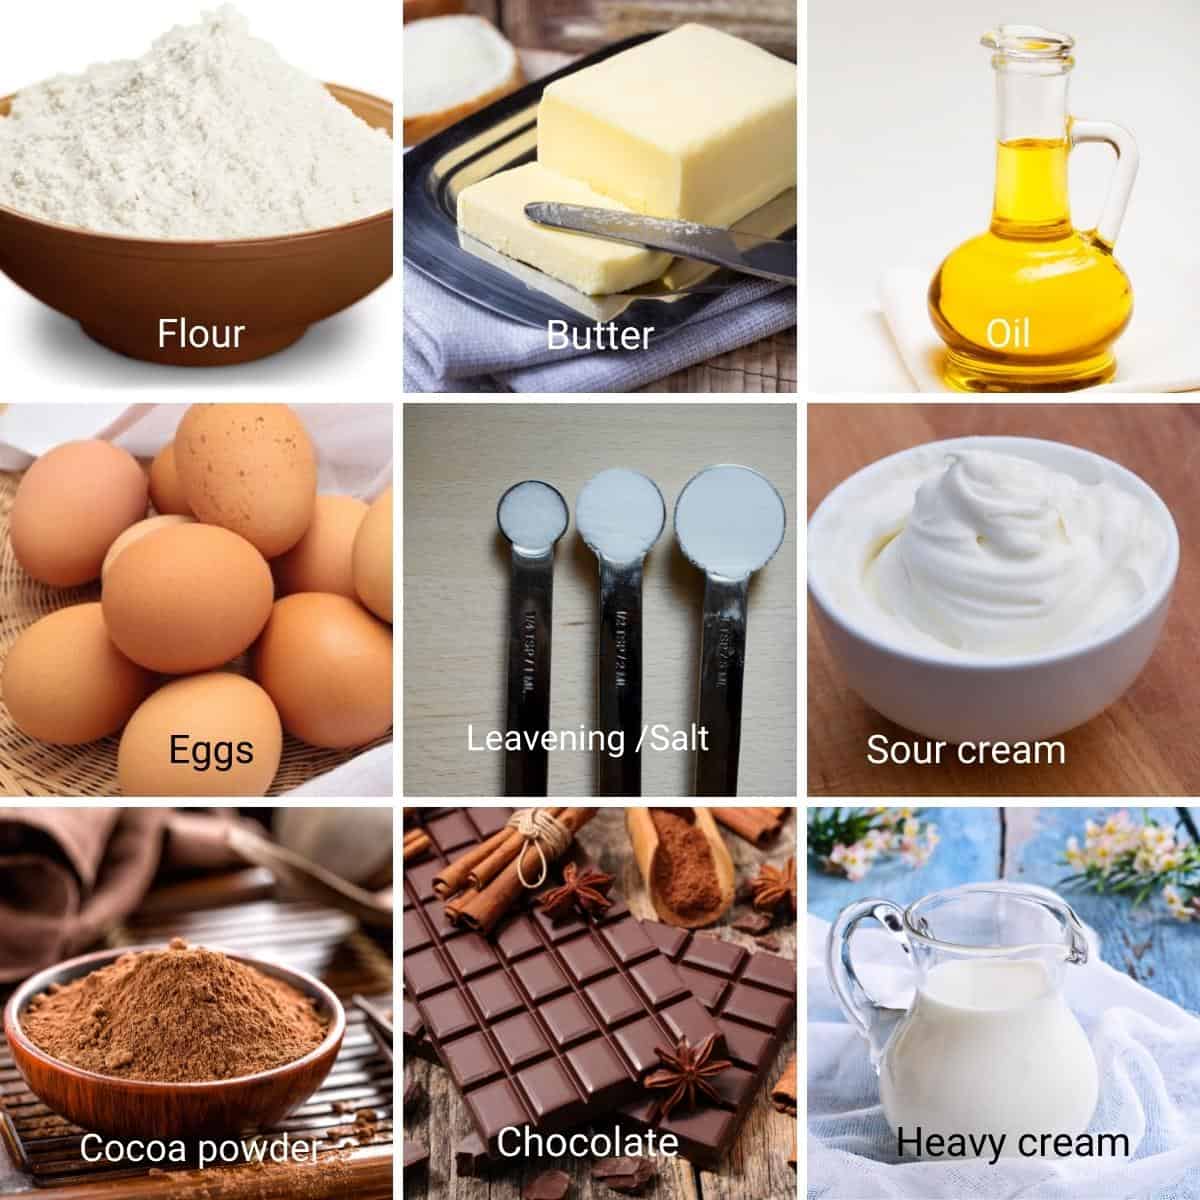
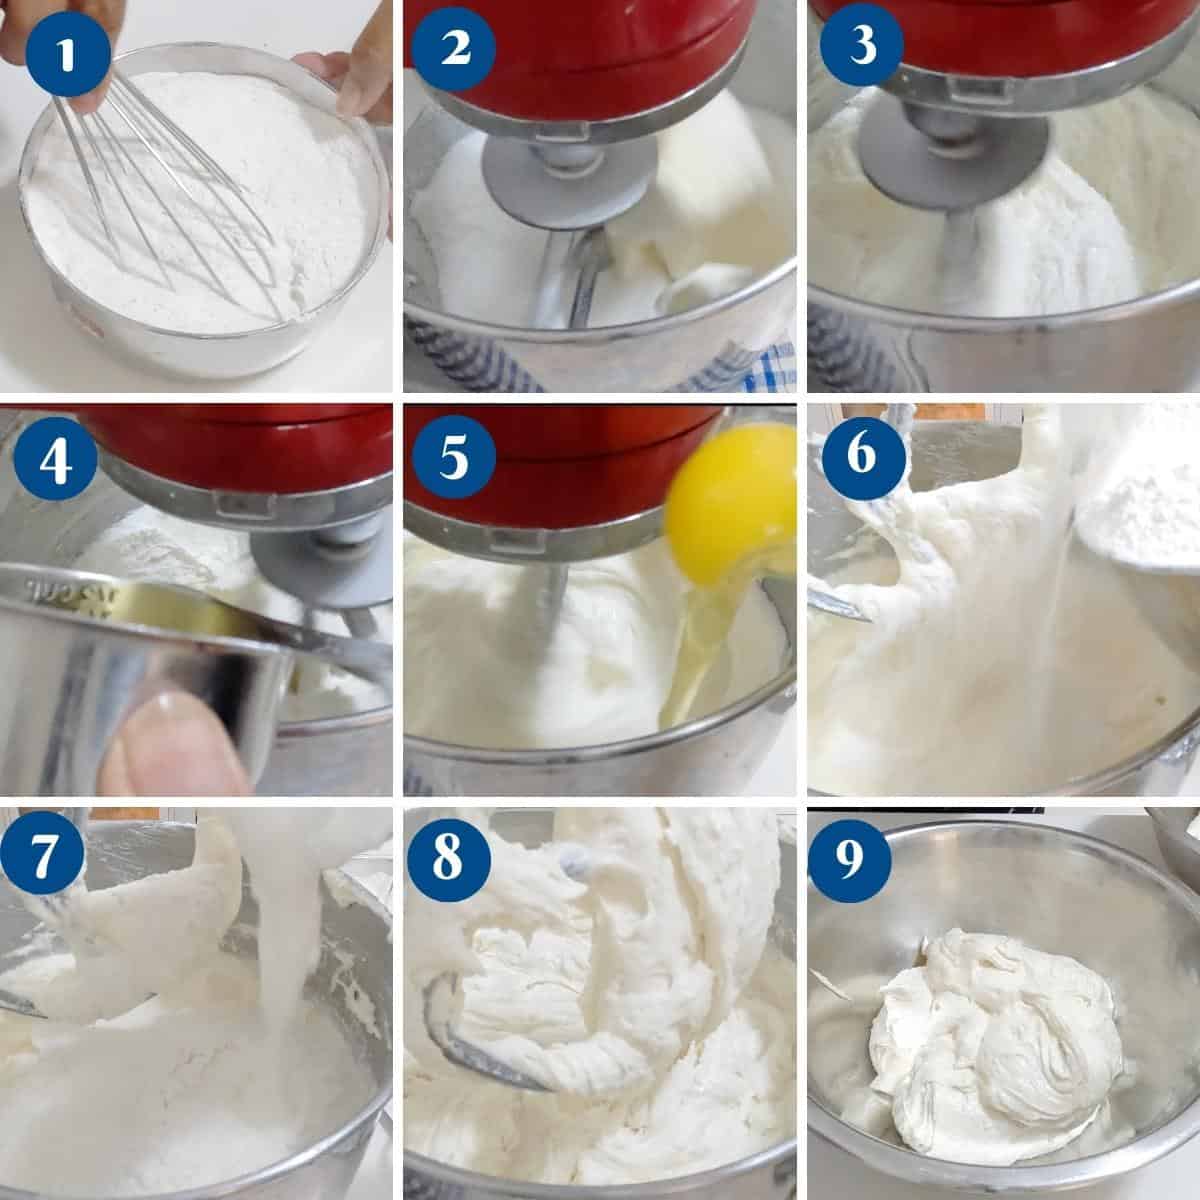
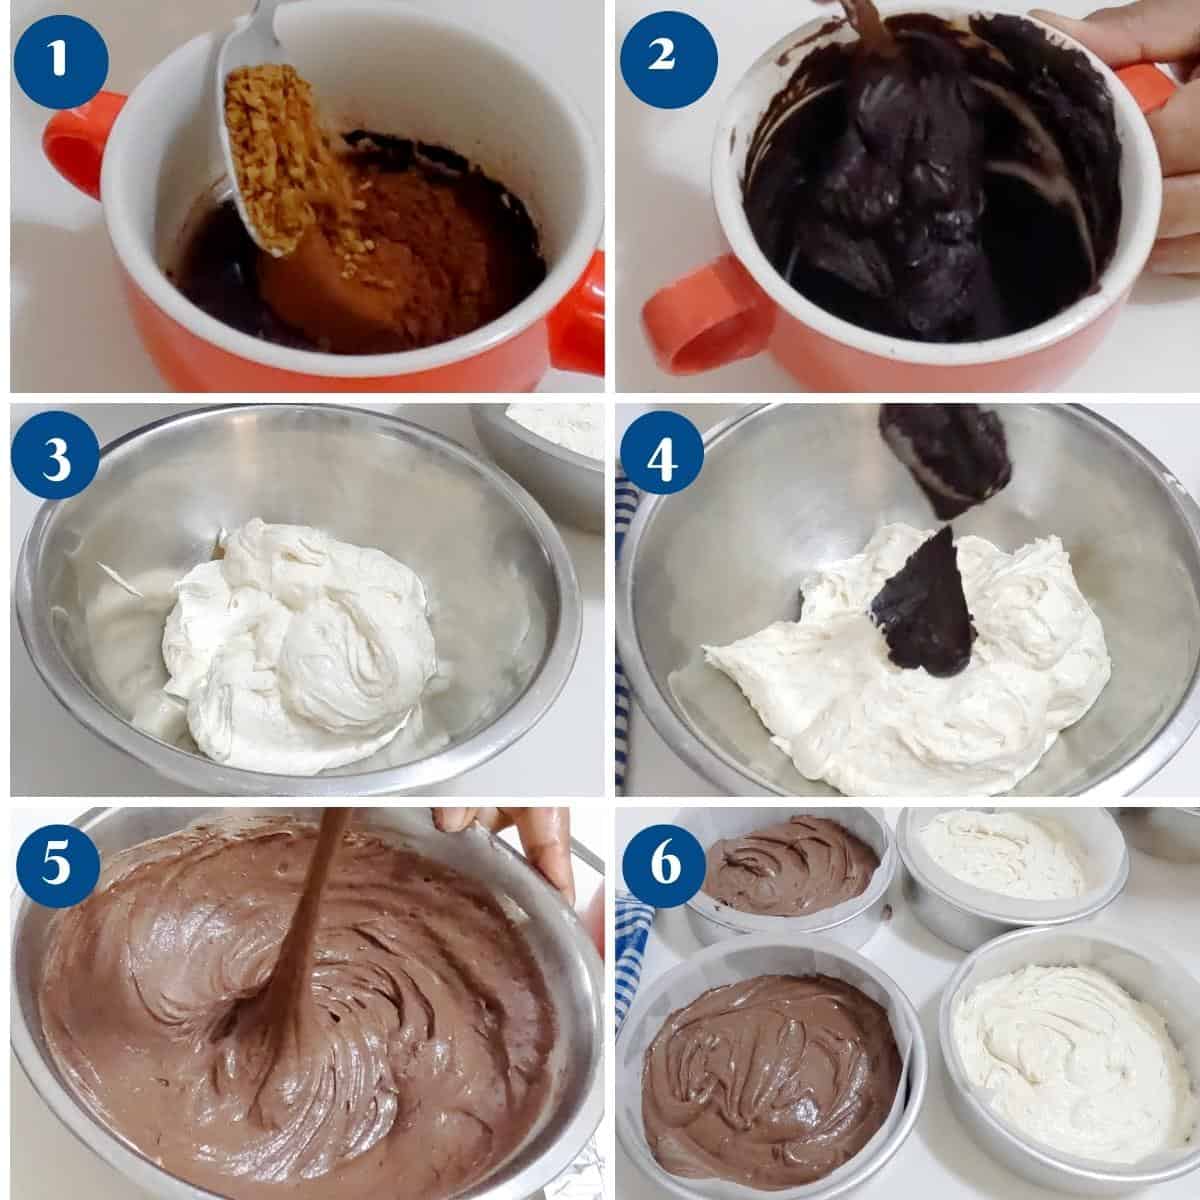
Oven – Preheat the oven to 325°F165°C/ Gas Mark 3 Pans – Grease and line with parchment paper 4 x6-inch round cake pans or 3 x 9-inch round cake pans. Chocolate paste – combine the hot water, cocoa powder, and coffee to make a thick chocolate paste. Set aside to cool while you prepare the batter. Dry ingredients – Sift together flour, baking powder, baking soda, and salt, Set aside. Wet ingredients – In a bowl of a stand mixer with the paddle attachment on medium speed, cream together butter and sugar until light and fluffy. Then, gradually add the oil followed by the eggs one at a time and the vanilla extract.Pro tip – add the eggs one at a time making sure each is well incorporated to prevent it from separating.
Combine – Next, add the flour mixture and sour cream in three batches making sure to combine well but do not overmix. This will be a thick drop consistency batter so do not add more milk or water unless necessary. Pro tip– make sure to scrape the bottom and sides of the bowl to ensure no dry flour is left behind. Divide – Using two similar size bowls divide the batter into two portions. One for the vanilla and one for the chocolate.Pro tip – I like to use two similar bowls and divide the batter approximately. Alternatively, you can also use a scale so I have two equal portions. Vanilla batter – Nothing needs to be done. Divide the vanilla batter between the two prepared baking pans. (2 vanilla cake layers) Chocolate batter – Add the chocolate paste mixture to the second batter. Then divide this batter between the other two prepared baking pans. (2 chocolate cake layers)
Bake – Transfer the pans to the oven and bake for about 25 to 30 minutes or until a toothpick inserted in the center of the cake comes out clean.Pro tip – if necessary rotate the pans in the oven halfway through the baking. Cool – When baked cool in the pan for 10 minutes then invert on a wire rack and cool completely. At least a few hours before frostingPro tip – I prefer to let the cakes cool overnight. Frosting warm cakes will cause the frosting to melt.
Frosting
Chocolate ganache – In a microwave-safe large bowl, heat the chocolate and cream until melted and smooth. Let cool at room temperature overnight or for a few hours in the fridge until set. You want the ganache to set to about peanut consistency.Pro tip – Alternatively you can heat the heavy cream in a saucepan and pour hot cream over the chocolate. Stir until smooth. Then cool until thick. Whipped chocolate ganache – Whip the chilled ganache in a stand mixer with the whisk attachment until light and fluffy. DO NOT OVERWHIP.Pro tip – Overwhiped ganache will become hard. If that happens add one or two tablespoons of hot milk and whip until smooth.
Checkerboard effect
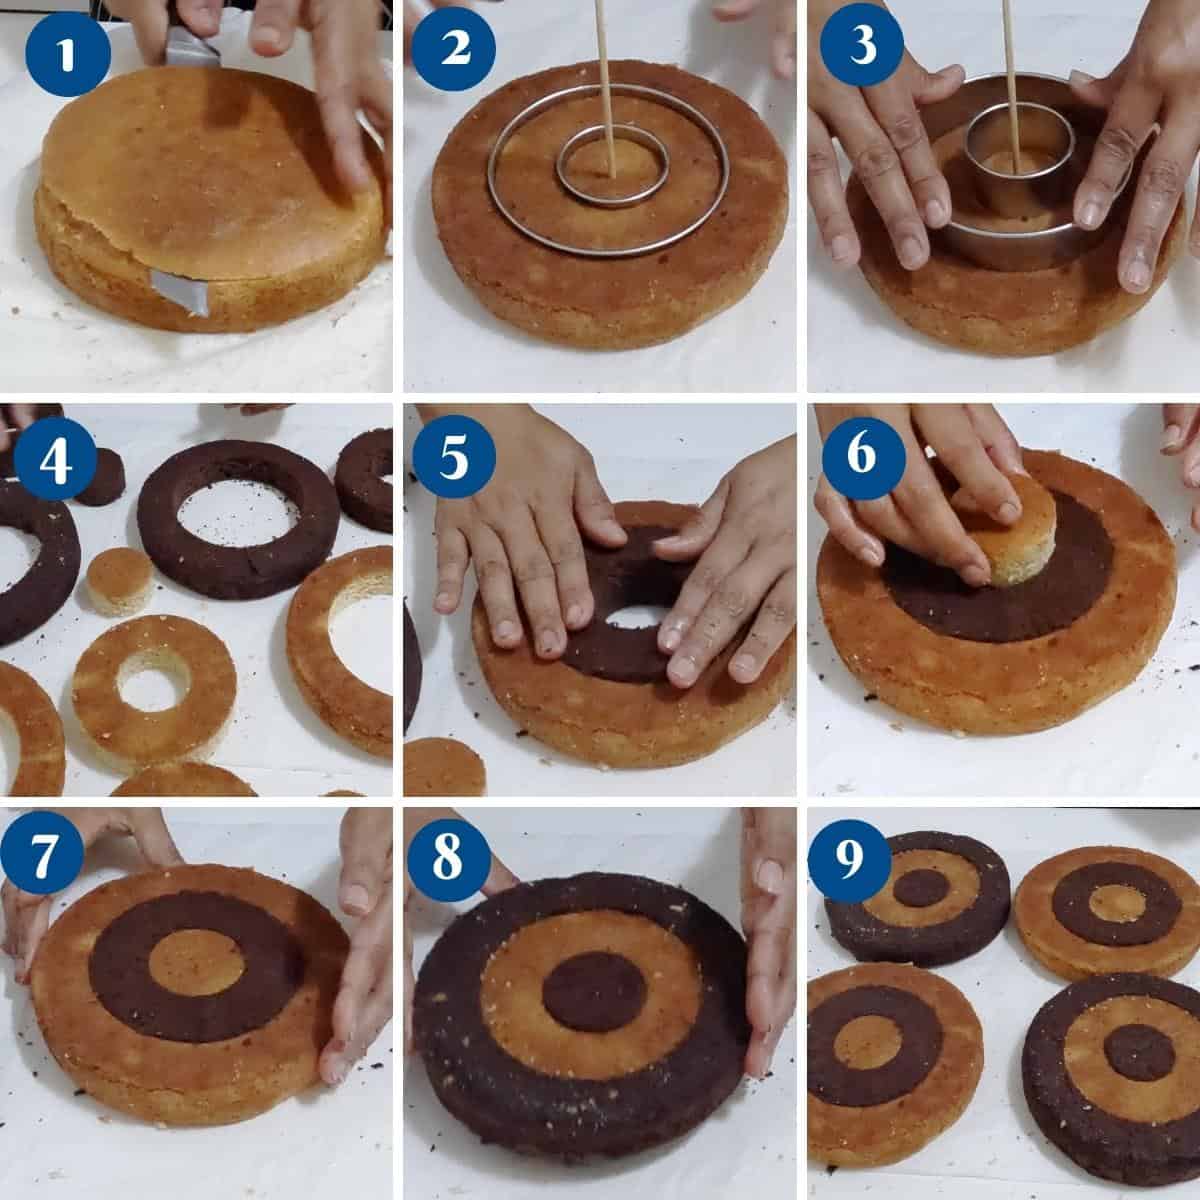
Level – Once cooled, use a bread knife to cut the domes off the cake layers. Cut the circles – For the 7-inch cakes, I used a 5-inch and a 2½-inch cookie cutter. Using the cookie cutter cut each cake layer into 3 rings as shown in the video. Do this with all four cakes.Pro tip – you can also use a small plate, bowl, glass, etc. as a guide to cut the cake into even rings. Arrange the circles Rearrange the cake rings so you have a chocolate ring and a vanilla ring in each cake as shown in the video. Now, do the same with all until you have 4 similar cakes with alternate colors.Pro tip – it is easier to work with two cakes at a time so you can interchange the rings without confusion.
Assemble
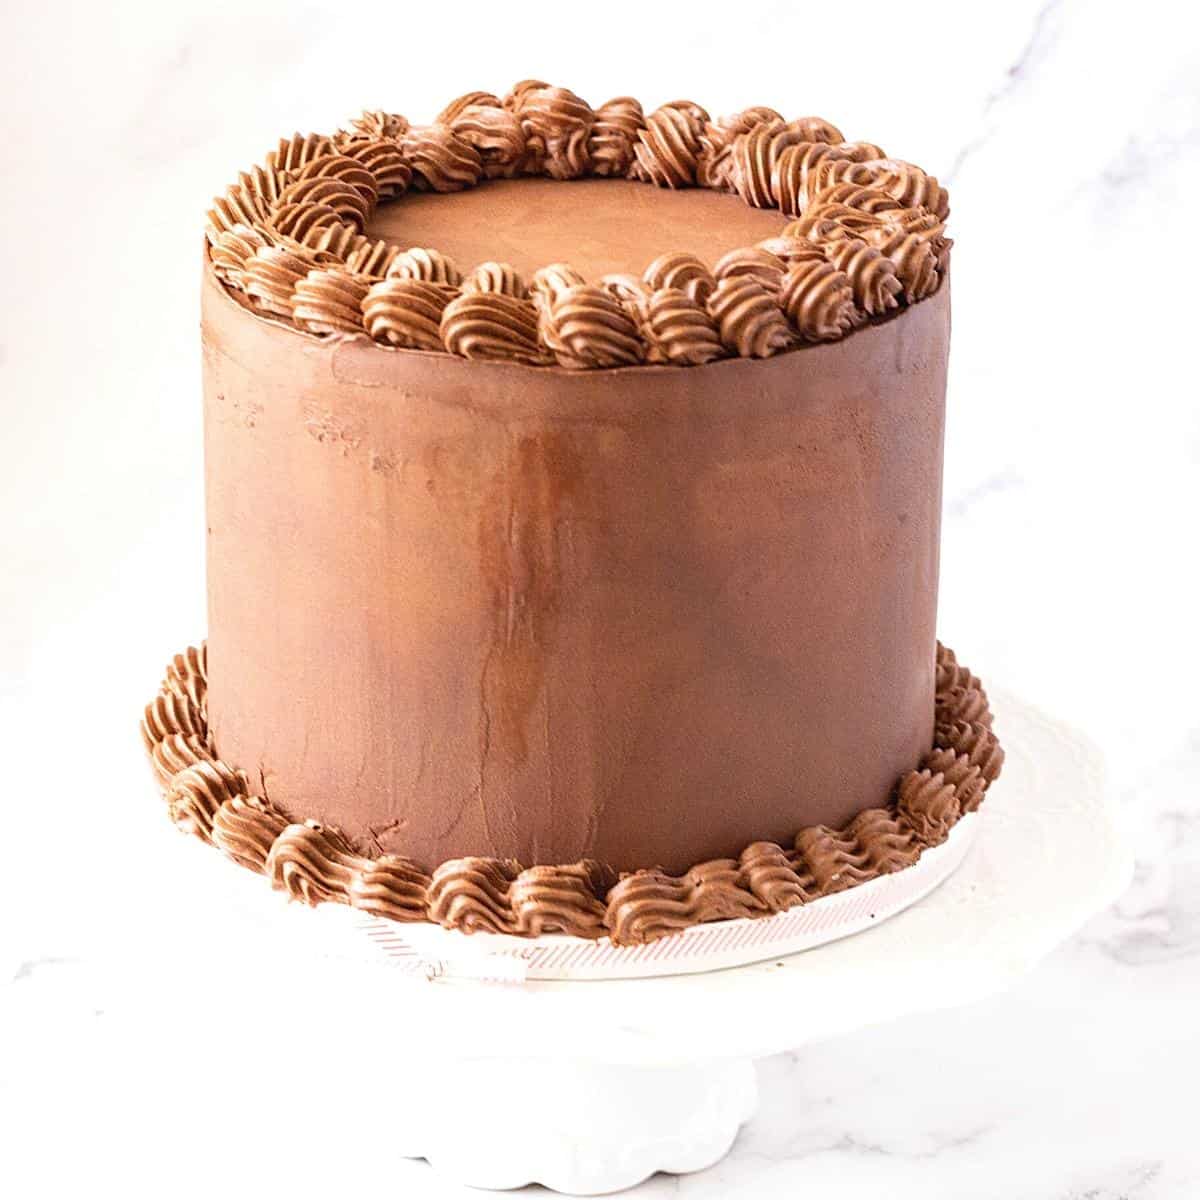
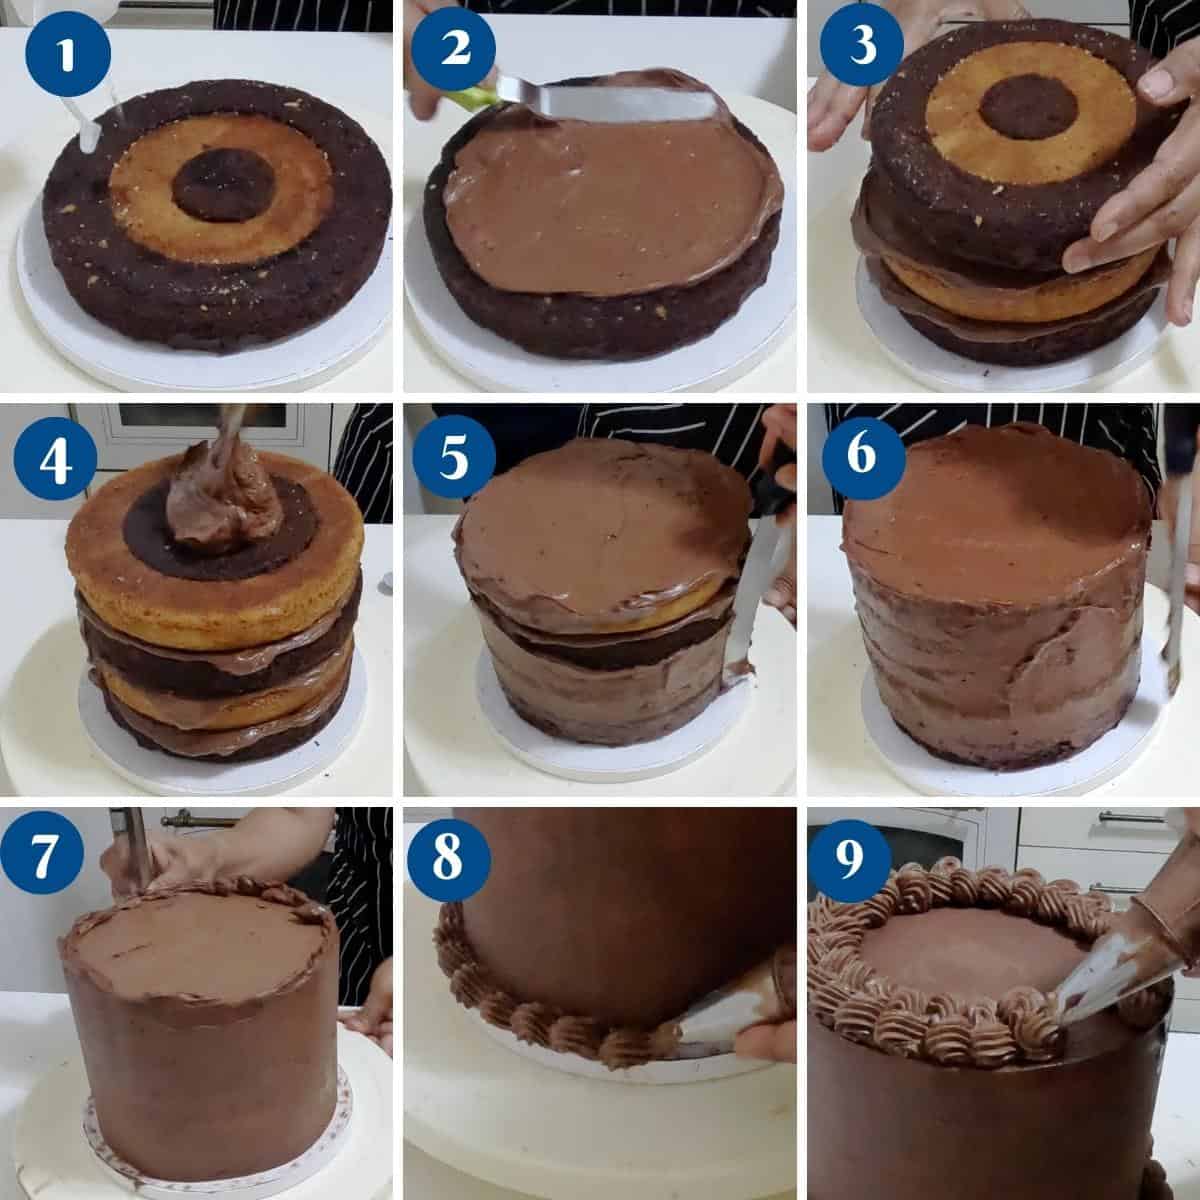
Simple syrup – Brush each layer with the cooled simple syrup.Pro tip – simple syrup is sugar boiled in water until melted and cooled. It helps keep the cakes moist. Stack – Place a cake layer on the cake board or cake stand. Top with a big dollop of ganache spread evenly using a straight-edge spatula. Top the second cake layer on top followed by more ganache until you have used up all the cake layers. Crumb coat – Spread more ganache on the top and sides of the cake with a spatula. Then, place the cake in the fridge for 15 minutes this will prevent the layers from moving while you frost the outside of the cake. Frost – When chilled spread more ganache around and on the top of the cake. Use a cake bench scraper to smooth the sides and an offset spatula for the top. Smooth with a bench scraper as best you can. Borders – Put any remaining frosting in a piping bag and pipe a border around the cake as well as on top of the cake. Garnish with chocolate decorations as desired.
Red Velvet Cake with Cream Cheese Frosting One Bowl Vanilla Cake Raspberry White Chocolate Cake Homemade Vanilla Birthday Cake Recipe Homemade Chocolate Birthday Cake Gluten-Free Chocolate Cake Recipe (Video Recipe)
Creative variations
Neapolitan Style: Use strawberry cake batter in addition to the vanilla and chocolate for a classic Neapolitan flavor combination. Mocha Flavor: Add instant espresso powder to the chocolate batter for a rich mocha flavor. Orange Chocolate: Add orange zest to the chocolate batter and orange extract to the vanilla batter for a chocolate orange flavor combination. Red Velvet Twist: Use a red velvet cake batter instead of the vanilla for a striking red, white, and chocolate checkerboard effect. Rainbow Colors: Use food coloring to dye the vanilla and chocolate batters in different colors for a rainbow checkerboard cake. Matcha Green Tea: Replace some of the flour with matcha green tea powder for a unique flavor and vibrant green color.
Creative ways to serve checkerboard cake
Checkerboard Slices: Slice the cake into wedges to showcase the checkerboard pattern in each slice. Mini Checkerboard Cakes: Use a small round cutter to cut out individual mini checkerboard cakes from the larger cake. Checkerboard Cake Roll: Roll the checkerboard cake with a layer of frosting or whipped cream for a fun twist on a classic cake roll. Individual Checkerboard Cupcakes: Use a small round cutter to cut out the centers of cupcakes, then swap the centers to create a checkerboard effect. Checkerboard Cake Sundae: Top a slice of checkerboard cake with ice cream, chocolate sauce, whipped cream, and sprinkles for a decadent sundae.
Mom’s Vanilla Cake Recipe: A Timeless Classic for Any OccasionCake Decorators Chocolate GanachePerfect Homemade Black FondantFrozen Hot Chocolate DrinkCake Decorators White Chocolate Ganache
Frequently asked questions
Thank you for sharing - Save for later