Have you ever tried coloring black fondant at home? It can be incredibly frustrating, especially if you start with white fondant. Adding black gel food color often results in a moss green shade that’s nowhere near black. Another issue with coloring black fondant is that the final product tends to be too soft due to the excessive gel food color. This makes it difficult to roll out and drape over a cake. No matter how much fondant I have on hand, I find that the best way to achieve true black fondant is to make it from scratch. This method consistently yields a rich black color that is pliable and easy to use without softness problems. That does not mean you can’t color a small batch of your regular fondant black. It can be done, and here are a few tips on how to color homemade fondant.
Why make homemade fondant?
Achieve True Black Color: Homemade black fondant consistently results in a deep, rich black color, unlike the moss green or grey shades often encountered when starting with white fondant and adding black gel color. Control the Consistency: By making black fondant from scratch, you can maintain the desired firmness and pliability, avoiding the overly soft texture that comes from adding too much gel food color. Cost-Effective: Creating your own black fondant can be more economical than purchasing pre-colored fondant, especially if you frequently work with large quantities. Customization: Making fondant at home allows you to tweak the flavor and texture to suit your preferences, ensuring a final product that is not only visually perfect but also tastes great and works well for your specific cake designs.
Ingredients and substitutes
Gelatin—The Gelatin in the recipe is not an option, so do not omit or substitute it with anything else. I believe you can use agar-agar, but I have not tested it out yet. If you do, please leave a comment and let us know the result so we can be as bold as you. Light Corn Syrup – If you can find LCS, you may look for glucose. Glucose is almost similar to light corn syrup but with a thicker consistency, so I’d say –use ¾ cup glucose + ¼ cup water and mix well. This will make the 1 cup of the right consistency you need. Creamer—I prefer to use non-dairy creamer to extend the shelf life of the black fondant. If you plan to use the fondant immediately, you can use fresh whipped cream as well. The sugar content is so high that it works as a preservative. This can be made non-dairy easily by simply replacing the creamer with water and butter with veg shortening.
Step-by-step: Black fondant
Vanilla black fondant
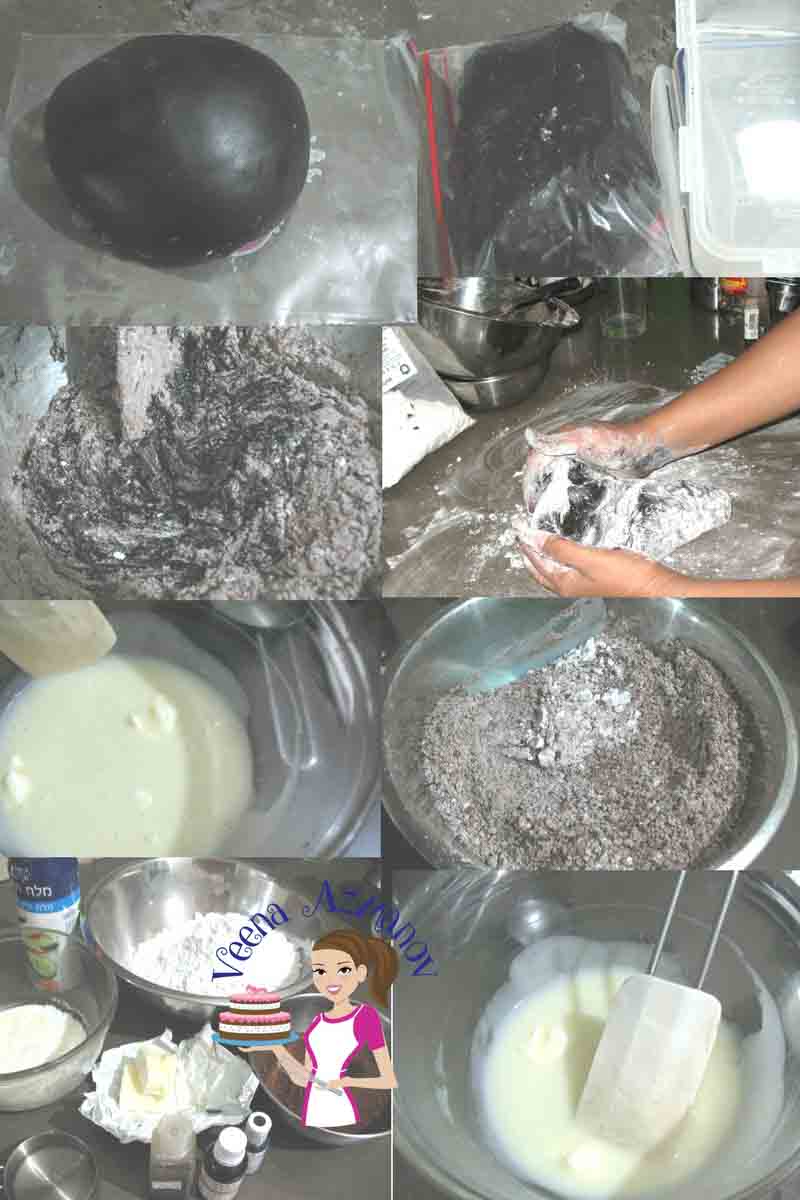
Wet ingredients: Add creamer and gelatin to a microwave-safe bowl or double boiler and let bloom for 2 minutes. Melt in the microwave at 50% power at 30-second intervals until completely dissolved (no grains left). While still warm and working quickly, add Butter/vegetable shortening, light corn syrup, glycerin, and vanilla and black food color. Stir well.Pro tip: The mixture should still be liquid, not set!! If necessary, place in the microwave for 10 seconds. Lastly, add the food coloring gels. Combine: Place powdered sugar in a large bowl. Make a hollow in the center, and pour in the wet ingredients. First, bring it all together with a wooden spoon. Then, transfer it to a work surface dusted with powdered sugar and knead until smooth and pliable. Knead in the butter until smooth.Pro tip: Avoid adding too much powdered sugar, or the rested fondant will be stiff and less elastic later. Wrap and rest: Divide the fondant dough into two discs. Place them in a ziplock bag and a sealed container to prevent drying out. Let them rest in the fridge for 3 hours or overnight on the counter.
Chocolate black fondant
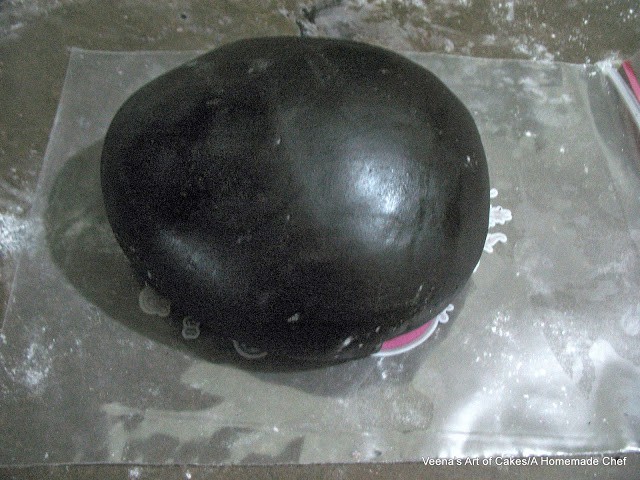
Wet ingredients: Soak the gelatin and water in a bowl for 3 minutes. Then, add the rest of the wet ingredients and combine well. Warm the wet ingredients if necessary to ensure the gelatin does not set. Combine: Place one cup of powdered sugar in a large bowl. Add the cocoa powder and mix well. Make a hollow in the center; pour in all the warm, wet ingredients, and combine well. Then, add the rest of the powdered sugar one cup at a time, kneading gently. Add the vanilla extract, salt, butter and knead some more. Then, add the gel food colors and knead until soft and elastic. Wrap and rest: Divide the fondant dough into two discs. Place them in a ziplock bag and a sealed container to prevent drying out. Let them rest in the fridge for 3 hours or overnight on the counter. Knead and check color: Gel colors will deepen over time. Knead the fondant until smooth and pliable. Check for color—at this point, you should have a dark black fondant. If necessary, add a drop or two more of black gel.
Storing
Black fondant is always a necessity on hand, so make extra. You can store this fondant at room temperature in a cool, dark place for three months. This can be frozen for over six months if sealed well. Be sure to always wrap the fondant well to prevent drying out.
Tips for Success in Making Black Fondant at Home
Use Quality Ingredients: Start with high-quality powdered sugar, gelatin, and glycerin. Quality ingredients ensure a better texture and taste for your fondant. Add Black Food Color Early: Incorporate black gel food color into the liquid ingredients before adding the powdered sugar. This helps achieve an even, deep color without overworking the fondant. Adjust Consistency Carefully: If the fondant is too soft, add small amounts of powdered sugar until you reach the desired firmness. If it’s too stiff, add a tiny bit of water or shortening. Rest the Fondant: Allow the fondant to rest overnight after making it. This helps the color deepen and the texture to stabilize, making it easier to work with. Use Cornstarch or Powdered Sugar for Rolling: When rolling out your fondant, use cornstarch or powdered sugar to prevent sticking without altering the texture too much. Store Properly: Keep your fondant tightly wrapped in plastic wrap and store it in an airtight container at room temperature. Proper storage prevents it from drying out and becoming unusable. Knead Well Before Use: Before rolling out the fondant, knead it well to warm it up and make it more pliable. This ensures a smooth and even covering for your cakes. Work Quickly and Confidently: Fondant can dry out quickly, so work efficiently. Have all your tools and cake ready before you start rolling out the fondant.
How much fondant do I need for my cake?
The chart below is based on 4 inch tall cakes. For shorter height you will need less and tall cakes will obviously need more. Having said that, this presumes rolling fondant closer to 1/8″ thickness. If you roll fondant too thick closer to 1/4″ inch thick you will need more.
Homemade Chocolate Fondant (No Marshmallows) Best EVER Homemade Fondant Homemade Piping Gel Recipe – Two Methods Hearty and Healthy: Slow Cooker Black Bean Soup Recipe! Homemade Vegetarian Fondant
Frequently asked questions
Did you LIKE this recipe? Save it for later. You can find my recipes on Pinterest. Follow me on Facebook, Twitter, and Instagram.Subscribe, and I’ll send you new recipes right to your inbox. Thank you for sharing - Save for later