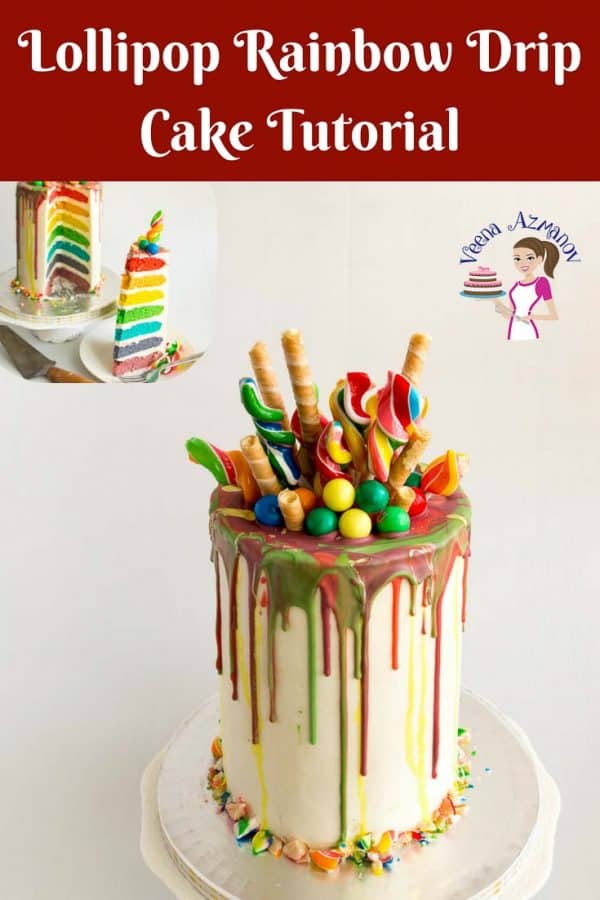
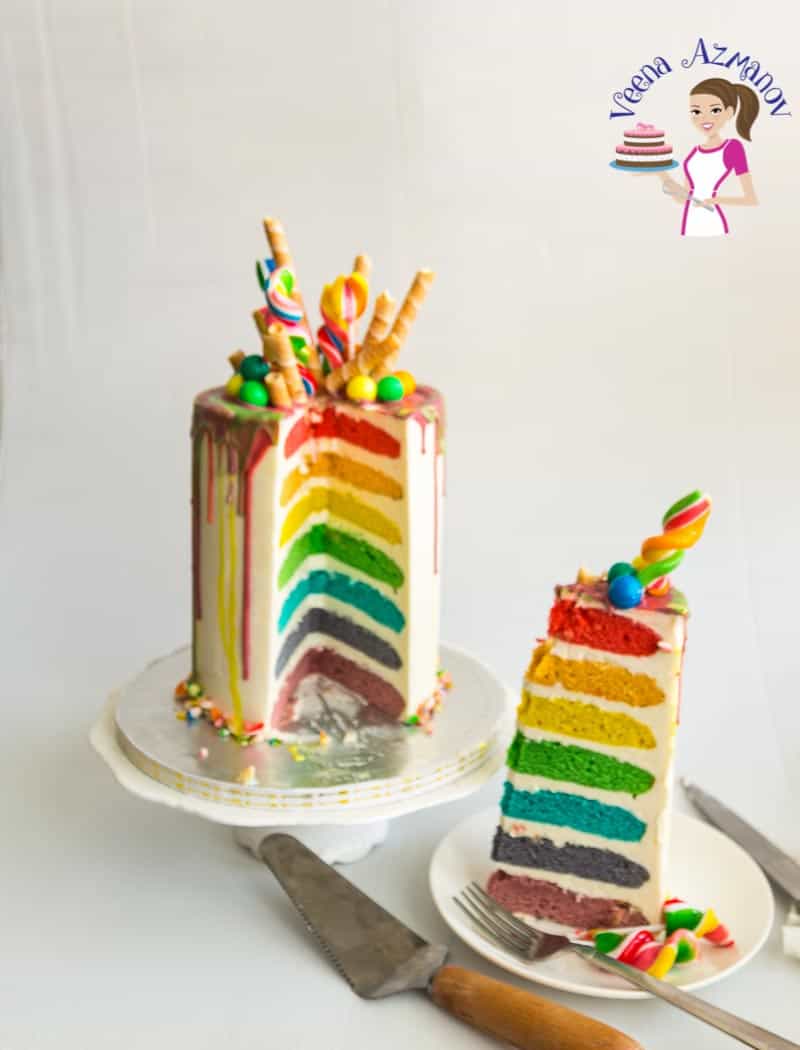
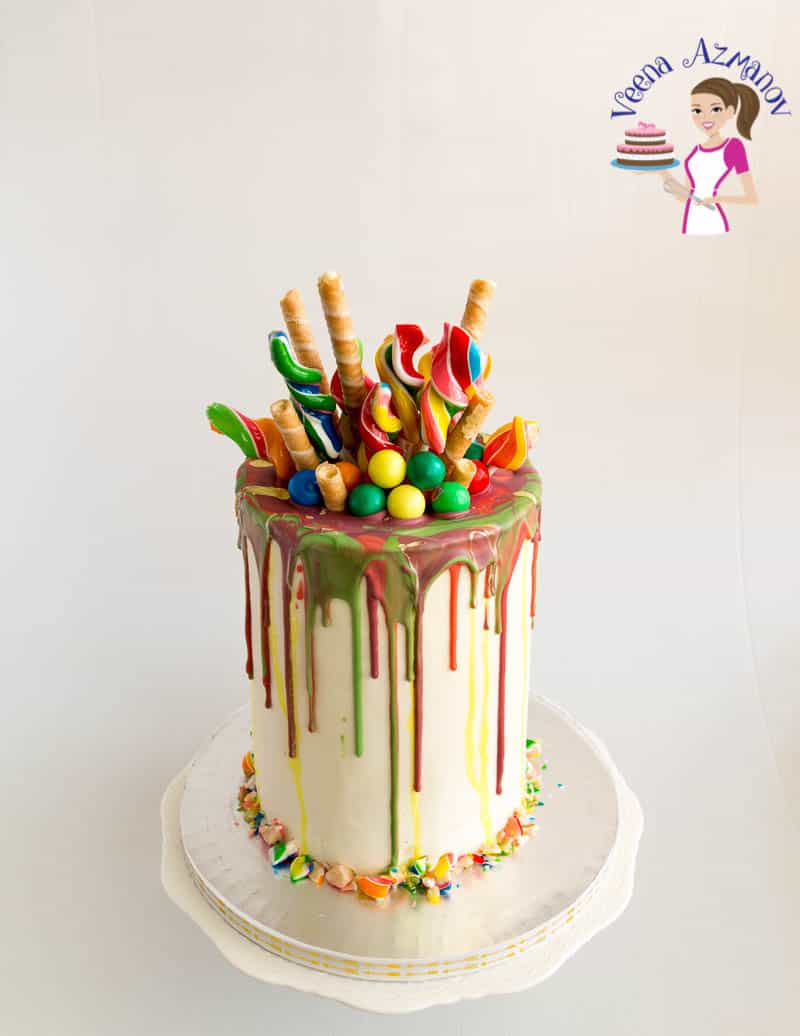
How happy does this cake look? Colorful cakes make me happy, very happy. I made this for my Aadi’s 11th birthday this year. It’s been two months, and I have still not shared this cake with you. Well, I made a video for the recipe and tutorial on decorating this cake. But, by the time I got my act together with editing the images and the video, I realized two months had gone by. The inside of this cake is my rainbow cake. It has been a popular recipe on this blog, but the images on that post were old. Before, I had this awesome camera. So, I thought it was time to give that post a facelift. As a result, my popular rainbow cake recipe now has the inside of this beautiful cake. See how pretty? Colorful on the inside and out. Just like my boy.
My Aadi’s birthday cake
This was one of the three birthday cakes my Aadi had this year. He wanted a colorful drip cake for his birthday and asked me to make a rainbow cake. As planned, he was supposed to share this cake with some of his friends at the bowling alley, but unfortunately, he fell sick the day before his birthday. Of course, we did not want him to celebrate his birthday while sick (and infect others with his virus), so we had to cancel the birthday celebration. Of course, according to the plan, I had already made or was making him his birthday cake. So, we had a beautiful lollipop rainbow drip cake for his birthday, which we celebrated with the family. The bowling alley party was postponed by a week, and I had to make another cake. But this time, instead of making the same cake again, I made the standing emoji cake. I shared a tutorial on how to make an emoji cake with you last week. I mean, how do you make a standing emoji cake? Yeah, I made a gravity-defying cake. My kids…!!
About this cake
This is a quick video. A long, detailed video tutorial can be found in the how-to card below. Don’t forget to subscribe for more videos every week. (Save/Pin)
Cake
As I said above, the cake is my rainbow cake recipe. It’s a very versatile recipe, and you can either make a tall cake with seven layers of the rainbow, as I have done here or divide the batter into six colors. You don’t have to make it tall. You will have a shorter cake if you use a 7-inch cake pan instead of a 6-inch, as I have. As I said, it’s very versatile. If you read the post, I have explained it in detail. And, of course, feel free to ask any questions in the comments section below. I am always happy to answer.
Frosting
I have used my favorite Swiss meringue buttercream for this, but you can also use my velvet American buttercream or Italian meringue buttercream recipe. A word of advice: If you want to make tall layers without any internal support, the secret is good butter-based buttercream. Yes, the buttercream, when chilled in the fridge, helps support the layers, aka the tall cake.
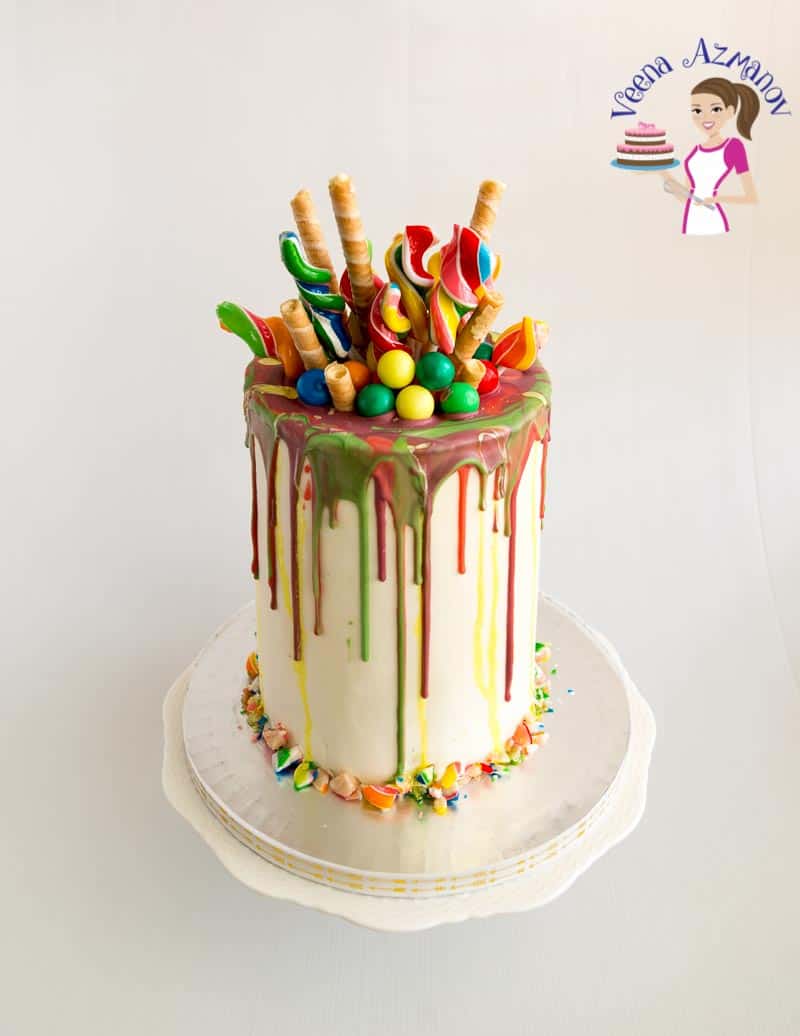
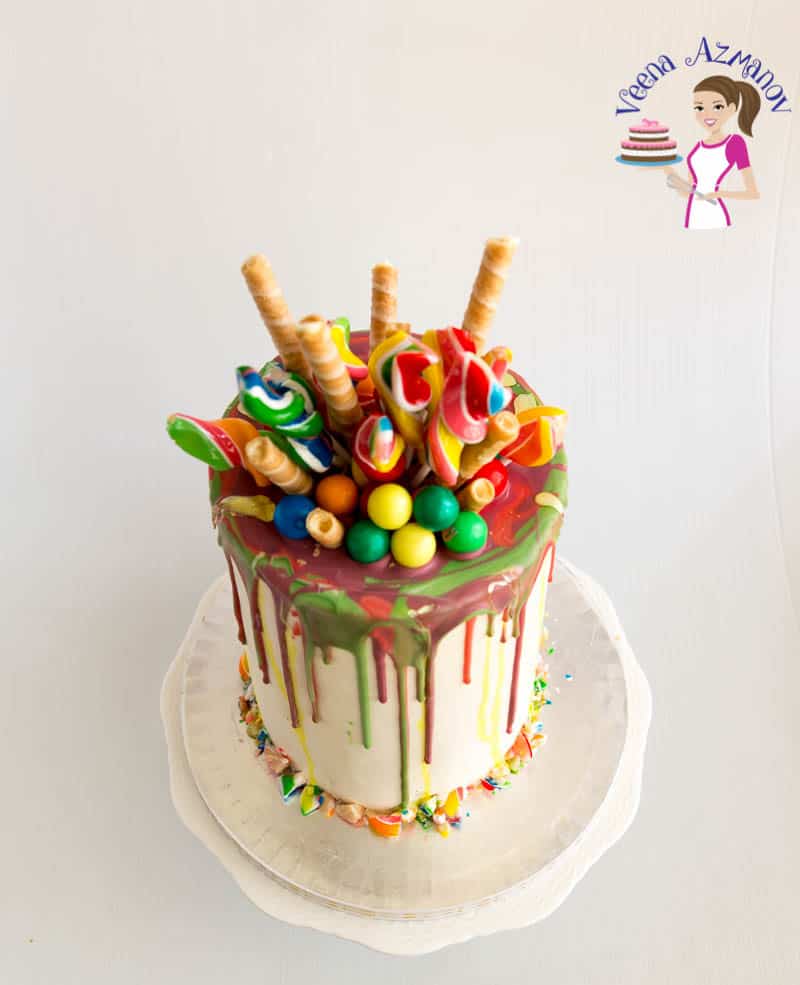
Candy
It’s all about the candy on drip cakes. You can use any candy you want. I have used inexpensive lollipops here only because my son wanted a colorful cake. When I went to buy lollipops, these were the ones with the brightest colors. So I picked them up.
Wafers
You don’t need wafers, but I liked the effect you get when you add these. However, these break easily and soak up any moisture. So, be aware of what is on that cake. If you use any sauce, you will end up with soaked-up wafers.
Chocolate or candy melts
Candy melts work best for drip cakes. Yes, unlike couverture chocolate, which I love very much, candy melts work best if you plan to make a drip cake. Once you have melted the chocolate, add just a little cooking oil or coconut oil to it. This will give you a pouring consistency, as I have shown in the video. My son did not want too much chocolate on this cake, so I used only as little as I needed for the drip. You could use more, but make sure you control the drip. If you add too much melted chocolate on top of the cake, it will continue to drip, which may be more than you need. Tip: I find the best way to control the drip is to pour over the edges first. Then, let the edges set a bit before pouring the rest of the melted chocolate on top. The set edges will prevent any more drips. Does that make sense?
Drip effect without chocolate or candy melts
Do you need to make a drip effect without using candy melts or melted chocolate? Yes, you certainly can—with royal icing. Just make a pouring consistency of royal icing in the colors you need, and then do the same as I have with the candy melts. Also, use the same drying technique to control the drip.
Edible colors / Candy Colors
Ideally, it’s best to buy candy melts in different colors. This would be the most inexpensive method if you don’t work with chocolate much. If you choose to color your chocolate or candy melts, please remember that not all edible food colors suit chocolate or candy melts. You need an oil-based color for chocolate/candy melts. So, not all edible color gels that you use for fondant will work with candy melts. This is why I highly recommend using different-colored candy melts (or making a royal icing drip cake).
Last but not least – doweling the cake
I did not use any dowels in this cake. We wanted tall cake slices with all seven colors on each slice. I know we’ve all been told that we must dowel our cakes. And generally, that is true. Once your cake has reached a height of 4 inches or a maximum of 6 inches tall, it’s time to think about doweling. Why? The weight of the top layers will usually be too much for the bottom layers to sustain, and they will get squashed. Sometimes, you can get away without doweling if:
You have a single-tier cake, which means it does not have weight from the top tiers and does not balance on any bottom tier. Or, you are using a good buttercream recipe; by that, I mean all buttercream. In this case, the Swiss meringue buttercream between layers and around the cake gets stiff, so the layers stay in place.
YouTube Video
As always, my YouTube videos are more detailed than the short version on the blog or Facebook. Don’t forget to subscribe for more videos every week. Well, that’s just about everything you need to know about making a drip cake, lollipop drip cake, rainbow drip cake. SAVE THIS RECIPE ON PINTEREST FOR LATER. TRIED MY RECIPE? SHARE IT WITH ME, PLEASE.Share a picture of your work with me by uploading an image here below my image on this board. You can also find a collection of my tutorials and recipes here on Pinterest. Thank you for sharing - Save for later