With the explosion of home baking in recent months, you may wonder what the differences are between bread made with active dry yeast and those made with sourdough. Is one better than the other? The answer lies in the process of fermentation. Sourdough is more flavorful and nutritious than quick bread with active dry yeast. Still, it can also be better for crafting complex and innovative loaves with a unique texture and robust aroma. While it’s possible to use store-bought sourdough bread, making your sourdough challah adds a unique flavor and texture to your dishes. If you have the time and resources, we highly recommend trying your hand at making your sourdough challah.
Why is this sourdough recipe the best for challah?
The secret lies in the natural fermentation process that occurs when using sourdough. As the starter ferments, it produces lactic acid and acetic acid, contributing to sourdough bread’s distinct flavor profile. These acids add a pleasant tang and help break down the gluten in the dough, resulting in a lighter and more easily digestible bread. But what sets this sourdough recipe apart from others? It’s all about the technique. This recipe utilizes a long fermentation period, allowing the sourdough starter to develop and work its magic fully. The longer fermentation not only enhances the flavor but also improves the overall texture of the challah, giving it a delightful chewiness while still maintaining a soft and tender crumb. Additionally, sourdough in this recipe provides a natural leavening agent, eliminating the need for commercial yeast. This adds depth of flavor and makes the bread more suitable for those with yeast sensitivities or allergies. With sourdough, you can enjoy a homemade challah that is not only delicious but also healthier and easier on the digestive system. So, if you want to elevate your challah bread to new heights, this sourdough recipe is the way to go. Its unique flavor, improved texture, and natural leavening make it a standout choice. But before we delve into the ingredients and substitutes, let’s take a closer look at the step-by-step process to ensure you can confidently bake the perfect sourdough challah.
Ingredients and substitutes
The star of the show, of course, is the sourdough starter. Its unique properties and flavor profile significantly contribute to the overall taste and texture of the challah. However, if you don’t have a sourdough starter or prefer not to use one. In that case, consider incorporating a small amount of apple cider vinegar or lemon juice into a regular yeasted bread recipe to mimic some of the tanginess that sourdough provides. For the flour component, the recipe suggests all-purpose flour or bread flour. Both will yield excellent results, but if you want to experiment, you could try using whole wheat flour or a combination of whole wheat and all-purpose flour. Remember that whole wheat flour absorbs more liquid, so you might need to adjust the hydration accordingly. Next up is the sweetener. While traditional challah recipes often call for honey, this sourdough version allows for some sweet flexibility. If honey isn’t your go-to sweetener, substitute it with alternatives like maple syrup, agave nectar, or granulated sugar. The choice is yours, and it’s all about finding the flavor profile that appeals to you. Regarding oil or fat, the recipe recommends using a neutral oil like vegetable or canola oil. However, you can get creative here too. Use olive oil for a subtle fruity flavor or melted butter for extra richness. These substitutions can lend a different character to your challah, enhancing its overall taste and aroma. Lastly, remember the eggs. They play a crucial role in contributing to the challah’s golden hue and tender texture. If you’re allergic to eggs or follow a vegan diet, you can opt for an egg substitute like mashed bananas, applesauce, or a commercially available egg replacer. While the texture might differ slightly, these substitutes can create a delicious and satisfying loaf.
Step-by-step: Sourdough challah bread
Autolyze – Stir the water, eggs, active sourdough starter, and flour in a stand mixer bowl. Cover the bowl and leave to rest for 60 minutes.Pro tip – Autolyze will help strengthen the gluten formation on the dough.
Knead – Next, add the oil, honey, and salt. Knead the dough with a dough hook attachment on medium speed for 10 to 12 minutes. It should become smoother and more elastic.Pro tip – You can also knead by hand on a lightly floured surface for 12 to 15 minutes. If it tries to stick to your hands or the countertop, sprinkle just a smidge more flour. Bulk ferment – Place your kneaded dough in a lightly oiled bowl, cover it with a damp cloth, and let it rest at room temperature for 4-8 hours. It should nearly double in size.Pro tip – The dough can be slowly fermented in the fridge for up to 24 hours.
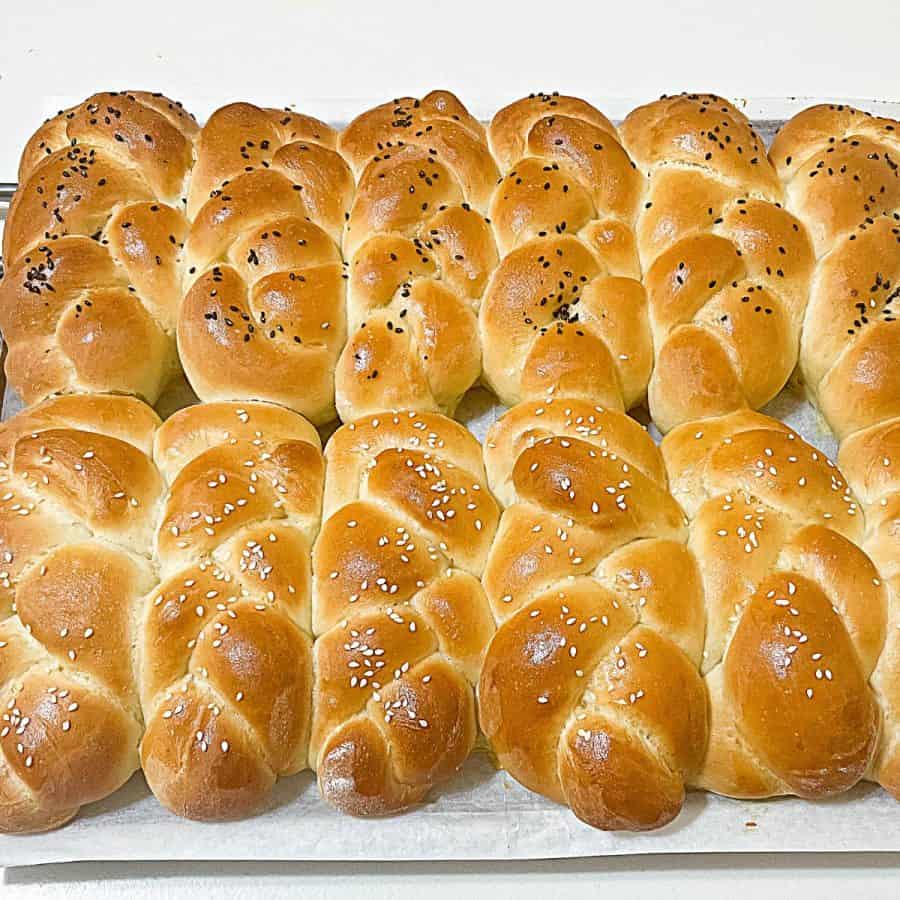
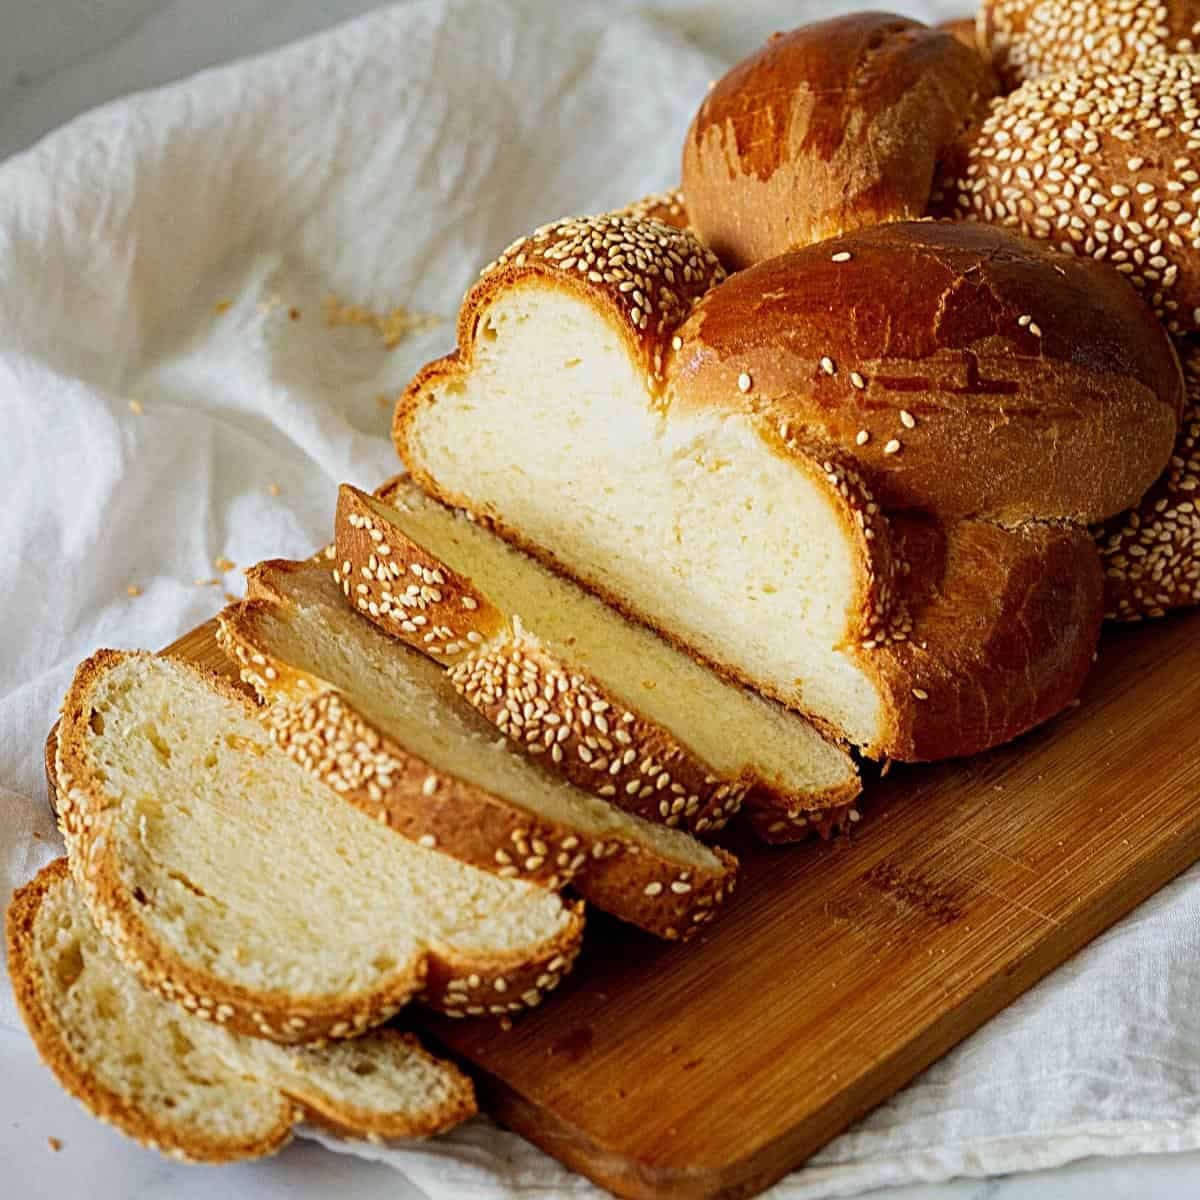
Divide – After the rise, punch down the dough and divide it into four equal parts. Shape each piece into a ball. Then, flatten each piece and roll it into a tight sausage. Roll each sausage into an 18-inch long rope. With a bit of water on a plate, moisten two ropes with water and coat them with sesame seeds. This is optional, but it does give the braid a nice look.Pro tip – Flatten and roll into a sausage before shaping it into a rope. This will create tension in the dough and prevent over-spreading.
Braid – To braid the four ropes, place them on your work surface, pin them together at the top, then braid them as shown in the video. From left to right, you now have 1, 2, 3, and 4 strands. Strand 1 goes over 4 and 4 goes over 1– simple criss-cross. Then, 4 comes in between 2 and 3. And 3 goes over 1 (in place of 4). Then, 1 comes down in between 2 and 4. And two goes over 4 (in place of 1). Proof – Place your lovely braid on a lined or lightly greased baking sheet. Cover with a damp cloth or greased plastic. Let it rest and rise again for 2 to 3 hours at room temperature or in the fridge for 4 to 6 hours.
Oven – About 20 minutes before baking, preheat the oven to 350°F /177°C / Gas Mark 4 Bake – Brush the bread with a beaten egg. Then, bake the loaf on the center rack of the oven for 35 to 40 minutes. You’re looking for a beautiful golden brown top and a bottom that sounds hollow when tapped. If it starts browning too quickly, tent it with some aluminum foil. Cool – Remove from the oven and let cool on a wire rack for 5 minutes. Then, cover it with a clean kitchen cloth to keep it soft.Pro tip – Do not leave the loaf on the tray for too long, as the steam will make the bread soggy on the bottom. Covering the bread with a cloth will help the bread retain moisture and prevent it from drying out.
Tips for making sourdough challah dough
First and foremost, ensure that your sourdough starter is active and bubbling before incorporating it into the dough. This will guarantee a strong fermentation process and the characteristic tanginess of sourdough. When adding flour, it’s best to opt for bread or high-protein flour to achieve the desired structure and texture. The protein in these flours will develop gluten, resulting in a chewy and elastic dough that holds its shape during baking. For those who prefer a softer texture, adding a small amount of all-purpose flour can help achieve a lighter and more tender crumb. Substitute a portion of the bread flour with all-purpose flour, keeping in mind that too much all-purpose flour may affect the overall structure of the challah. Another tip for making sourdough challah dough is to use room-temperature ingredients. Bringing your eggs, water, and sourdough starter to room temperature before mixing them with the flour helps promote proper fermentation and allows the yeast to thrive. This will result in a more flavorful and well-risen challah. When kneading the dough, balancing developing gluten and avoiding over-kneading is crucial. Over-kneading can result in a dense and gummy texture, so it’s best to stop when the dough is smooth and elastic and springs back when lightly pressed with your finger. Lastly, don’t rush the fermentation process. Sourdough challah benefits from a slower rise, allowing the flavors to develop and the dough to become more manageable. Consider giving it an overnight rise in the refrigerator, enhancing the flavor and making the dough easier to handle and shape.
Mastering the fermentation process
To truly elevate your challah bread and unlock its full potential, it is essential to master the fermentation process.
While it may seem daunting, the rewards are well worth the effort. Fermentation is where the magic happens, as the dough transforms, developing rich flavors and a delightful texture. As with any good thing, patience is vital. Don’t rush the fermentation process. Sourdough challah benefits from a slower rise, allowing the flavors to develop and the dough to become more manageable. Consider giving it an overnight rise in the refrigerator, enhancing the flavor and making the dough easier to handle and shape. During fermentation, the wild yeast and lactic acid bacteria present in the sourdough starter work their magic, breaking down complex carbohydrates and proteins into simpler, more flavorful compounds. This slow and gradual process allows for the release of enzymes that contribute to the unique taste and texture of the bread. Maintaining the right temperature is one tip to ensure a successful fermentation process. The ideal range for fermentation is between 70°F and 85°F (21°C and 29°C), as this provides the perfect environment for the yeast to thrive and create those wonderful tangy flavors. It’s essential to find a warm spot in your kitchen or use a proofing box to maintain the desired temperature consistently. Another aspect to consider is the hydration level of your dough. A higher hydration level leads to a more open crumb, while a lower hydration level results in a denser texture. Experiment with different hydration levels to find the balance that suits your taste preferences and desired outcome. As you embark on this fermentation journey, remember to trust your instincts and keep a watchful eye on your dough. Visual cues, such as the rise and texture, can guide you in determining when the fermentation process is complete. It is a dance between science and intuition, where you can genuinely connect with the art of breadmaking.
Milk and Honey ChallahEasiest 3 Braid Challah Bread RecipeChallah Sandwich BreadMini Single Braid Challah Rolls5 Braid Challah Recipe – Braided Bread
Frequently asked questions
Creative ways to use challah bread
French Toast Extravaganza – Take your brunch game to a new level by using slices of your sourdough challah to make the most indulgent French toast you’ve ever tasted. Soak the bread in a mixture of eggs, milk, cinnamon, and vanilla extract, then fry it up in a hot skillet until golden brown. Top with fresh berries, a dusting of powdered sugar, and a drizzle of maple syrup for a breakfast treat that will have everyone begging for seconds. Bread Pudding Bliss – Transform your sourdough challah into a rich, decadent bread pudding that will warm your soul. Tear the bread into bite-sized pieces and soak them in a custard made from eggs, milk, sugar, and a hint of nutmeg. Bake until golden and crispy on top, then serve with a dollop of whipped cream or a scoop of vanilla ice cream for the ultimate comfort dessert. Gourmet Grilled Cheese – Elevate the classic grilled cheese sandwich with sourdough challah. Spread slices of the bread with a layer of tangy Dijon mustard, then pile on a generous amount of your favorite cheeses. Grill until the bread is golden and crispy and the cheese is melted and gooey. Serve with a side of tomato soup for a comforting and satisfying lunch. Savory Bread Pudding – Step outside traditional desserts and explore the savory side of bread pudding. Combine chunks of sourdough challah with sautéed vegetables, cooked bacon or sausage, and a mix of herbs and spices. Pour a savory custard over the mixture and bake until golden and set. This hearty dish is perfect for brunch, lunch, or a comforting dinner. Challah Bread Croutons – Don’t waste any part of your sourdough challah! Cut any leftover slices into cubes and toss them with olive oil, salt, and your favorite herbs and spices. Bake in the oven until crispy and golden, then use these homemade croutons to top salads, soups or even as a crunchy addition to your favorite pasta dishes.
Did you LIKE this recipe? Save it for later. You can find my recipes on Pinterest. Follow me on Facebook, Twitter, and Instagram.Subscribe, and I’ll send you new recipes right to your inbox. Thank you for sharing - Save for later