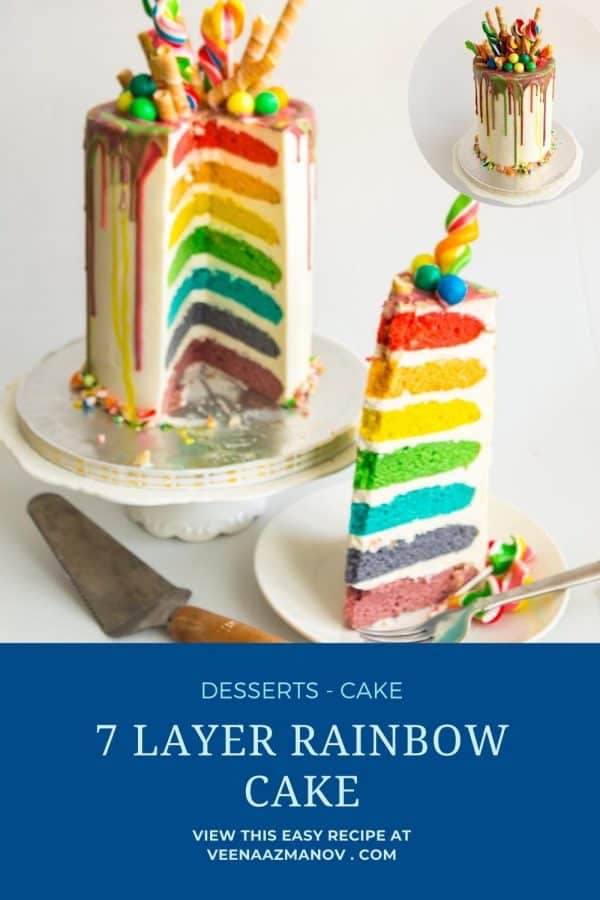
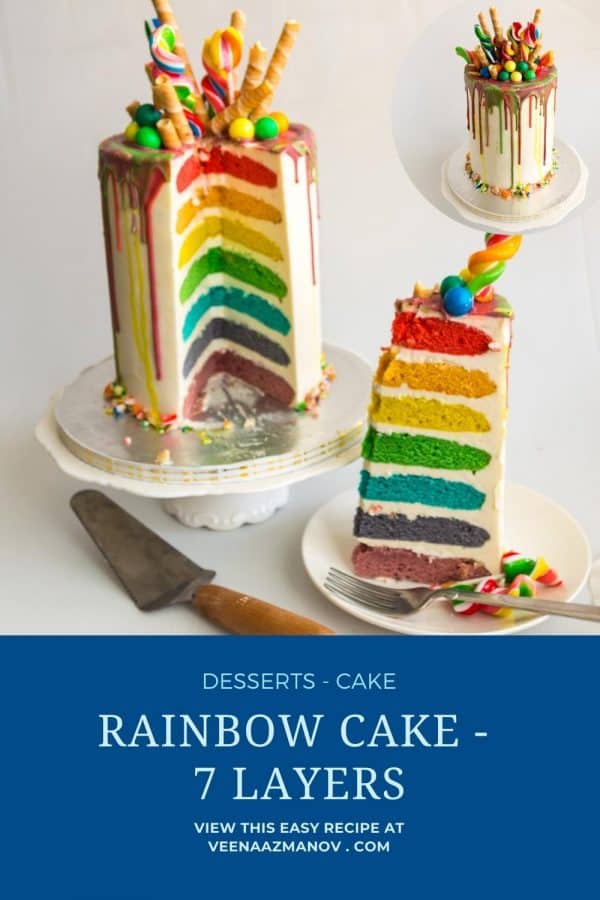
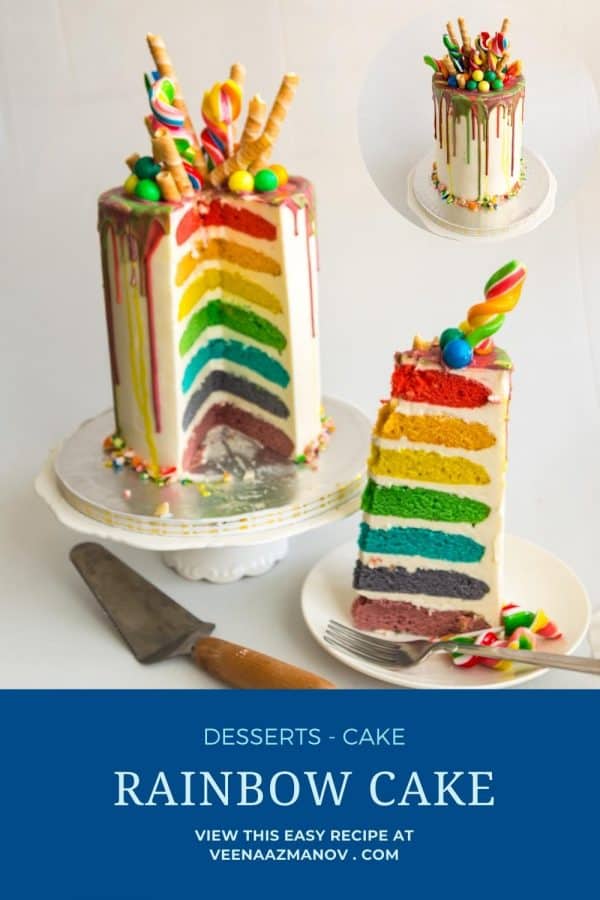
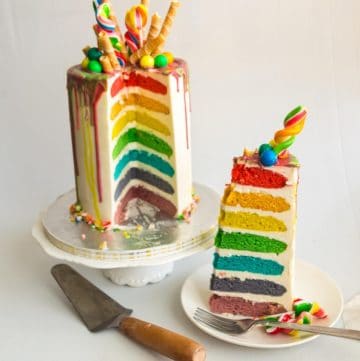
Nothing beats having a rainbow cake to celebrate your kid’s birthday party. This was my son’s birthday cake. Having a mom as a cake decorator means my kids get more than one cake. I had strict instructions and was specifically told to make sure there were seven colors. In fact, with the kids hovering I may have even placed one color in the wrong order. ???
Why make this recipe?
This is a simple, easy, and quick recipe as you can see in the video. I used my butter-based vanilla cake batter with buttermilk for a tender crumb. This is a 6-inch cake with seven layers but you can make six layers and omit the indigo layer. The truth is you can make any number of layers. Even a 3 layer rainbow cake would be beautiful. I am using Swiss meringue buttercream but you can also use Italian meringue, American, French or German or any other of your favorite frosting. It’s all about the candy on drip cakes. You can use any candy you want. I have used inexpensive lollipops here only because my son wanted a colorful cake. When I went to buy lollipops, the ones with the brightest colors were my kids choice. So I picked them up.
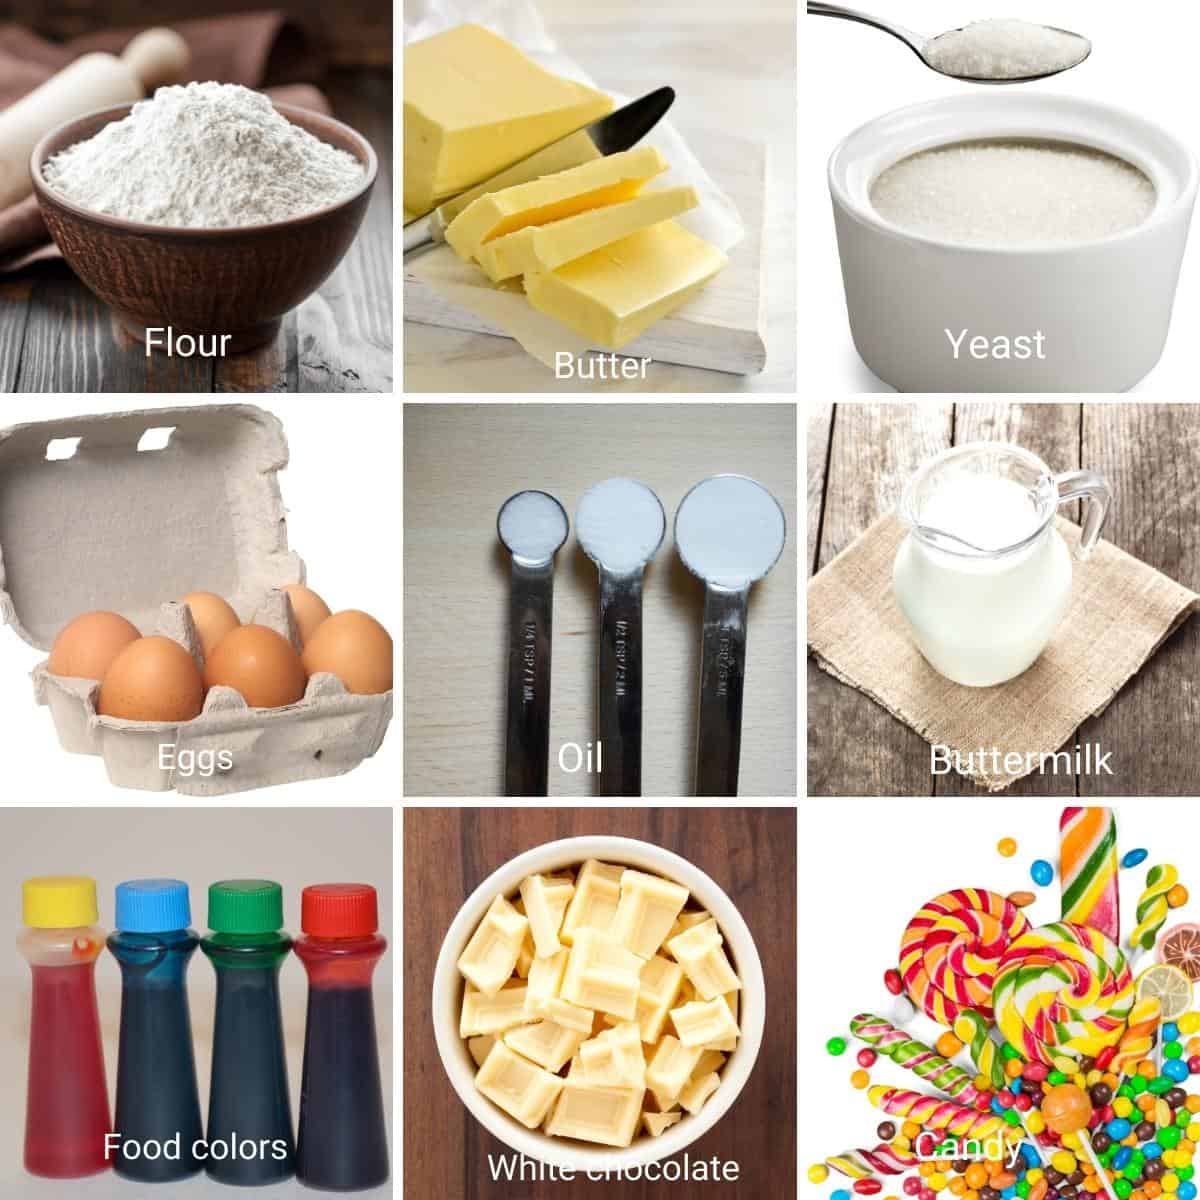
Ingredients and substitutes
All-purpose flour – I’m using all-purpose flour for this tall cake because I want some stability to the cake layers. Butter – I prefer unsalted butter so I can control the amount of salt. If salted butter is all you get go-ahead and use it – just omit the salt in the recipe. Sugar – White sugar means the colors of the rainbow will be bright and beautiful. I like the taste of brown sugar but that would not bring out the true colors in this cake. Buttermilk – This contributes to a nice soft crumb in this cake. You can use store-bought or make your own buttermilk in just 5 minutes Vanilla – Always use good quality vanilla. Ideally, it would be nice to use a clear vanilla extract or vanilla sugar to ensure the colors stay bright and beautiful. But but vanilla extract works just fine.
Step-by-step: 7 Layer Rainbow cake
Rainbow Cake Layers
Preheat the oven to 350°F (175°C). Grease and flour seven 6-inch round cake pans. In a medium bowl, whisk together the flour, baking powder, baking soda, and salt.
In a large bowl, cream the butter and sugar together until light and fluffy. Beat in the eggs one at a time, then stir in the vanilla extract. Gradually mix in the dry ingredients, alternating with the buttermilk, until just combined. Divide the batter evenly into seven bowls. Tint each bowl of batter with gel food coloring to create a rainbow of colors. Pour each colored batter into a prepared cake pan and spread it evenly. Bake for 15-20 minutes, or until a toothpick inserted into the center comes out clean. Let the cakes cool in the pans for 10 minutes, then remove them from the pans and transfer them to a wire rack to cool completely.
Swiss meringue buttercream
In a heatproof bowl, whisk together the egg whites and sugar. Place the bowl over a pot of simmering water, making sure the bottom of the bowl doesn’t touch the water. Heat the mixture, whisking constantly, until the sugar is completely dissolved and the mixture reaches 160°F (71°C). Remove the bowl from the heat and beat the mixture on high speed until stiff peaks form and the mixture is cool about 10 minutes. Gradually add the softened butter, a few tablespoons at a time, beating well after each addition. Add the vanilla extract and beat until the buttercream is smooth and creamy.
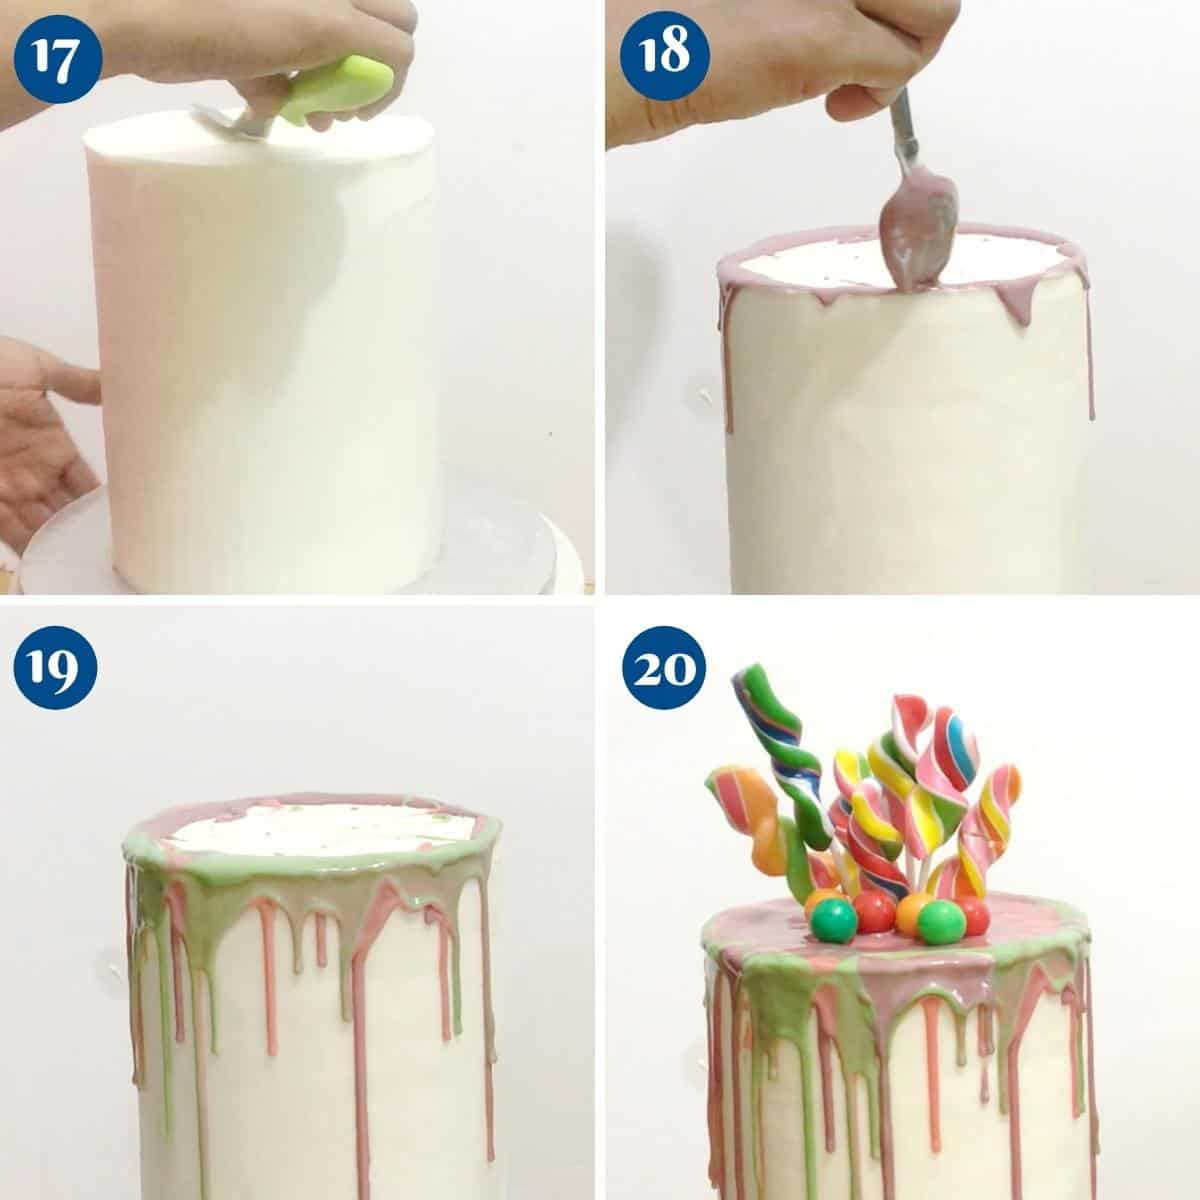
White chocolate rainbow drip
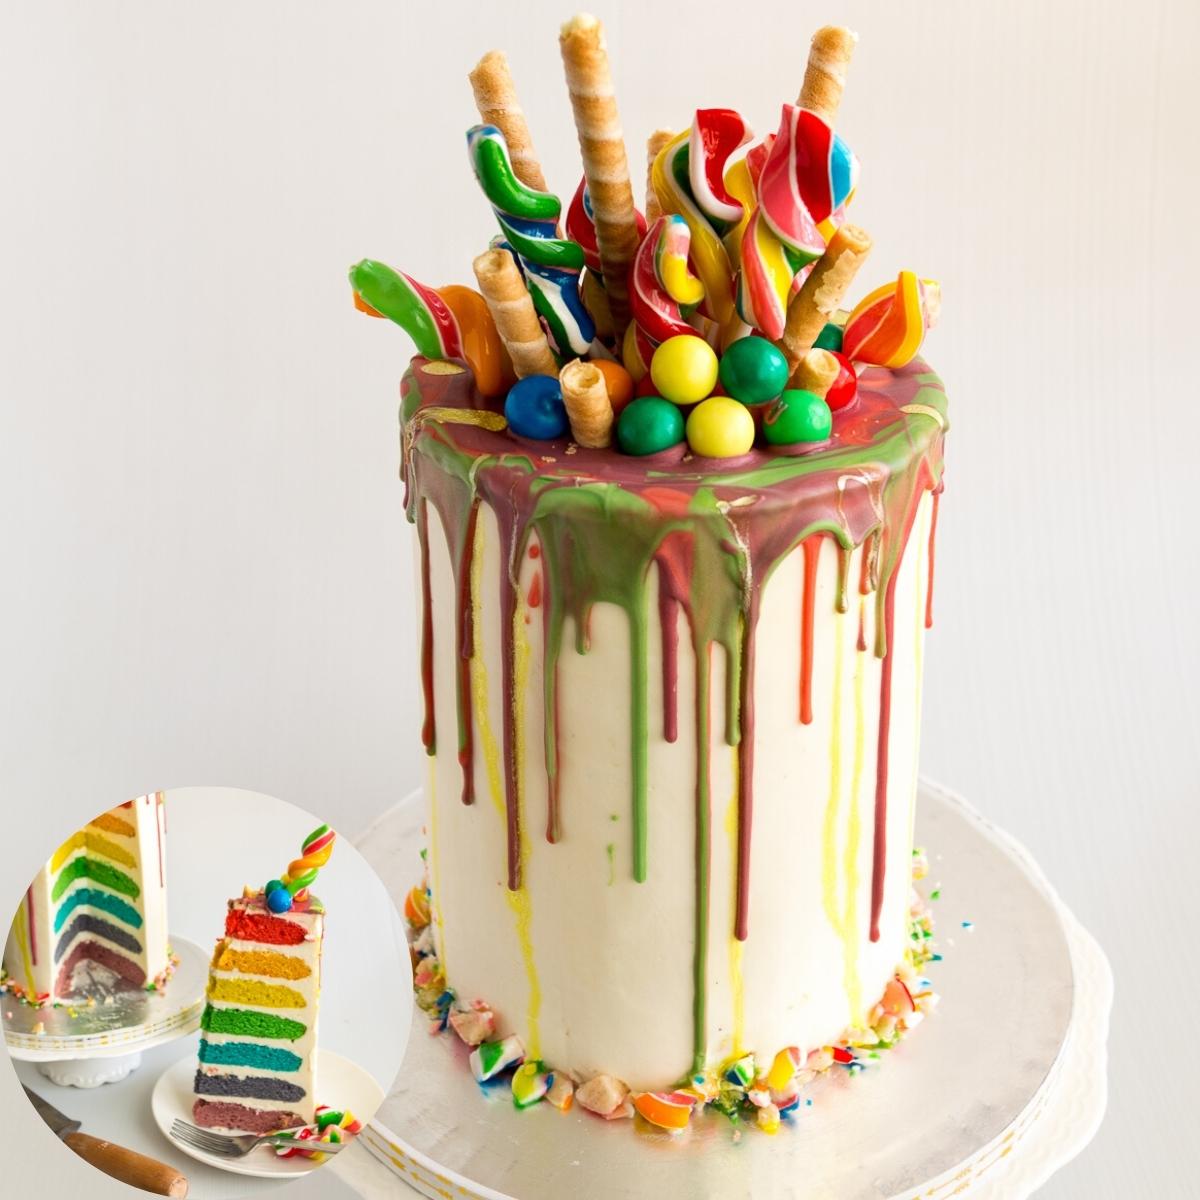
Melt the white chocolate chips in a heatproof bowl in the microwave or over a double boiler. Divide the melted chocolate into separate bowls and tint each bowl with a different color of gel food coloring. Pour the colored chocolate into piping bags.
Assemble
Starting with the bottom layer of the cake, frost each layer with the Swiss meringue buttercream. Stack the layers on top of each other, using a different color for each layer. Frost the outside of the cake with a thin layer of buttercream to create a crumb coat. Chill the cake in the refrigerator for 30 minutes. Once chilled, frost the cake with the remaining buttercream and smooth the sides and top. Pipe the colored white chocolate drips around the edges of the cake, allowing them to drip down the sides. Decorate the top of the cake with any remaining colored chocolate drips. Rest in the fridge until ready to serve.
Tips for Success
Room Temperature Ingredients: Ensure that your butter, eggs, and buttermilk are at room temperature before starting. This helps them mix together smoothly and evenly. Even Layers: To ensure your cake layers bake evenly, consider using a kitchen scale to measure the batter for each layer. Cooling Time: Allow your cake layers to cool completely before assembling the cake. This prevents the layers from crumbling and helps the buttercream adhere better. Chill the Cake: After assembling the cake with the crumb coat, chill it in the refrigerator for at least 30 minutes. This helps set the buttercream and makes it easier to frost the cake. Smooth Frosting: To achieve a smooth finish on your cake, use a bench scraper or offset spatula dipped in hot water to smooth the buttercream. Storing the Cake: Store the assembled cake in the refrigerator, but let it come to room temperature before serving for the best texture and flavor. White Chocolate Drip: When piping the colored white chocolate drips, start from the top edge of the cake and gently squeeze the piping bag to create a drip effect. Adjust the pressure to control the length of the drips. Decorating: Feel free to add additional decorations to the cake, such as sprinkles, edible glitter, or fondant decorations, to enhance the rainbow theme.
Rainbow Drip Cake – 7 layers 50 Plus Layer Cake Recipes Coffee Chocolate Cake Homemade Chocolate Birthday Cake
Frequently asked questions
Strawberry Cake with Swiss Meringue Buttercream Funfetti cake recipe or Funfetti Cupcakes Vanilla Birthday Cake See all layer cakes or see all cake decorating tutorails
Creative ways to serve rainbow cake batter
Rainbow Layer Cake: Bake individual layers of cake batter in different colors and stack them to create a stunning rainbow layer cake. Frost each layer with a complementary colored buttercream or cream cheese frosting. Rainbow Cupcakes: Fill cupcake liners with layers of colorful cake batter, creating a rainbow effect when the cupcakes are baked. Top them with swirled rainbow frosting for a delightful treat. Rainbow Cake Pops: Crumble-baked rainbow cake layers and mix with frosting to form cake pop balls. Dip the cake pops in various colored candy melts and add colorful sprinkles for a fun and playful dessert. Rainbow Cake Roll: Spread rainbow cake batter in a thin layer on a baking sheet, bake it, and then roll it up with a layer of frosting in the middle. Slice into pinwheels to reveal the beautiful rainbow pattern. Rainbow Cake Donuts: Fill a donut pan with layers of rainbow cake batter, and after baking, glaze the donuts with different colored icing and sprinkles. Rainbow Pancakes: Divide pancake batter into several bowls and color each one differently with food coloring. Make pancakes of each color and stack them to form a rainbow tower. Top with whipped cream and fruit. Rainbow Cheesecake: Create a rainbow effect in a cheesecake by layering different colored batters, one on top of the other. Bake the cheesecake until set, and then top it with a colorful fruit compote or fresh berries. Rainbow Muffins: Add layers of different colored cake batter into muffin cups, creating rainbow-striped muffins. Serve them warm with a pat of butter or cream cheese. Rainbow Cake Parfait: Crumble baked rainbow cake and layer it with whipped cream or yogurt and fresh fruit in individual glasses to create a delightful rainbow parfait. Rainbow Ice Cream Cake: Press layers of rainbow cake into the bottom of a springform pan, top with different flavored ice creams in corresponding colors, and freeze until firm. Decorate the top with whipped cream and sprinkles. Rainbow Cake Push Pops: Fill small push-pop containers with layers of rainbow cake and frosting to create a portable and colorful dessert for parties and picnics. Rainbow Trifle: Cube-baked rainbow cake and layer it in a trifle dish with whipped cream, fresh fruit, and a drizzle of fruit syrup or sauce.
Did you LIKE this recipe? Save it for later. You can find my recipes on Pinterest. Follow me on Facebook, Twitter, and Instagram.Subscribe, and I’ll send you new recipes right to your inbox. Thank you for sharing - Save for later